
NUnit详细使用方法
NUnit2.0详细使用方法
注:NUnit中文文档可以参看我的另一个站点:http://www.36sign.com/nunit
前一段时间,有人问我在.NET里如何进行TDD开发.这个问题促使我想对NUnit做一个详细的介绍.因为我们大家都知道NUnit是在.NET进行TDD的利器.
如果你已经知道很多关于NUnit的应用,请指出我的不对之处和提出一些建议,使本文更加完善.如果你对NUnit还不是很了解的话,我建议你还是阅读一下.
前一段时间,有人问我在.NET里如何进行TDD开发.这个问题促使我想对NUnit做一个详细的介绍.因为我们大家都知道NUnit是在.NET进行TDD的利器.
如果你已经知道很多关于NUnit的应用,请指出我的不对之处和提出一些建议,使本文更加完善.如果你对NUnit还不是很了解的话,我建议你还是阅读一下.
本文分为以下部分:
1. TDD的简介
首先什么是TDD呢?Kent Beck在他的<<测试驱动开发 >>(Addison-Wesley Professional,2003)一书中,使用下面2个原则来定义TDD:
·除非你有一个失败的自动测试,永远不要写一单行代码.
·阻止重复
我想第一个原则是显而易见的.在没有失败的自动测试下就不要写代码.因为测试是嵌入在代码必须满足的需求中.如果没有需求,就没有必要实现任何东西.所以这个原则阻止我们去实现那些没有测试和在解决方案中不需要的功能.
第二个原则说明了在一个程序中,不应该包含重复的代码.如果代码重复,我想这就是不好的软件设计的象征.随着时间的流逝,它会对程序造成不一致 的问题,并且使代码变非常混乱 ,因为我们时常不会记得重复代码的位置.如果发现代码重复,我想我们应该立即删除代码重复.其实这就涉及到重构了.在这里我就不多讲了.
一般来说,测试分为2种类型,一是程序员自己的测试,另外一种是客户的测试.关于客户测试,我推荐一个FIT的框架,非常不错。在这里,我们讲 的TDD就是程序员测试.那么什么是程序员测试呢?我认为就是我们常说的单元测试.既然是单元测试,在.NET里势必会用到某些工具,目前最著名恐怕就是 我即将介绍的NUnit了,
2.NUnit的介绍
NUnit是一个单元测试框架,专门针对于.NET来写的.其实在前面有JUnit(Java),CPPUnit(C++),他们都是xUnit的一员.最初,它是从JUnit而来.现在的版本是2.2.接下来我所用的都是基于这个版本.
NUnit最初是由James W. Newkirk, Alexei A. Vorontsov 和Philip A. Craig, 后来开发团队逐渐庞大起来.在开发过程中, Kent Beck 和Erich Gamma2位牛人也提供了许多帮助.看来对于NUnit还真是下了一番力气了.J
NUnit是xUnit家族种的第4个主打产品,完全由C#语言来编写,并且编写时充分利用了许多.NET的特性,比如反射,客户属性等等.
最重要的一点是它适合于所有.NET语言.
如果你还没有下载,可以到http://www.nunit.org/去下载.
2.1 NUnit的介绍
Ok,下面正式讲解NUnit.在讲解之前,看看几张图片:
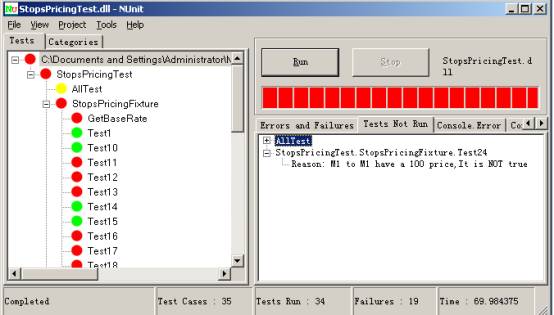
图1 NUnit运行的效果

图2 NUnit运行的另外一个效果
从中我们可以非常容易发现,右边是个状态条,图1是红色的,图2是绿色的.为什么会这样呢?因为如果所有测试案例运行成功,就为绿色,反之如果有一个不成功,则为红色,但也有黄色的.左面的工作域内则是我们写的每一个单元测试.
通过上面的图片,我想你对NUnit有个总的了解了.
接下来还是分为2个部分,一是NUnit的布局,另外一部分就是它的核心概念.
首先熟悉一下NUnit GUI的布局.
让我们更进一步看一下测试运行器窗口的布局。在右边面板的中间,可以看到测试进度条。进度条的颜色反映了测试执行的状态:
- 绿色 描述目前所执行的测试都通过
- 黄色 意味某些测试忽略,但是这里没有失败
- 红色 表示有失败
底部的状态条表示下面的状态:
- 状态.说明了现在运行测试的状态。当所有测试完成时,状态变为Completed.运行测试中,状态是Running: <test-name> (<test-name>是正在运行的测试名称)。
- Test Cases说明加载的程序集中测试案例的总个数。这也是测试树里叶子节点的个数。
- Tests Run 已经完成的测试个数。
- Failures 到目前为止,所有测试中失败的个数.
- Time 显示运行测试时间(以秒计)
File主菜单有以下内容:
- New Project允许你创建一个新工程。工程是一个测试程序集的集合。这种机制让你组织多个测试程序集,并把他们作为一个组对待。
- Open 加载一个新的测试程序集,或一个以前保存的NUnit工程文件。
- Close关闭现在加载的测试程序集或现在加载的NUnit工程。
- Save 保存现在的Nunit工程到一个文件。如果正工作单个程序集,本菜单项允许你创建一个新的NUnit工程,并把它保存在文件里。
- Save As允许你将现有NUnit工程作为一个文件保存。
- Reload 强制重载现有测试程序集或NUnit工程。NUnit-Gui自动监测现加载的测试程序集的变化。
当程序集变化时,测试运行器重新加载测试程序集。(当测试正运行时,现在加载的测试程序集不会重新加载。在测试运行之间测试程序集仅可以重新加 载。一个忠告:如果测试程序集依赖另外一个程序集,测试运行器不会观察任何依赖的程序集。对测试运行器来说,强制一个重载使全部依赖的程序集变化可见。
- Recent Files 说明5个最近在NUnit中加载的测试程序集或NUnit工程(这个列表在Windows注册表,由每个用户维护,因此如果你共享你的PC,你仅看到你的测试)。最近程序集的数量可以使用Options菜单项修改,可以访问Tool主菜单。
- Exit退出。
- View菜单有以下内容:
- Expand一层层扩展现在树中所选节点
- Collapse 折叠现在树中选择的节点
- Expand All递归扩展树中所选节点后的所有节点
- Collapse All递归折叠树中所选节点后的所有节点
- Expand Fixtures扩展树中所有代表测试fixture的节点。
- Collapse Fixtures 折叠树中所有代表测试fixture的节点。
- Properties 显示树中现所选节点的属性。
- Tools 菜单由这些项:
- Save Results as XML作为一XML文件保存运行测试的结果。
- Options让你定制NUnit的行为。
现在看看右边,你已经熟悉Run按钮和进度条。这里还有一个紧跟Run按钮的Stop按钮:点击这个按钮会终止执行正运行的测试。进度条下面是一个文本窗口,在它上方,由以下4个标签:
- Errors and Failures 窗口显示失败的测试。在我们的例子里,这个窗口是空。
- Tests Not Run 窗口显示没有得到执行的测试。
- Console.Error 窗口显示运行测试产生的错误消息。这些此消息是应用程序代码使用Console.Error输出流可以输出的。
- Console.Out窗口显示运行测试打印到Console.Error输出流的文本消息。
2.2 一些常用属性
接下来,我将讲述这个框架如何使用.同时也涉及到一些非常重要的概念,我想其客户属性是非常重要的.在NUnit里,有以下几种属性:
- TestFixture
- Test
下面我将对每种属性一一讲解.
TestFixtureAttribute
本属性标记一个类包含测试,当然setup和teardown方法可有可无.(关于setup 和teardown方法在后面介绍)
做为一个测试的类,这个类还有一些限制
- 必须是Public,否则NUnit看不到它的存在.
- 它必须有一个缺省的构造函数,否则是NUnit不会构造它.
- 构造函数应该没有任何副作用,因为NUnit在运行时经常会构造这个类多次,如果要是构造函数要什么副作用的话,那不是乱了.
举个例子
1usingSystem;
2
3
4{
5
6[TestFixture]
7
8{
9
10}
11}
12


TestAttribute
Test属性用来标记一个类(已经标记为TestFixture)的某个方法是可以测试的.为了和先前的版本向后兼容,头4个字符(“test”)忽略大小写.(参看http://nunit.org/test.html)
这个测试方法可以定义为:
从上面可以看出,这个方法没有任何参数,其实测试方法必须没有参数.如果我们定义方法不对的话,这个方法不会出现在测试方法列表中.也就是说在NUnit的界面左边的工作域内,看不到这个方法.还有一点就是这个方法不返回任何参数,并且必须为Public.
例如:
1
2
3
4
5
6
7
8
9
10*/}
11
12
13
14
一般来说,有了上面两个属性,你可以做基本的事情了.

另外,我们再对如何进行比较做一个描述。
在NUnit中,用Assert(断言)进行比较,Assert是一个类,它包括以下方法:AreEqual,AreSame,Equals, Fail,Ignore,IsFalse,IsNotNull,具体请参看NUnit的文档。
3.如何在.NET中应用NUnit
我将举个例子,一步一步演示如何去使用NUnit.
第1步.为测试代码创建一个Visual Studio工程。
在Microsoft Visual Studio .NET中,让我们开始创建一个新的工程。选择Visual C#工程作为工程类型,Class Library作为模板。将工程命名为NUnitQuickStart.图4-1是一个描述本步骤的Visual Studio .NET。

图 4-1: 创建第一个NUnit工程
第2步.增加一个NUnit框架引用
在Microsoft Visual Studio .NET里创建这个例子时,你需要增加一个NUnit.framework.dll引用,如下:
在Solution Explorer右击引用,然后选择增加引用
NUnit.framework组件,在Add Reference对话框中按Select和OK按钮。
图4-2 描述了这步:

第3步.为工程加一个类.
为工程加一个NumbersFixture类。这里是这个例子的代码。
1usingSystem;
2usingNUnit.Framework;
3
4namespaceNUnitQuickStart
5{
6[TestFixture]
7publicclassNumersFixture
8{
9[Test]
10publicvoidAddTwoNumbers()
11{
12inta=1;
13intb=2;
14intsum=a+b;
15Assert.AreEqual(sum,3);
16}
17}
18}
19
usingSystem;2
usingNUnit.Framework;3
4
namespaceNUnitQuickStart5
{6
[TestFixture]7
publicclassNumersFixture8
{9
[Test]10
publicvoidAddTwoNumbers()11
{12
inta=1;13
intb=2;14
intsum=a+b;15
Assert.AreEqual(sum,3);16
}17
}18
}19
第4步.建立你的Visual Studio 工程,使用NUnit-Gui测试
从程序->NUnit2.2打开NUnit-gui,加载本本工程编译的程序集.
为了在Visual Studio .NET中自动运行NUnit-Gui,你需要建立NUnit-Gui作为你的启动程序:
在 Solution Explorer里右击你的NunitQuickStart工程。
在弹出菜单中选择属性。
在显示的对话框的左面,点击Configuration Properties夹
选择出现在Configuration Properties夹下的Debugging。
在属性框右边的Start Action部分,选择下拉框的Program作为Debug Mode值。
按Apply按钮
设置NUnit-gui.exe 作为Start Application。,你既可以键入nunit-gui.exe的全路径,也可使用浏览按钮来指向它。


图 4-3:将NUnit-Gui 作为工程的测试运行器
第5步.编译运行测试.
现在编译solution。成功编译后,开始应用程序。NUnit-Gui测试运行器出现。当你第一次开始NUnit-Gui,它打开时没有测试加载。从File菜单选择Oprn,浏览NUnitQuickStart.dll的路径。当你加载了测试的程序集,测试运行器为加载的程序集的测试产生一个可见的表现。在例子中,测试程序集仅有一个测试,测试程序集的结构如图4-4所示:

按Run按钮。树的节点变为绿色,而且测试运行器窗口上的进度条变绿,绿色代表成功通过。
4.其他的一些核心概念
上面的例子介绍了基本的NUnit特性和功能. TestFixture, Test, 和 Assert是3 个最基本的特征,我们可以用这些特性进行程序员测试了.但是有的时候,你觉得这3个远远不够,比如有的时候打开一个数据库连接多次,有没有只让它打开一次 的方法呢?如果我想把测试分类,应该怎样实现呢?如果我想忽略某些测试,又应该如何去完成呢?不用担心,NUnit已经有这样的功能了.
下面我们一一作出回答.
SetUp/TearDown 属性
在早期给的test fixture定义里,我们说test fixture的测试是一组常规运行时资源.在测试完成之后,或是在测试执行种,或是释放或清除之前,这些常规运行时资源在一确定的方式上可能需要获取和初始化.NUnit使用2个额外的属性:SetUp 和TearDown,就支持这种常规的初始化/清除.我们上面的例子来描述这个功能.让我们增加乘法.
1usingSystem;
2usingNUnit.Framework;
3
4namespaceNUnitQuickStart
5{
6[TestFixture]
7publicclassNumersFixture
8{
9[Test]
10publicvoidAddTwoNumbers()
11{
12inta=1;
13intb=2;
14intsum=a+b;
15Assert.AreEqual(sum,3);
16}
17[Test]
18publicvoidMultiplyTwoNumbers()
19{
20inta=1;
21intb=2;
22intproduct=a*b;
23Assert.AreEqual(2,product);
24}
25
26}
27}
28
usingSystem;2
usingNUnit.Framework;3
4
namespaceNUnitQuickStart5
{6
[TestFixture]7
publicclassNumersFixture8
{9
[Test]10
publicvoidAddTwoNumbers()11
{12
inta=1;13
intb=2;14
intsum=a+b;15
Assert.AreEqual(sum,3);16
}17
[Test]18
publicvoidMultiplyTwoNumbers()19
{20
inta=1;21
intb=2;22
intproduct=a*b;23
Assert.AreEqual(2,product);24
}25
26
}27
}28
1usingSystem;
2usingNUnit.Framework;
3
4namespaceNUnitQuickStart
5{
6[TestFixture]
7publicclassNumersFixture
8{
9privateinta;
10privateintb;
11[SetUp]
12publicvoidInitializeOperands()
13{
14a=1;
15b=2;
16}
17
18[Test]
19publicvoidAddTwoNumbers()
20{
21intsum=a+b;
22Assert.AreEqual(sum,3);
23}
24[Test]
25publicvoidMultiplyTwoNumbers()
26{
27intproduct=a*b;
28Assert.AreEqual(2,product);
29}
30
31}
32}
33
usingSystem;2
usingNUnit.Framework;3
4
namespaceNUnitQuickStart5
{6
[TestFixture]7
publicclassNumersFixture8
{9
privateinta;10
privateintb;11
[SetUp]12
publicvoidInitializeOperands()13
{14
a=1;15
b=2;16
}17
18
[Test]19
publicvoidAddTwoNumbers()20
{21
intsum=a+b;22
Assert.AreEqual(sum,3);23
}24
[Test]25
publicvoidMultiplyTwoNumbers()26
{27
intproduct=a*b;28
Assert.AreEqual(2,product);29
}30
31
}32
}33
这样NUnit将在执行每个测试前执行标记SetUp属性的方法.在本例中就是执行InitializeOperands()方法.记住,这里这个方法必须为public,不然就会有以下错误:Invalid Setup or TearDown method signature
ExpectedException
这里是一个验证这个假设的测试.有的时候,我们知道某些操作会有异常出现,例如, 在实例中增加除法,某个操作被0除,抛出的异常和.NET文档描述的一样.参看以下源代码.
1
2
3
4
5
6
7
8
9
除了[Test]属性之外, DivideByZero方法有另外一个客户属性: ExpectedException. 在这个属性里,你可以在执行过程中捕获你期望的异常类型,例如在本例就是DivideByZeroException.如果这个方法在没有抛出期望异常的 情况下完成了,这个测试失败.使用这个属性帮助我们写程序员测试验证边界条件(Boundary Conditions).
Ignore 属性
由于种种原因,有一些测试我们不想运行.当然,这些原因可能包括你认为这个测试还没有完成,这个测试正在重构之中,这个测试的需求不是太明确.但你有不想破坏测试,不然进度条可是红色的哟.怎么办?使用Ignore属性.你可以保持测试,但又不运行它们.让我们标记MultiplyTwoNumbers测试方法为Ignore属性:
1
2
3
4
5
6
7
运行测试,现在产生了下面的输出(在图5-1显示):

图 5-1: 在一个程序员测试中使用 Ignore属性
Ignore属性可以附加到一个独立的测试方法,也可以附加到整个测试类(TestFixture).如果Ignore属性附加到TestFixture,所有在fixture的测试都被忽略.
TestFixtureSetUp/TestFixtureTearDown
有时,一组测试需要的资源太昂贵.例如,数据库连接可能是一个关键资源,在一个test fixture的每个测试中,打开/关闭数据库连接可能非常慢.这就是我在开始提到的问题.如何解决?NUnit有一对类似于前面讨论的SetUp/TearDown的属性: TestFixtureSetUp/TestFixtureTearDown.正如他们名字表明的一样,这些属性用来标记为整个test fixture初始化/释放资源方法一次的方法.
例如,如果你想为所有test fixture的测试共享相同的数据库连接对象,我们可以写一个打开数据库连接的方法,标记为TestFixtureSetUp属性,编写另外一个关闭数据库连接的方法,标记为TestFixtureTearDown属性.这里是描述这个的例子.
1
2
3
4
5
6
7
8
9
10
11
12
13
14
15
16
17
18
19
20
21
22
23
24
25
26
27
28
29
30
31
32
33
34
35
36
37
38
39
40
41
42
43
Test Suite
Test Suite是test case或其他test suite的集合. 合成(Composite),模式描述了test case和test suite之间的关系.
参考来自NUnit的关于Suite的代码
Suite Attribute
1namespaceNUnit.Tests
2{
3usingSystem;
4usingNUnit.Framework;
5
6
7
8publicclassAllTests
9{
10[Suite]
11publicstaticTestSuiteSuite
12{
13get
14{
15TestSuitesuite=newTestSuite("AllTests");
16suite.Add(newOneTestCase());
17suite.Add(newAssemblies.AssemblyTests());
18suite.Add(newAssertionTest());
19returnsuite;
20}
21}
22}
23}
24
Category属性
1namespaceNUnit.Tests
2{
3usingSystem;
4usingNUnit.Framework;
5
6
7
8publicclassAllTests
9{
10[Suite]
11publicstaticTestSuiteSuite
12{
13get
14{
15TestSuitesuite=newTestSuite("AllTests");
16suite.Add(newOneTestCase());
17suite.Add(newAssemblies.AssemblyTests());
18suite.Add(newAssertionTest());
19returnsuite;
20}
21}
22}
23}
24
namespaceNUnit.Tests2
{3
usingSystem;4
usingNUnit.Framework;5
6
7
8
publicclassAllTests9
{10
[Suite]11
publicstaticTestSuiteSuite12
{13
get14
{15
TestSuitesuite=newTestSuite("AllTests");16
suite.Add(newOneTestCase());17
suite.Add(newAssemblies.AssemblyTests());18
suite.Add(newAssertionTest());19
returnsuite;20
}21
}22
}23
}24
对于测试来说,你有的时候需要将之分类,此属性正好就是用来解决这个问题的。
你可以选择你需要运行的测试类目录,也可以选择除了这些目录之外的测试都可以运行。在命令行环境里 /include 和/exclude来实现。在GUI环境下,就更简单了,选择左边工作域里的Catagories Tab,选择Add和Remove既可以了。
在上面的例子上做了一些改善,代码如下:
1
2
3
4
5
6
7
8
9
10
11
12
13
14
15
16
17
18
19
20
21
22
23
24
25
26
27
28
29
30
31
32
33
34
35
36
37
38
39
40
41
42
43
44
45
NUnit-GUI界面如图5-2:

图5-2:使用Catagories属性的界面
Explicit属性
本属性忽略一个test和test fixture,直到它们显式的选择执行。如果test和test fixture在执行的过程中被发现,就忽略他们。所以,这样一来进度条显示为黄色,因为有test或test fixture忽略了。
例如:
1
2[Test,Explicit]
3[Category("Exception")]
4[ExpectedException(typeof(DivideByZeroException))]
5publicvoidDivideByZero()
6{
7intzero=0;
8intinfinity=a/zero;
9Assert.Fail("Shouldhavegottenanexception");
10}
11
2
[Test,Explicit]3
[Category("Exception")]4
[ExpectedException(typeof(DivideByZeroException))]5
publicvoidDivideByZero()6
{7
intzero=0;8
intinfinity=a/zero;9
Assert.Fail("Shouldhavegottenanexception");10
}11
Expected Exception属性
期望在运行时抛出一个期望的异常,如果是,则测试通过,否则不通过。
参看下面的例子:
1[Test]
2[ExpectedException(typeofInvalidOperationException))]
3publicvoidExpectAnException()
4{
5intzero=0;
6intinfinity=a/zero;
7Assert.Fail("Shouldhavegottenanexception");
8
9}
10
[Test]2
[ExpectedException(typeofInvalidOperationException))]3
publicvoidExpectAnException()4
{5
intzero=0;6
intinfinity=a/zero;7
Assert.Fail("Shouldhavegottenanexception");8
9
}10
5 . 测试生命周期合约
如果记得test case的定义,其中一个属性是测试的独立性或隔离性.SetUp/TearDown方法提供达到测试隔离性的目的.SetUp确保共享的资源在每个测试运行前正确初始化,TearDown确保没有运行测试产生的遗留副作用. TestFixtureSetUp/TestFixtureTearDown同样提供相同的目的,但是却在test fixture范围里,我们刚才描述的内容组成了测试框架的运行时容器(test runner)和你写的测试之间的生命周期合约(life-cycle contract).
为了描述这个合约,我们写一个简单的测试来说明什么方法调用了,怎么合适调用的.这里是代码:
1
2
3
4
5
6
7
8
9
10
11
12
13
14
15
16
17
18
19
20
21
22
23
24
25
26
27
28
29
30
31
32
33
34
35
36
37
38
39
40
41
42
43
44
当编译和运行这个测试,可以在System.Console窗口看到下面的输出:
可以看到, SetUp/TearDown方法调用在每个测试方法的前后. 整个fixture调用一次TestFixtureSetUp/TestFixtureTearDown方法.
3)本文的源代码下载
参考
2) James W. NewkirkandAlexei A. Vorontsov ,Test-Driven Development in Microsoft .NET,Microsoft Press,2003
4) Kent Beck, Test-Driven Development: By Example ,Addison-Wesley Professional, 2003
5) Andrew Hunt ,David Thomas ,Pragmatic Unit Testing In C# With NUnit
6) NUnit中文文档:http://www.36sign.com/nunit
6) NUnit中文文档:http://www.36sign.com/nunit
Last Updated:2005年6月23日
Last Updated:2007年4月12日
Last Updated:2007年4月12日
posted on 2005-06-20 17:01 Confach 阅读(22232) 评论(76) 编辑 收藏 所属分类: 框架&库 、敏捷软件开发


相关推荐
NUnit2.0详细使用方法
Nunit是一个单元测试工具,其使用方法简单,便于进行单元测试
单元测试工具NUnit2.0主要用于C#程序的测试
这个问题促使我相对NUnit做一个详细的介绍.因为我们大家都知道NUnit是在.NET进行TDD的利器. 如果你已经知道很多关于NUnit的应用,请指出我的不对之处和提出一些建议,使本文更加完善.如果你对NUnit还不是很了解的话,...
给初学者介绍关于NUnit2.0详细使用方法
利用NUnit进行单元测试。讲述NUnit测试的原理、过程、方法,并有大量详细步骤
NUnit是.Net平台的测试框架,广泛用于.Net平台的单元测试和回归测试中,下面我们用示例详细学习一下他的使用方法
TestFixture属性:用来标识类,表示这个可能包含有用于测试的方法。 Test属性:用来标识方法,表示这个方法需要进行测试(前提是该方法所在的类是可以测试的)。 SetUp属性:用来标识方法,在开始所有测试之前执行,...
其中一些新特性有:支持MSTest、.NET Reflector 6 Pro、VS 2010、Silverlight 4、NUnit 2.5.3,使用项目所用的.NET框架等。 TestDriven.NET原来叫做NUnitAddIn,它是个Visual Studio插件,集成了如下测试框架:...
编写代码文档资料几乎总是一项令人畏惧的任务。我所说的不是早期设计文档,甚至也不是更为详细的设计文档;我说的是记录类上的各个方法和属性。...下面是 NUnit 示例中的一个用 XML 编写了文档的方法:
可以在以下位置找到项目API文档: : 它提供以下功能: 支持.NET Framework 4.5、4.7.2和.NET Core 3.1 支持跨平台Windows,Linux和macOS系统准备执行并行测试,更多详细信息 可以使用MSTest,NUnit或xUNIT框架准备...
使用.ashx文件处理IHttpHandler实现发送文本及二进制数据的方法 制作一个简单的多页Tab功能 一完美的关于请求的目录不存在而需要url重写的解决方案! 在C#中实现MSN消息框的功能 XmlHttp实现无刷新三联动ListBox 鼠标...
我选择与NUnit一起使用,因为我对此已有一些经验。 这也使我能够将解决方案开发为不带任何UI框架的独立类库,这对我来说真的是一次很酷的体验。 方法: 我认为我从一开始就对问题有了很好的了解,并在前进的过程中...
通过单击上面的“使用此模板”按钮或安装并运行相关的NuGet程序包,可以基于此模板创建新项目(有关详细信息,请参阅《入门》)。 技术领域 ASP.NET Core 5 实体框架核心5 角度10 中介 自动贴图 流利验证 NUnit...