- 浏览: 21486806 次
- 性别:

- 来自: 杭州
-

最新评论
-
ZY199266:
配置文件还需要额外的配置ma
Android 客户端通过内置API(HttpClient) 访问 服务器(用Spring MVC 架构) 返回的json数据全过程 -
ZY199266:
我的一访问为什么是 /mavenwebdemo/WEB-I ...
Android 客户端通过内置API(HttpClient) 访问 服务器(用Spring MVC 架构) 返回的json数据全过程 -
lvgaga:
我又一个问题就是 如果像你的这种形式写。配置文件还需要额外的 ...
Android 客户端通过内置API(HttpClient) 访问 服务器(用Spring MVC 架构) 返回的json数据全过程 -
lvgaga:
我的一访问为什么是 /mavenwebdemo/WEB-I ...
Android 客户端通过内置API(HttpClient) 访问 服务器(用Spring MVC 架构) 返回的json数据全过程 -
y1210251848:
你的那个错误应该是项目所使用的目标框架不支持吧
log4net配置(web中使用log4net,把web.config放在单独的文件中)
【转贴】Managing paths-关于各种JBuilder的path,文件结构,设置的意义等基本概念
Paths are the infrastructure of Java program development. Paths provide a program with what it needs to run. When you set a JDK, you tell the program what path to use to access a JDK. When you create a library, you collate a set of paths that the program will need. Every time a file references another file, it uses a path to get to it.
This section covers how JBuilder constructs paths, how to manipulate paths in the Project Properties dialog box, and how to use path-based tools such as libraries and CodeInsight features.
Working with libraries
What is a library?
JBuilder uses libraries to find everything it needs to run a project as well as for browsing through source, viewing Javadoc, using the visual designer, applying CodeInsight, and compiling code. Libraries are collections of paths that include classes, source files, and documentation files. Libraries are static, not dynamic. Individual library paths are often contained in JAR or ZIP files but can also be contained in directories.
When libraries are added to JBuilder, they are added to the class pathso JBuilder can find them. Libraries are searched in the order listed. The order of libraries can be changed in the Configure Librariesdialog box (Tools|Configure Libraries) and on the Pathspage of the Project Properties dialog box (Project|Project Properties).
See also
"How JBuilder constructs paths"
Library configurations are saved in .libraryfiles and can be saved to several locations:
User Home
Saves the .libraryfile to the <.jbuilder>directory in the user's home directory.
JBuilder
This is a feature of JBuilder SE and Enterprise
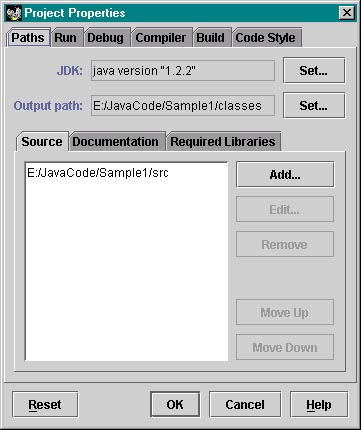
Saves the .libraryfile to the <jbuilder>/libdirectory. Multiple users who are using JBuilder on a network or sharing JBuilder on a single machine have access to the libraries in this folder. <br><br> <strong>Project</strong> <br><br> This is a feature of JBuilder SE and Enterprise <br><br> Saves the .libraryfile in the current project's directory. When using the version control features, the .libraryfile is checked in with the other project files. <br><br> <strong>User-defined folder</strong> <br><br> This is a feature of JBuilder Enterprise <br><br> Saves the .libraryfile to a user-defined folder or shared directory. You must add the new folder in the Configure Libraries dialog box before it can appear in the drop-down list. <br><br> <strong>Adding and configuring libraries</strong> <br><br> There are several ways to add new libraries to your project. First, you may want to gather your files into JAR files, especially if you plan to deploy your program. <br><br> Once you've created the library, add it to JBuilder as follows: <br><br> Select Tools|Configure Libraries. The Configure Libraries dialog box appears. <br><br> The left-hand pane lets you browse the available libraries. The right-hand pane shows the settings of the selected library. <br><br> Click the New button under the left pane to open the New Library wizard. <br><br> <img alt="" src="http://www.ida.liu.se/%7ETDDB62/introjb/images/newlibwiz2.gif"><br><br> <br><br> Enter a name for the new library in the Name field. <br><br> Select a location from the drop-down list to save the library configurations: Project, User Home, JBuilder, or user-defined folder. User-defined folders are a feature of Enterprise. <br><br> Click the Add button and select one or more paths containing class, source, and documentation files. JBuilder automatically determines the correct path for the files. Click OK. Notice that the selection appears in the Library Paths list. <br><br> Click OK to close the New Library wizard. Note that the library is saved to the appropriate class, source, and documentation paths in the Configure Libraries dialog box. You can also add, edit, remove, and reorder the library lists in this dialog box. JBuilder Enterprise also includes an Add Folder feature. <br><br> <img alt="" src="http://www.ida.liu.se/%7ETDDB62/introjb/images/configurelibs2.gif"><br><br> <br><br> Click OK or press Enterto close the Configure Libraries dialog box. <br><br> To add the library to a project, see "Setting paths for required libraries." <br><br> You can also add libraries in the Project Properties dialog box. <br><br> Select Project|Project Properties. <br><br> Select the Required Libraries tab on the Paths pageand click the Add button. <br><br> Click the New button to open the New Library wizard. <br><br> See also <br><br> "Setting paths for required libraries" <br><br> "Using JAR Files: The Basics"at http://java.sun.com/docs/books/tutorial/jar/basics/index.html <br><br> "New Library wizard" <br><br> "How JBuilder constructs paths" <br><br> "Where are my files?" <br><br> <strong>Editing libraries</strong> <br><br> To edit an existing library, <br><br> Select Tools|Configure Libraries. <br><br> Select the library you want to edit from the list of libraries. <br><br> Select the Class, Source, or Documentation tab to choose the library path you want to edit. <br><br> Select the library path and click Edit. <br><br> Browse to a file or user-defined folder in the Select Directory dialog box. Click OK. <br><br> Click Add to browse to a library to add. <br><br> Select a library path and click Remove to remove it. <br><br> Reorder library paths by selecting a library path and clicking Move Up or Move Down. <br><br> Tip:JBuilder searches libraries in the order listed. <br><br> Click OK or press Enterto close the Configure Libraries dialog box. <br><br> <strong>Display of library lists</strong> <br><br> There are three possible colors for libraries listed in JBuilder dialog boxes: <br><br> Colors in library lists: <br><br> Color Description Troubleshooting <br><br> Black The library is defined correctly. <br><br> Red The library definition is missing. This typically means the project refers to a library that is not yet defined. It can also mean that the library definition is faulty: either the library has been defined without any paths or there is more than one library with that name. <br><br> Gray Use of this library requires an upgrade. You need to upgrade your edition of JBuilder in order to use this library. For example, if you have JBuilder Personal, use of the dbSwing library requires that you upgrade to JBuilder Enterprise. <br><br> <strong>Setting project properties</strong> <br><br> Project properties control how the project is compiled. In the Project Properties dialog box (Project|Project Properties), you can set such options as: <br><br> Paths page: set project path settings for the JDKversion, output path, backup path, working directory, source paths, test path, documentation path, and required libraries paths. <br><br> General page:set options for encoding, enabling automatic source packages, modify class Javadoc fields that wizards can generate, and set the option to include references from project libraries. <br><br> Run page:select or create a configuration to use for running or debugging. <br><br> Build page:set compiler options for building a project, including debug information and selective resource copying. <br><br> Code Style page:set options for customizing your coding style on a project-by-project basis. <br><br> Import Style page:This is a feature of JBuilder SE and Enterprise: set options for configuring import statements. <br><br> Editor page:set end of line characters. <br><br> UML page:This is a feature of JBuilder Enterprise: set options to change the display of UML diagrams, such as exclude package/class filters and diagram references from generated source. <br><br> Server page:This is a feature of JBuilder Enterprise: set server options. <br><br> Note:You can also set these options for all future projects in the Default Project Properties dialog box (Project|Default Project Properties) or select the default project as your project template in the Project wizard. <br><br> To set project properties, <br><br> Right-click the .jpxfile name in the project pane and choose Properties to display the Project Properties dialog box. Or, select the project and choose Project|Project Properties. The Project Properties dialog box appears. <br><br> Select the appropriate tab for the options you want to set. In this image the Paths page is selected. <br><br> On the Paths page, you can set the JDK version, various paths for the project, and the Required Libraries Paths. <br><br> <img alt="" src="http://www.ida.liu.se/%7ETDDB62/introjb/images/projproperties_paths.gif"><br><br> <br><br> <strong>Setting the JDK</strong> <br><br> JBuilder SE and Enterprise fully support JDK switching, while JBuilder Personal allows you to edit a single JDK. JBuilder compiles and runs against all Sun JDKs and many others. <br><br> With JBuilder SE and Enterprise, you can set the JDK version for your project on the Paths pageof the Project Properties dialog box as well as add, edit, and remove JDKs in the Configure JDKsdialog box. See "Setting the JDK in SE and Enterprise." <br><br> For JBuilder Personal, you can edit the JDK in the Configure JDKsdialog box (Tools|Configure JDKs). See "Editing the JDK." <br><br> <strong>Editing the JDK</strong> <br><br> You can edit the current JDK version as follows: <br><br> Select Tools|Configure JDKsto open the Configure JDKs dialog box: <br><br> <img alt="" src="http://www.ida.liu.se/%7ETDDB62/introjb/images/dlgconfigurejdks.gif"><br><br> <br><br> Click the Change button to the right of the JDK Home Path field. The Select Directory dialog box appears. <br><br> Browse to the target JDK. <br><br> Click OK to change the JDK. <br><br> Note the revised JDK name and home path in the Configure JDKs dialog box. <br><br> Click OK to close the Configure JDKs dialog box. <br><br> <strong>Debugging with -classic</strong> <br><br> The Always Debug With -Classic option in the Configure JDKs dialog box provides improved performance for users with JVM versions below 1.3.1. JBuilder automatically checks to see if this option will improve your performance, then checks or unchecks this box according to what will give you the best results. This feature is available in all editions of JBuilder. <br><br> In performing its evaluation, JBuilder performs two checks: <br><br> Do you have the Classic VM? <br><br> If present, is the JVM a version earlier than 1.3.1? <br><br> This selection is overridden when you define VM parameters such as native, hotspot, green, or server. <br><br> <strong>Setting the JDK in SE and Enterprise</strong> <br><br> JBuilder SE and Enterprise support JDK switching. You can also add, edit, and delete JDKs. To switch to another JDK, follow these steps: <br><br> Select Project|Project Properties and select the Paths tab. <br><br> Click the ellipsis button to the right of the JDK version. The Select A JDKdialog box appears: <br><br> <img alt="" src="http://www.ida.liu.se/%7ETDDB62/introjb/images/selectjdk.gif"><br><br> <br><br> If the target JDK is listed, select it and press OK. <br><br> If it's not listed, select New to open the New JDK wizard. <br><br> <img alt="" src="http://www.ida.liu.se/%7ETDDB62/introjb/images/newjdkwiz.gif"><br><br> <br><br> Click the ellipsis button and browse to the home directory of the JDK you want to add to the list. Click OK. Note that the JDK Name field is filled in automatically. <br><br> Select the location to store the JDK specifications: <br><br> <strong>User Home:</strong>saves the JDK specifications in a .libraryfile in the .jbuilderdirectory of the user's home directory. Save to this location if you want the JDK available to all projects. <br><br> <strong>JBuilder:</strong>saves the JDK specifications in a .libraryfile in the jbuilderdirectory. Multiple users who are using JBuilder on a network or sharing JBuilder on a single machine have access to the JDKs in this folder. This is a feature of JBuilder SE and Enterprise. <br><br> <strong>Project:</strong>saves the JDK specifications in a .libraryfile in the current project's directory. Save to this location if you only want the JDK available to this project. This is a feature of JBuilder SE and Enterprise. <br><br> <strong>User-defined folder:</strong>saves the JDK specifications to an existing user-defined folder or shared directory. You must add the new folder (select Tools|Configure JDK and click Add Folder) before it can appear in the drop-down list. This is a feature of JBuilder Enterprise. <br><br> Click OK. Note that the JDK specification has been added to the specified directory in the Select A JDK dialog box. <br><br> Click OK to close the Select A JDK dialog box. Note that the JDK path is updated to the new selection. <br><br> Click OK to close the Project Properties dialog box. <br><br> Save the project. The JDK version is updated in the project file. <br><br> Tip:You can add, edit, and delete JDKs by selecting Tools|Configure JDKs. You can also modify the Default Project Properties (Project|Default Project Properties) to change the JDK for all future projects. <br><br> <strong>Configuring JDKs</strong>Adding and deleting JDKs are features of JBuilder SE and Enterprise. <br><br> You can add, edit, and delete JDKs in the Configure JDKsdialog box (Tools|Configure JDKs). JBuilder Personal users can edit JDKs as explained in "Editing the JDK." <br><br> In this dialog box, you can: <br><br> Name the JDK by selecting the Rename button. <br><br> Add, edit, remove, and reorder JDK class, source, and documentation files. <br><br> Open the New JDK wizard and add JDKs by selecting the New button. <br><br> Add a folder that others can share. This is a feature of JBuilder Enterprise. <br><br> Delete an existing JDK from the list. <br><br> See also <br><br> Configure JDKs dialog boxHelp button. <br><br> New JDK wizardHelp button. <br><br> <strong>Setting paths for required libraries</strong> <br><br> On the Paths pageof the Project Properties dialog box, you can set the libraries to use when compiling. JBuilder places any selected libraries on the classpath. To add, edit, remove, and reorder libraries, select the Required Libraries tab. <br><br> <img alt="" src="http://www.ida.liu.se/%7ETDDB62/introjb/images/requiredlibsdialog_s.gif"><br><br> <br><br> You can select libraries in the Required Libraries list on the Paths page and edit, delete, or change their order in the library list. <br><br> Note:Libraries are searched in the order listed. To switch the order of libraries, select a library, then click Move Up or Move Down. <br><br> The Add button displays the Select One Or More Librariesdialog box, where you choose the libraries to add to your project. Select New in this dialog box to open the New Library wizardand create a new library. <br><br> <img alt="" src="http://www.ida.liu.se/%7ETDDB62/introjb/images/availjavalibsdialog_s.gif"><br><br> <br><br> You can also configure libraries by selecting Tools|Configure Libraries. <br><br> See also <br><br> "Working with libraries" <br><br> <strong>Packages</strong> <br><br> Java groups .javaand .classfiles in a package. All the files that make up the source for a Java package are in one subdirectory (src) and all compiled files are in another subdirectory (classes). When building applications, JBuilder uses the name of the project as the default name for the package in the Application or Applet wizard. For instance, if the project name is untitled1.jpx, the Application or Applet wizard suggests using a package name of untitled1. Suggested package names are always based on the project name. <br><br> Let's look at a sample project to see how the package name affects the file structure. <br><br> Note:In these examples, paths reflect the UNIX platform. See "Documentation conventions"for information on how paths are documented here. <br><br> To organize your project, you might have your project in a folder called SampleProject. This project folder contains a project file (africa.jpx), a classesdirectory and a srcdirectory: <br><br> <img alt="" src="http://www.ida.liu.se/%7ETDDB62/introjb/images/sampleproj1.gif"><br><br> <br><br> In creating this project, you'll want to create your own packages to hold related sources and classes. In this example, africa.jpxcontains a package name of feline.africa.This package contains source files on certain felines found in Africa: Lions, Cheetahs and Leopards. <br><br> The class files, which are saved in a directory structure that matches the package name, are saved in the classessubdirectory within the project. The srcsubdirectory, which contains the .javafiles, has the same structure as the class subdirectory. <br><br> <img alt="" src="http://www.ida.liu.se/%7ETDDB62/introjb/images/sampleproj2.gif"><br><br> <br><br> If the individual classes contained in this project are Lion.class, Cheetah.class, and Leopard.class, these would be found in classes/feline/africa. The source files, Lion.java, Cheetah.java,and Leopard.java, would be in found in src/feline/africaas shown here. <br><br> <img alt="" src="http://www.ida.liu.se/%7ETDDB62/introjb/images/sampleproj3.gif"><br><br> <br><br> <strong>.java file location = source path + package path</strong> <br><br> It's important to understand what pieces of information JBuilder uses to build the directory location for any given .javafile. The first part of the directory path is determined by the source path.The source path is defined at the project level and can be modified on the Paths pageof the Project Properties dialog box. <br><br> Continuing with the SampleProjectexample, the source path for Lion.javais: <br><br> <br><br> /<home>/<username>/jbproject/SampleProject/src <br><br> <br><br> Note: For the definition of the <home>directory, see "JBuilder documentation conventions." <br><br> The second part of the directory path is determined by the package name, which in this case is feline.africa. <br><br> Note:Java nomenclature uses a period (.) to separate the levels of a package. <br><br> The .javafile location for Lion.javais: <br><br> <br><br> /<home>/<username>/jbproject/SampleProject/src/feline/africa/Lion.java <br><br> <br><br> See also <br><br> "How JBuilder constructs paths" <br><br> <strong>.class file location = output path + package path</strong> <br><br> The directory location for the .classfile is determined by the output pathand the package name. The output path is the "root" to which JBuilder will add package paths to create the directory structure for the .classfiles generated by the compiler. The output path is defined at the project level and can be modified on the Paths pageof the Project Properties dialog box. <br><br> In the SampleProjectexample, the output path for Lion.classis: <br><br> <br><br> /<home>/<username>/jbproject/SampleProject/classes <br><br> <br><br> The second part of the directory path is determined by the package name, which in this case is feline.africa. <br><br> As shown below, the .classlocation for Lion.classis: <br><br> <br><br> /<home>/<username>/jbproject/SampleProject/classes/feline/africa/Lion.class <br><br> <br><br> See also <br><br> "How JBuilder constructs paths" <br><br> <strong>Using packages in JBuilder</strong> <br><br> When referencing classes from a package, you can use an import statement for convenience. An import statement allows you to reference any class in the imported package just by using the short name in the code. (JBuilder's designers and wizards add import statements automatically.) Here's an example of an import statement: <br><br> <br><br> <strong>import</strong>feline.africa.*; <br><br> <br><br> If this import statement is included in your source code, you could refer to the Lionclass as just Lionin the body of the code. <br><br> If you don't import the package, you must reference a particular class in your code with its fully qualified class name. As shown in the following diagram, the fully qualified class name for Lion.javais feline.africa.Lion(package name + class name without the extension). <br><br> <img alt="" src="http://www.ida.liu.se/%7ETDDB62/introjb/images/FQName_s.gif"><br><br> <br><br> Packages can be selectively excluded from the build process. <br><br> See also <br><br> Filtering packagesin Building Applications with JBuilder. <br><br> <strong>Package naming guidelines</strong> <br><br> The following package naming guidelines are recommended for use in all Java programs. To encourage consistency, readability, and maintainability, package names should be <br><br> One word <br><br> Singular, rather than plural <br><br> All lowercase, even if more than one word (for example, fourwordpackagenamenot FourWordPackageName) <br><br> If your packages will be shared outside your group, package names should start with an Internet domain name with the elements listed in reverse order. For example, if you were using the domain name foo.domain.com, your package names should be prefixed with com.domain.foo. <br><br> <strong>How JBuilder constructs paths</strong> <br><br> The JBuilder IDE uses several paths during processing: <br><br> Source path <br><br> Output path <br><br> Class path <br><br> Browse path <br><br> Doc path <br><br> Backup path <br><br> Working directory <br><br> Paths are set at a project level. To set paths, use the Project Properties dialog box. See "Setting project properties"for more information. <br><br> In the construction of paths, JBuilder eliminates duplicate path names. This prevents potential problems with DOS limitations in Windows. <br><br> Note:In these examples, paths reflect the UNIX platform. See "Documentation conventions." <br><br> <strong>Source path</strong> <br><br> The source path controls where the compiler looks for source files. The source path is constructed from both of the following: <br><br> The path defined on the Source tab of the Paths pageof the Project Properties dialog box. <br><br> The directory for generated files. This directory contains source files that are automatically generated by the IDE. Examples of these source files include IDL server and skeleton files. The directory for generated files is placed in the output path. You can change this option on the Build pageof the Project Properties dialog box. <br><br> The complete source path is composed of these two elements in this order: <br><br> source path + output path/generated source <br><br> Using the SampleProjectas an example, the source path for the feline.africa.jpxproject is: <br><br> <br><br> /<home>/<username>/jbproject/SampleProject/src <br><br> <br><br> <strong>Output path</strong> <br><br> The output path contains the .classfiles created by JBuilder. The output path is constructed from the path defined in the output path text box, located on the Paths pageof the Project Properties dialog box. <br><br> Files are placed in a directory whose path matches the output path + the package name. There is only one output path per project. <br><br> For example, in the SampleProjectexample, the output path for the feline.africa.jpxproject is: <br><br> /<home>/<username>/jbproject/SampleProject/classes <br><br> <strong>Class path</strong> <br><br> The class path is used during compiling. This path is constructed from all of the following: <br><br> The output path <br><br> The class path for each library listed on the Paths page of the Project Properties dialog box (in the same order in which they are listed) <br><br> The target JDK version selected on the Paths page of the Project Properties dialog box <br><br> The complete class path is composed of these elements in this order: <br><br> output path + library class paths(in the order libraries are listed in the Project Properties dialog box) + target JDK version <br><br> For example, the complete class path for Lion.classis: <br><br> <br><br> /<home>/<username>/jbproject/SampleProject/classes: <br><br> /user/jbuilder/lib/dbswing3.1.jar:/user/jdk1.3/bin <br><br> <br><br> The class path is displayed on the Build tab after you compile. <br><br> <strong>Browse path</strong> <br><br> The browse path is used by the IDE when you: <br><br> Use CodeInsight <br><br> Choose Find Definition from the editor pop-up menu <br><br> Choose Search|Find Classes. <br><br> Run the debugger <br><br> The browse path is constructed from all of the following: <br><br> The source path <br><br> The source path for each library listed on the Paths page of the Project Properties dialog box (in the same order in which they are listed) <br><br> The source path for the target JDK version selected on the Paths page of the Project Properties dialog box <br><br> The complete browse path is composed of these elements in this order: <br><br> source path + library source paths(in the order libraries are listed on the Paths page of the Project Properties dialog box) + JDK target version source path <br><br> For example, the complete browse path for Lion.classis: <br><br> <br><br> /<home>/<username>/jbproject/SampleProject/src: <br><br> /user/jbuilder/lib/dbswing3.1.jar: <br><br> /user/jbuilder/lib/dx3.1.jar:/user/jdk1.3/bin <br><br> <br><br> <strong>Doc path</strong> <br><br> The doc path is the path or paths that contain HTML documentation files for API class files. This allows reference documentation to be displayed in the Doc page of the content pane. <br><br> The doc path can be set on the Paths page of the Project Properties dialog box. Paths are searched in the order listed. <br><br> <strong>Backup path</strong> <br><br> JBuilder uses the backup path to store backup versions of source files. The default backup directory is: <br><br> <br><br> /<home>/<username>/jbproject/[project name]/bak <br><br> <br><br> Important: JSP files, HTML files, and some other text files are not treated as source files. These files are backed up in their original directories. <br><br> However, you can include these backups in the backup directory of your project instead. To do so, <br><br> Select Project|Project Properties and look at the Paths page. <br><br> Select the Source page inside the Paths page. <br><br> Click Add in the Source page. This brings up the Select One Or More Directories dialog box. <br><br> Browse to the project backup directory, select it, and click OK. <br><br> <strong>Working directory</strong> <br><br> The working directory is the starting directory that JBuilder gives a program when it is launched. Any directory may be configured as the working directory. By default, it has the same name as the project file. <br><br> It's generally the parent directory of the source directory. It's the default parent directory of the output, backup, documentation, and library directories. <br><br> <strong>Where are my files?</strong> <br><br> Each file in a project is stored with a relative path to the location of the project file. JBuilder uses the source path, test path, class path, browse path, and output pathto find and save files. <br><br> The source path controls where the compiler looks for source files. <br><br> The test path serves as the source path when you're using unit testing. <br><br> The class path is used during compiling and at runtime and for certain Enterprise editor features. <br><br> The browse path is used by the IDE when using CodeInsight, Find Definition in the editor, searching, and debugging. <br><br> The output path contains the .classfiles created by JBuilder when you compile your project. <br><br> <strong>How JBuilder finds files when you drill down</strong> <br><br> When you drill down to explore source code, JBuilder searches for the .javafiles using the browse path. For more information about drilling down, see "Navigating in the source code." <br><br> <strong>How JBuilder finds files when you compile</strong> <br><br> When you compile your project, JBuilder uses the following paths: <br><br> class path <br><br> source path <br><br> output path <br><br> JBuilder looks in the class path to find the location of the .classfiles, the libraries to use, and the target JDK version to compile against. The compiler compares the .classfiles with their source files, located in the source path, and determines if the .classfiles need to be recompiled to bring them up to date. The resulting .classfiles are placed in the specified output path. <br><br> For information about compiling files, see "Building and compiling Java programs"in Building Applications with JBuilder. <br><br> <strong>How JBuilder finds class files when you run or debug</strong> <br><br> When you run and debug your program, JBuilder uses the class path to locate all classes your program uses. <br><br> When you step through code with the debugger, JBuilder uses the browse path to find source files. <br><br> For information about debugging files, see "Debugging Java programs"in Building Applications with JBuilder. <br><br><br><br>本文转自 <br><br><a href="http://www.ida.liu.se/%7ETDDB62/introjb/pathmgmt.html#how_jbuilder_constructs_paths">http://www.ida.liu.se/~TDDB62/introjb/pathmgmt.html#how_jbuilder_constructs_paths</a> <br><br><br>下面转自:<br>http://www.systronix.com/jb_tutorial/jbt_paths/jbt_paths.htm<br></username></home></username></home></username></home></username></home></username></home></username></home></username></home></username></home></home></username></home></jbuilder>
JBuilder Project Paths
paths? what paths? jars? packages? logic?
or: The Blind Lead the Blind Down the Primrose Path
| In the course of using JBuilder it seemed logical to me to set up a file structure, with input and output folders and tell JBuilder to use those paths. Surprise! It doesn't work, at least in my experience with Windows NT and 98. Here's a step by step approach to what does work followed by one of many examples of what doesn't. Most of this has nothing to do with TINI or TiniTools. |
Where JBuilder wants to put its projects:Since Java from the beginning was intended to support dynamic module loading over the internet, it includes provisions for avoiding name space conflicts. Java has no "global" variables, functions or procedures. Java makes some assumptions about paths, especially Java packages. JBuilder has two places to set paths - Default Project Properties, and the properties of the current project. In addition, you specify "Required Libraries" which gives you a way to point to required packages such as tiniclasses.jar and tini.jar (more about these in a moment). I spent far too much time in a state of puzzlement, groping through JB's help and tutorials, not to mention trying every possibility. My conclusion is that JB does not automatically create the paths you will probably want in the Windows operating systems. (It certainly won't create the path structure I would like). You have to do some of the work yourself, manually. The problem is that JBuilder wants to make all your project files part of a /user folder in the operating system main folder. For NT, that means: C:/WINNT/Profiles/bab/jbproject/untitled1/untitled1.jpr Where I want JBuilder to keep my projects:Maybe you want all your JBuilder projects in such a place, if so, go ahead. This doesn't work for me, and probably not for most developers. I have a separate logical drive on my local disk for code development and I want my 'private' JBuilder projects there. We also maintain 'public' projects (meant to be shared by others within Systronix), and those projects are organized on our company file server. |
JBuilder Project File Path Help
| This portion of the path called the "Source Path" above is not at all what I want. I recommend changing it to {drive_letter}:/java_code_folder/project_folder, but doing so at the new project wizard path dialog. |
| What about the output path? It wants to be a subfolder of /myproject called 'classes': |
| So what help is all this help? Not much really, since it's all based on a faulty premise, that we want our projects in the operating system folder. I included it here so that you can see the (not at all obvious) answer to the (very obvious) question - "well, did you check the online help"? Yes, I did. |
How Java wants to organize packages:To avoid namespace conflicts, Java uses 'packages'. Packages are simply collections of classes. Every class you write can be part of an explicit package which you name, or part of a default package if you don't create a package name. For simple example and practice programs, you don't really have to create packages, if you are not intending to distribute your code. Packages intended for distribution should use the writer's Internet domain name, reversed, to create a unique package path. For example if Systronix were to distribute a CANBus class, it could be: com.systronix.tini.can.canbus. Java would look for the class "canbus.class" in the folder path: com/systronix/tini/can/canbus.class. This way, every other TINI user could write and distribute their own "canbus" class and they could never be confused since only one company in the world can have the domain name systronix.com. And in fact, Dallas distributes TINI classes in packages in just this fashion - for example, "tiniclasses.jar". |
Jar Files:Jar is an acronym for "java archive". Jar files are simply a collection of classes, images, html pages, and any other files which you want to distribute together. They are similar in concept to the ubiquitous ".zip" files which are widely used to compress and distribute files on the Internet. JBuilder's jdk1.2.2/bin folder includes a jar utility. If it is in your path (and it will be if you followed the previous installation instructions) you can invoke jar on the file tiniclasses.jar file and see what it contains. If you type "jar" with no other arguments you will get some help which explains that the "-tvf" switches mean to generate a verbose table of contents for the filename which follows: E:/tinibeta2.2>jar -tvf tiniclasses.jar Try this yourself now. Be careful what you type. The jar utility is capable of modifying the tiniclasses file, something you don't want to do right now. Keep a backup copy just in case. |
Contents of tiniclasses.jar:E:/tinibeta2.2>jar -tvf tiniclasses.jar E:/tinibeta2.2>jar -tvf tiniclasses.jar This is a partial listing of the contents of tiniclasses.jar, and you can see the class "CanBus" is in the path com/dalsemi/comm/CanBus.class. |
What's in a Typical JAR file
Jars, packages, and import:In tiniclasses.jar, the class "CanBus" is in the path com/dalsemi/comm/CanBus.class. In our program if we wanted to use this class, and the tiniclasses.jar file was in our classpath (as a Required Library in JBuilder), we could refer to the class using its fully qualified pathname: com.dalsemi.comm.CanBus, but this is a lot of typing. To save some typinng and make source code less cluttered, you can 'import' the entire com/dalsemi/comm package using the "import" statement in your program. (In a java program, imports must occur after any package statement and before any class definitions.) Import is used in the java program examples which follow. import com.dalsemi.comm.* Import doesn't copy, load, or paste the whole package into your java program, it just makes it accessible to your use. With the import statement above in a java program, you can then refer to any of the comm classes, such as CanBus by their simple class names. If this sounds a little confusing, don't worry about it now, the examples should clear things up. |
One JBuilder Approach Which Works
No default paths, manually typed prj pathI created a folder e:/JavaCode/ with the intent of subfolders for each sample program, i.e., e:/JavaCode/Sample1, e:/JavaCode/Sample2, etc. There was no default project source path. At the JB New Project Wizard, I manually typed in the path, even though the folders did not exist at the time. JBuilder went ahead and created the folders (without asking for acknowledgement, as most windows apps would). Paths.jpr got created in the JavaCode/Sample1 folder as hoped. Now I created a new class 'ClassOne' in package 'PackageOne'. Interestingly, JBuilder created subfolders "src" and "classes" for the project source and output folders, respectively. |
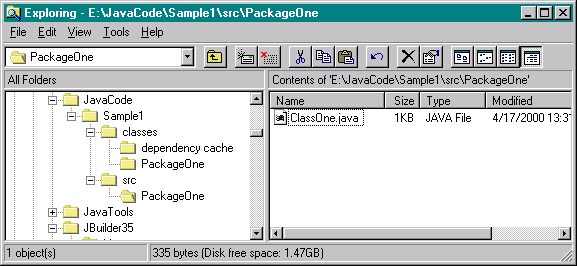
| Note that the actual java and class files are located in the project package folder. A project can contain several packges. This is a very usable structure and is what I wanted, so I recommend this approach as one which works. |
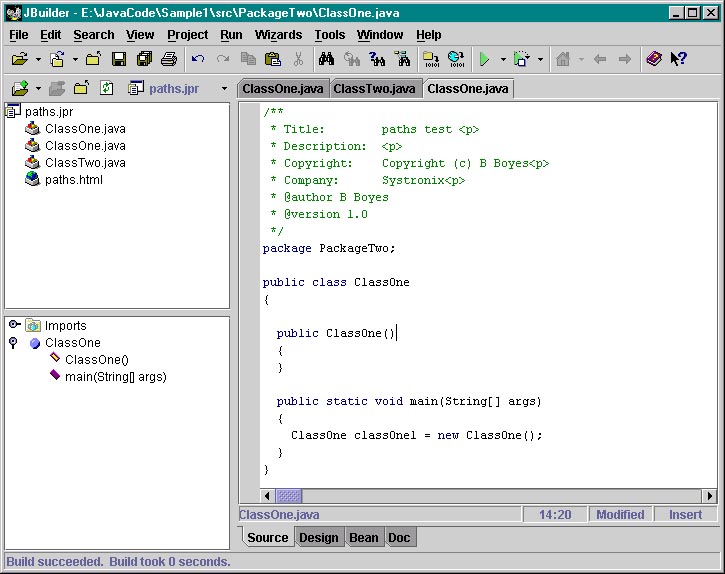
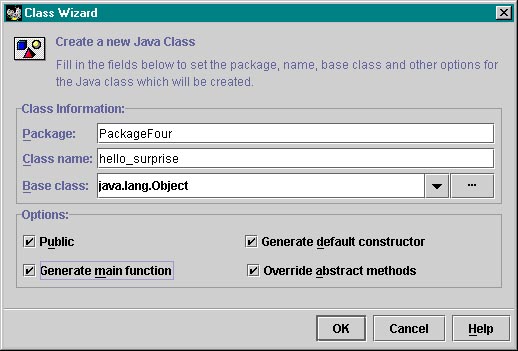
Adding another class in the same package,
and a class with a new package

| Above is the new class wizard for a new class in the same package, and below for a new class in a new package. |

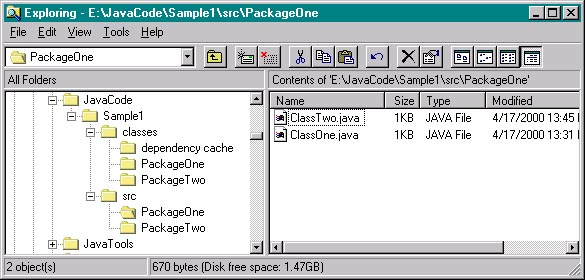
| Here's the result, after a build, both in JBuilder and Explorer. |
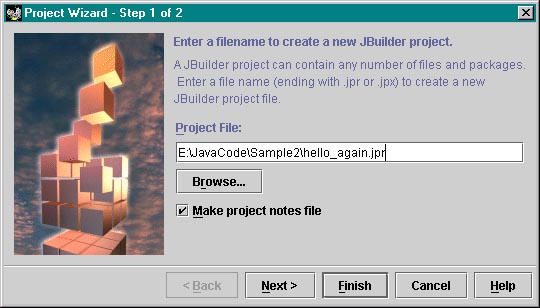
Adding another project folder (with new projects and classes)
to the same parent folder
| One more thing to test is adding another new project in the same main JavaCode folder, browsing to it in the new project wizard. Close the current projec and start a new one. All I can browse to is the JavaCode folder, and then type in the new project folder - Sample2 - and the project name which I will call "hello_again.jpr" |

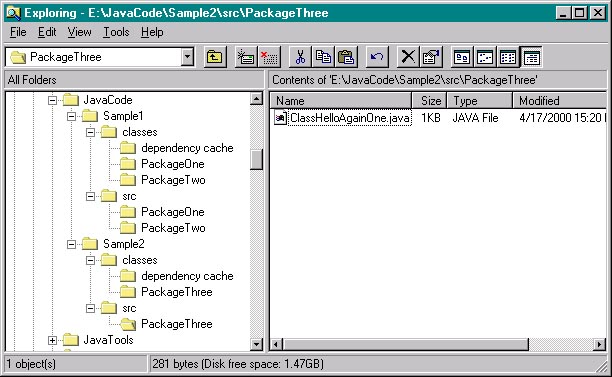
| Now I'll create a new class in a new package in this new project: |
| Here's the result in Explorer. Looks OK. |
| I've experimented with various settings of the Default Project Source Paths and invariably JBuilder does not do what I want it to. The above scheme is the only one which works consistently. There may be others, email me if you learn something interesting. |
An approach which won't work
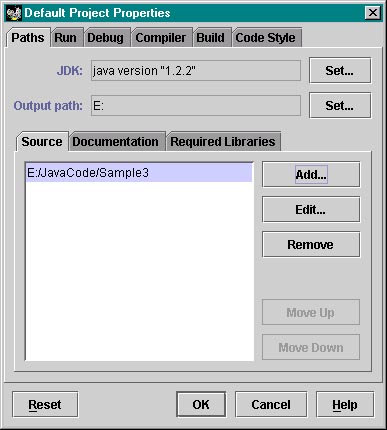
| Here's an example of the dark side of JBuilder's paths, in which seemingly obvious choices lead to a surprising outcome. (At least for me.) For example, in Explorer create e:/JavaCode/Sample3 and make it the default project source path. |
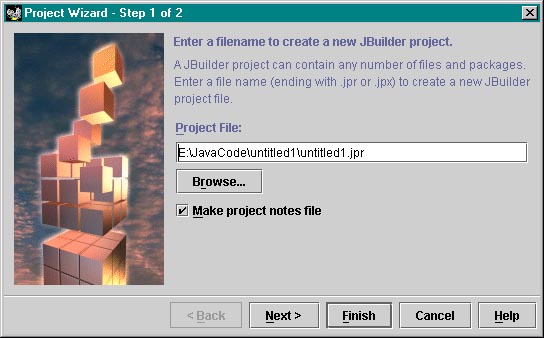
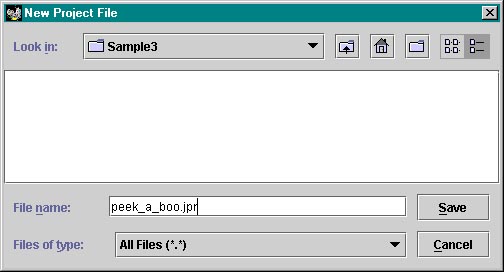
| Now create a new project. Hmm - JBuilder skips the /Sample3 folder, which was where we wanted the .jpr file to go, so we'll browse to it and create a new project peek_a_boo.jpr |
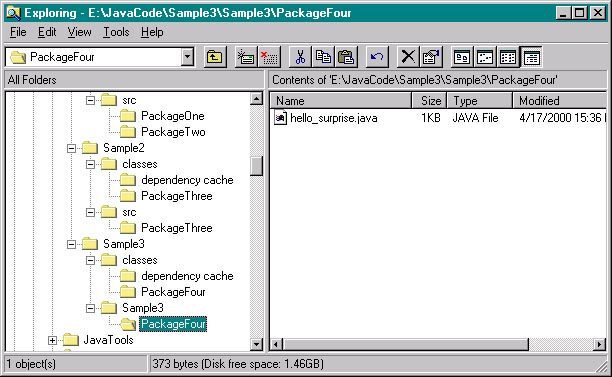
| So far so good, now create a new class in a package, the way we did previously. |
| Save and build the new project and see what we have in Explorer. Whoa what? JBuilder created a second /Sample3 folder and put our source there, not in a /src folder. There's a little bit of logic to this since we DID set the source path to d:/JavaCode/Sample3, but that's not what we got - the source is now in d:/JavaCode/Sample3/Sample3?? Oh well... |


发表评论

相关推荐
PKI Implementing and Managing E-Security 学习PKI的好书
framework for managing IT-enabled
managing-hierarchical-data-in-mysql.rar
Oracle WebDBTM Creating and Managing Components - Field-Level Help Release 2.2
Oracle WebDBTM Creating and Managing Sites - Field-Level Help Release 2.2
Managing-Your-Biological-Data-with-Python.pdf
Oracle WebDBTM Creating and Managing Components - Task Help Release 2.2
Oracle WebDBTM Creating and Managing Sites - Task Help Release 2.2
Implementing-a-Database-for-Managing-Access-Control-main.rar
Managing-State-in-Flutter-Pragmatically:Packt实用地
Red_Hat_Enterprise_Linux-6-Managing_Confined_Services-en-US
Managing gigabytes 英文版,图片格式的。 看到有位兄弟上传了djvu格式的,可能有些LINUX下的看不了。上传这个版本。另外,我买了那个名为“深入搜索引擎”的中文版,不得不说翻译书不是个容易的活儿,英文不过关...
But in truth, the skill needed is that of managing complexity - to save time performing common system administration tasks, to allow safe use of untrained and trained help in maintaining mission-...
Managing gigabytes 英文版,图片格式的。 看到有位兄弟上传了djvu格式的,可能有些LINUX下的看不了。上传这个版本。另外,我买了那个名为“深入搜索引擎”的中文版,不得不说翻译书不是个容易的活儿,英文不过关...
Managing gigabytes 英文版,图片格式的。 看到有位兄弟上传了djvu格式的,可能有些LINUX下的看不了。上传这个版本。另外,我买了那个名为“深入搜索引擎”的中文版,不得不说翻译书不是个容易的活儿,英文不过关...
Managing Yourself is a practical, easily absorbed and implemented guide to the assessment and then continuous personal improvement of your emotional intelligence. It provides the reader with easily ...
sap press doc 解压密码:abap_developer
Managing gigabytes 英文版,图片格式的。 看到有位兄弟上传了djvu格式的,可能有些LINUX下的看不了。上传这个版本。另外,我买了那个名为“深入搜索引擎”的中文版,不得不说翻译书不是个容易的活儿,英文不过关...
Managing gigabytes 英文版,图片格式的。 看到有位兄弟上传了djvu格式的,可能有些LINUX下的看不了。上传这个版本。另外,我买了那个名为“深入搜索引擎”的中文版,不得不说翻译书不是个容易的活儿,英文不过关...