- 浏览: 21486398 次
- 性别:

- 来自: 杭州
-

最新评论
-
ZY199266:
配置文件还需要额外的配置ma
Android 客户端通过内置API(HttpClient) 访问 服务器(用Spring MVC 架构) 返回的json数据全过程 -
ZY199266:
我的一访问为什么是 /mavenwebdemo/WEB-I ...
Android 客户端通过内置API(HttpClient) 访问 服务器(用Spring MVC 架构) 返回的json数据全过程 -
lvgaga:
我又一个问题就是 如果像你的这种形式写。配置文件还需要额外的 ...
Android 客户端通过内置API(HttpClient) 访问 服务器(用Spring MVC 架构) 返回的json数据全过程 -
lvgaga:
我的一访问为什么是 /mavenwebdemo/WEB-I ...
Android 客户端通过内置API(HttpClient) 访问 服务器(用Spring MVC 架构) 返回的json数据全过程 -
y1210251848:
你的那个错误应该是项目所使用的目标框架不支持吧
log4net配置(web中使用log4net,把web.config放在单独的文件中)
Android应用程序键盘(Keyboard)消息处理机制分析http://blog.csdn.net/luoshengyang/article/details/6882903
http://blog.csdn.net/luoshengyang/article/details/6882903
在Android系统中,键盘按键事件是由WindowManagerService服务来管理的,然后再以消息的形式来分发给应用程序处理,不过和普通消息不一样,它是由硬件中断触发的;在上一篇文章《Android应用程序消息处理机制(Looper、Handler)分析》中,我们分析了Android应用程序的消息处理机制,本文将结合这种消息处理机制来详细分析Android应用程序是如何获得键盘按键消息的。
在系统启动的时候,SystemServer会启动窗口管理服务WindowManagerService,WindowManagerService在启动的时候就会通过系统输入管理器InputManager来总负责监控键盘消息。这些键盘消息一般都是分发给当前激活的Activity窗口来处理的,因此,当前激活的Activity窗口在创建的时候,会到WindowManagerService中去注册一个接收键盘消息的通道,表明它要处理键盘消息,而当InputManager监控到有键盘消息时,就会分给给它处理。当当前激活的Activity窗口不再处于激活状态时,它也会到WindowManagerService中去反注册之前的键盘消息接收通道,这样,InputManager就不会再把键盘消息分发给它来处理。
由于本文的内容比较多,在接下面的章节中,我们将分为五个部分来详细描述Android应用程序获得键盘按键消息的过程,每一个部分都是具体描述键盘消息处理过程中的一个过程。结合上面的键盘消息处理框架,这四个过程分别是InputManager的启动过程、应用程序注册键盘消息接收通道的过程、InputManager分发键盘消息给应用程序的过程以及应用程序注销键盘消息接收通道的过程。为了更好地理解Android应用程序获得键盘按键消息的整个过程,建议读者首先阅读Android应用程序消息处理机制(Looper、Handler)分析一文,理解了Android应用程序的消息处理机制后,就能很好的把握本文的内容。
1. InputManager的启动过程分析
前面说过,Android系统的键盘事件是由InputManager来监控的,而InputManager是由窗口管理服务WindowManagerService来启动的。
从前面一篇文章Android系统进程Zygote启动过程的源代码分析中,我们知道在Android系统中,Zygote进程负责启动系统服务进程SystemServer,而系统服务进程SystemServer负责启动系统中的各种关键服务,例如我们在前面两篇文章Android应用程序安装过程源代码分析和Android系统默认Home应用程序(Launcher)的启动过程源代码分析中提到的Package管理服务PackageManagerService和Activity管理服务ActivityManagerService。这里我们所讨论的窗口管理服务WindowManagerService也是由SystemServer来启动的,具体的启动过程这里就不再详述了,具体可以参考PackageManagerService和ActivityManagerService的启动过程。
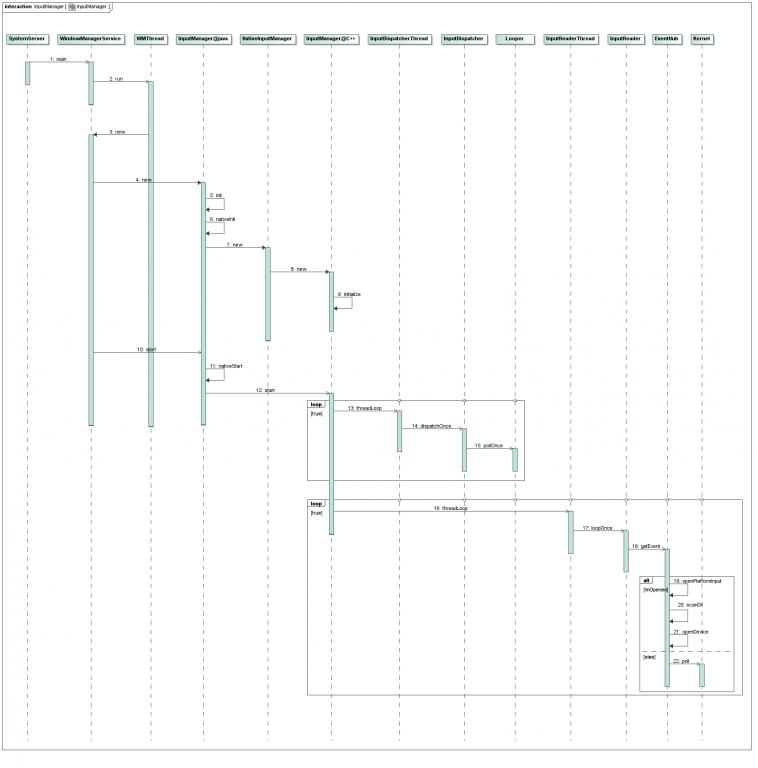
了解了WindowManagerService的启动过程之后,我们就可以继续分析InputManager的启动过程了。我们先来看一下InputManager启动过程的序列图,然后根据这个序列图来一步步分析它的启动过程:
Step 1. WindowManagerService.main
这个函数定义在frameworks/base/services/java/com/android/server/WindowManagerService.java文件中:
- publicclassWindowManagerServiceextendsIWindowManager.Stub
- implementsWatchdog.Monitor{
- ......
- publicstaticWindowManagerServicemain(Contextcontext,
- PowerManagerServicepm,booleanhaveInputMethods){
- WMThreadthr=newWMThread(context,pm,haveInputMethods);
- thr.start();
- synchronized(thr){
- while(thr.mService==null){
- try{
- thr.wait();
- }catch(InterruptedExceptione){
- }
- }
- returnthr.mService;
- }
- }
- ......
- }
Step 2. WMThread.run
这个函数定义在frameworks/base/services/java/com/android/server/WindowManagerService.java文件中:
- publicclassWindowManagerServiceextendsIWindowManager.Stub
- implementsWatchdog.Monitor{
- ......
- staticclassWMThreadextendsThread{
- ......
- publicvoidrun(){
- ......
- WindowManagerServices=newWindowManagerService(mContext,mPM,
- mHaveInputMethods);
- ......
- }
- }
- ......
- }
Step 3. WindowManagerService<init>
WindowManagerService类的构造函数定义在frameworks/base/services/java/com/android/server/WindowManagerService.java文件中:
- publicclassWindowManagerServiceextendsIWindowManager.Stub
- implementsWatchdog.Monitor{
- ......
- finalInputManagermInputManager;
- ......
- privateWindowManagerService(Contextcontext,PowerManagerServicepm,
- booleanhaveInputMethods){
- ......
- mInputManager=newInputManager(context,this);
- ......
- mInputManager.start();
- ......
- }
- ......
- }
Step 4. InputManager<init>@java
Java层的InputManager类的构造函数定义在frameworks/base/services/java/com/android/server/InputManager.java文件中:
- publicclassInputManager{
- ......
- publicInputManager(Contextcontext,WindowManagerServicewindowManagerService){
- this.mContext=context;
- this.mWindowManagerService=windowManagerService;
- this.mCallbacks=newCallbacks();
- init();
- }
- ......
- }
Step 5. InputManager.init
这个函数定义在frameworks/base/services/java/com/android/server/InputManager.java文件中:
- publicclassInputManager{
- ......
- privatevoidinit(){
- Slog.i(TAG,"Initializinginputmanager");
- nativeInit(mCallbacks);
- }
- ......
- }
Step 6. InputManager.nativeInit
这个函数定义在frameworks/base/services/jni$ vi com_android_server_InputManager.cpp文件中:
- staticvoidandroid_server_InputManager_nativeInit(JNIEnv*env,jclassclazz,
- jobjectcallbacks){
- if(gNativeInputManager==NULL){
- gNativeInputManager=newNativeInputManager(callbacks);
- }else{
- LOGE("Inputmanageralreadyinitialized.");
- jniThrowRuntimeException(env,"Inputmanageralreadyinitialized.");
- }
- }
Step 7. NativeInputManager<init>
NativeInputManager类的构造函数定义在frameworks/base/services/jni$ vi com_android_server_InputManager.cpp文件中:
- NativeInputManager::NativeInputManager(jobjectcallbacksObj):
- mFilterTouchEvents(-1),mFilterJumpyTouchEvents(-1),mVirtualKeyQuietTime(-1),
- mMaxEventsPerSecond(-1),
- mDisplayWidth(-1),mDisplayHeight(-1),mDisplayOrientation(ROTATION_0){
- JNIEnv*env=jniEnv();
- mCallbacksObj=env->NewGlobalRef(callbacksObj);
- sp<EventHub>eventHub=newEventHub();
- mInputManager=newInputManager(eventHub,this,this);
- }
Step 8. InputManager<init>@C++
C++层的InputManager类的构造函数定义在frameworks/base/libs/ui/InputManager.cpp文件中:
- InputManager::InputManager(
- constsp<EventHubInterface>&eventHub,
- constsp<InputReaderPolicyInterface>&readerPolicy,
- constsp<InputDispatcherPolicyInterface>&dispatcherPolicy){
- mDispatcher=newInputDispatcher(dispatcherPolicy);
- mReader=newInputReader(eventHub,readerPolicy,mDispatcher);
- initialize();
- }
Step 9. InputManager.initialize
这个函数定义在frameworks/base/libs/ui/InputManager.cpp文件中:
- voidInputManager::initialize(){
- mReaderThread=newInputReaderThread(mReader);
- mDispatcherThread=newInputDispatcherThread(mDispatcher);
- }
至此,InputManager的初始化工作就完成了,在回到Step 3中继续分析InputManager的进一步启动过程之前,我们先来作一个小结,看看这个初始化过程都做什么事情:
A. 在Java层中的WindowManagerService中创建了一个InputManager对象,由它来负责管理Android应用程序框架层的键盘消息处理;
B. 在C++层也相应地创建一个InputManager本地对象来负责监控键盘事件;
C. 在C++层中的InputManager对象中,分别创建了一个InputReader对象和一个InputDispatcher对象,前者负责读取系统中的键盘消息,后者负责把键盘消息分发出去;
D.InputReader对象和一个InputDispatcher对象分别是通过InputReaderThread线程实例和InputDispatcherThread线程实例来实键盘消息的读取和分发的。
有了这些对象之后,万事就俱备了,回到Step 3中,调用InputManager类的start函数来执行真正的启动操作。
Step 10. InputManager.start
这个函数定义在frameworks/base/services/java/com/android/server/InputManager.java文件中:
- publicclassInputManager{
- ......
- publicvoidstart(){
- Slog.i(TAG,"Startinginputmanager");
- nativeStart();
- }
- ......
- }
Step 11. InputManager.nativeStart
这个函数定义在frameworks/base/services/jni$ vi com_android_server_InputManager.cpp文件中:
- staticvoidandroid_server_InputManager_nativeStart(JNIEnv*env,jclassclazz){
- if(checkInputManagerUnitialized(env)){
- return;
- }
- status_tresult=gNativeInputManager->getInputManager()->start();
- if(result){
- jniThrowRuntimeException(env,"Inputmanagercouldnotbestarted.");
- }
- }
Step 12. InputManager.start
这个函数定义在frameworks/base/libs/ui/InputManager.cpp文件中:
- status_tInputManager::start(){
- status_tresult=mDispatcherThread->run("InputDispatcher",PRIORITY_URGENT_DISPLAY);
- if(result){
- LOGE("CouldnotstartInputDispatcherthreadduetoerror%d.",result);
- returnresult;
- }
- result=mReaderThread->run("InputReader",PRIORITY_URGENT_DISPLAY);
- if(result){
- LOGE("CouldnotstartInputReaderthreadduetoerror%d.",result);
- mDispatcherThread->requestExit();
- returnresult;
- }
- returnOK;
- }
我们先来分析InputDispatcherThread线程分发消息的过程,然后再回过头来分析InputReaderThread线程读取消息的过程。
Step 13.InputDispatcherThread.threadLoop
这个函数定义在frameworks/base/libs/ui/InputDispatcher.cpp文件中:
- boolInputDispatcherThread::threadLoop(){
- mDispatcher->dispatchOnce();
- returntrue;
- }
Step 14. InputDispatcher.dispatchOnce
这个函数定义在frameworks/base/libs/ui/InputDispatcher.cpp文件中:
- voidInputDispatcher::dispatchOnce(){
- nsecs_tkeyRepeatTimeout=mPolicy->getKeyRepeatTimeout();
- nsecs_tkeyRepeatDelay=mPolicy->getKeyRepeatDelay();
- nsecs_tnextWakeupTime=LONG_LONG_MAX;
- {//acquirelock
- AutoMutex_l(mLock);
- dispatchOnceInnerLocked(keyRepeatTimeout,keyRepeatDelay,&nextWakeupTime);
- if(runCommandsLockedInterruptible()){
- nextWakeupTime=LONG_LONG_MIN;//forcenextpolltowakeupimmediately
- }
- }//releaselock
- //Waitforcallbackortimeoutorwake.(makesureweroundup,notdown)
- nsecs_tcurrentTime=now();
- int32_ttimeoutMillis;
- if(nextWakeupTime>currentTime){
- uint64_ttimeout=uint64_t(nextWakeupTime-currentTime);
- timeout=(timeout+999999LL)/1000000LL;
- timeoutMillis=timeout>INT_MAX?-1:int32_t(timeout);
- }else{
- timeoutMillis=0;
- }
- mLooper->pollOnce(timeoutMillis);
- }
Step 15. Looper.pollOnce
这个函数定义在frameworks/base/libs/utils/Looper.cpp文件中,具体可以参考前面Android应用程序消息处理机制(Looper、Handler)分析一文,这里就不再详述了。总的来说,就是在Looper类中,会创建一个管道,当调用Looper类的pollOnce函数时,如果管道中没有内容可读,那么当前线程就会进入到空闲等待状态;当有键盘事件发生时,InputReader就会往这个管道中写入新的内容,这样就会唤醒前面正在等待键盘事件发生的线程。
InputDispatcher类分发消息的过程就暂时分析到这里,后面会有更进一步的分析,现在,我们回到Step 12中,接着分析InputReader类读取键盘事件的过程。在调用了InputReaderThread线程类的run就函数后,同样会进入到InputReaderThread线程类的threadLoop函数中去。
Step 16. InputReaderThread.threadLoop
这个函数定义在frameworks/base/libs/ui/InputReader.cpp文件中:
- boolInputReaderThread::threadLoop(){
- mReader->loopOnce();
- returntrue;
- }
Step 17. InputReader.loopOnce
这个函数定义在frameworks/base/libs/ui/InputReader.cpp文件中:
- voidInputReader::loopOnce(){
- RawEventrawEvent;
- mEventHub->getEvent(&rawEvent);
- #ifDEBUG_RAW_EVENTS
- LOGD("Inputevent:device=0x%xtype=0x%xscancode=%dkeycode=%dvalue=%d",
- rawEvent.deviceId,rawEvent.type,rawEvent.scanCode,rawEvent.keyCode,
- rawEvent.value);
- #endif
- process(&rawEvent);
- }
Step 18. EventHub.getEvent
这个函数定义在frameworks/base/libs/ui/EventHub.cpp文件中:
- boolEventHub::getEvent(RawEvent*outEvent)
- {
- outEvent->deviceId=0;
- outEvent->type=0;
- outEvent->scanCode=0;
- outEvent->keyCode=0;
- outEvent->flags=0;
- outEvent->value=0;
- outEvent->when=0;
- //NotethatweonlyallowonecallertogetEvent(),sodon'tneed
- //todolockinghere...onlywhenadding/removingdevices.
- if(!mOpened){
- mError=openPlatformInput()?NO_ERROR:UNKNOWN_ERROR;
- mOpened=true;
- mNeedToSendFinishedDeviceScan=true;
- }
- for(;;){
- //Reportanydevicesthathadlastbeenadded/removed.
- if(mClosingDevices!=NULL){
- device_t*device=mClosingDevices;
- LOGV("Reportingdeviceclosed:id=0x%x,name=%s\n",
- device->id,device->path.string());
- mClosingDevices=device->next;
- if(device->id==mFirstKeyboardId){
- outEvent->deviceId=0;
- }else{
- outEvent->deviceId=device->id;
- }
- outEvent->type=DEVICE_REMOVED;
- outEvent->when=systemTime(SYSTEM_TIME_MONOTONIC);
- deletedevice;
- mNeedToSendFinishedDeviceScan=true;
- returntrue;
- }
- if(mOpeningDevices!=NULL){
- device_t*device=mOpeningDevices;
- LOGV("Reportingdeviceopened:id=0x%x,name=%s\n",
- device->id,device->path.string());
- mOpeningDevices=device->next;
- if(device->id==mFirstKeyboardId){
- outEvent->deviceId=0;
- }else{
- outEvent->deviceId=device->id;
- }
- outEvent->type=DEVICE_ADDED;
- outEvent->when=systemTime(SYSTEM_TIME_MONOTONIC);
- mNeedToSendFinishedDeviceScan=true;
- returntrue;
- }
- if(mNeedToSendFinishedDeviceScan){
- mNeedToSendFinishedDeviceScan=false;
- outEvent->type=FINISHED_DEVICE_SCAN;
- outEvent->when=systemTime(SYSTEM_TIME_MONOTONIC);
- returntrue;
- }
- //Grabthenextinputevent.
- for(;;){
- //Consumebufferedinputevents,ifany.
- if(mInputBufferIndex<mInputBufferCount){
- conststructinput_event&iev=mInputBufferData[mInputBufferIndex++];
- constdevice_t*device=mDevices[mInputDeviceIndex];
- LOGV("%sgot:t0=%d,t1=%d,type=%d,code=%d,v=%d",device->path.string(),
- (int)iev.time.tv_sec,(int)iev.time.tv_usec,iev.type,iev.code,iev.value);
- if(device->id==mFirstKeyboardId){
- outEvent->deviceId=0;
- }else{
- outEvent->deviceId=device->id;
- }
- outEvent->type=iev.type;
- outEvent->scanCode=iev.code;
- if(iev.type==EV_KEY){
- status_terr=device->layoutMap->map(iev.code,
- &outEvent->keyCode,&outEvent->flags);
- LOGV("iev.code=%dkeyCode=%dflags=0x%08xerr=%d\n",
- iev.code,outEvent->keyCode,outEvent->flags,err);
- if(err!=0){
- outEvent->keyCode=AKEYCODE_UNKNOWN;
- outEvent->flags=0;
- }
- }else{
- outEvent->keyCode=iev.code;
- }
- outEvent->value=iev.value;
- //Useaneventtimestampinthesametimebaseas
- //java.lang.System.nanoTime()andandroid.os.SystemClock.uptimeMillis()
- //asexpectedbytherestofthesystem.
- outEvent->when=systemTime(SYSTEM_TIME_MONOTONIC);
- returntrue;
- }
- //Finishreadingalleventsfromdevicesidentifiedinpreviouspoll().
- //ThiscodeassumesthatmInputDeviceIndexisinitially0andthatthe
- //reventsmemberofpollfdisinitializedto0whenthedeviceisfirstadded.
- //SincemFDs[0]isusedforinotify,weprocessregulareventsstartingatindex1.
- mInputDeviceIndex+=1;
- if(mInputDeviceIndex>=mFDCount){
- break;
- }
- conststructpollfd&pfd=mFDs[mInputDeviceIndex];
- if(pfd.revents&POLLIN){
- int32_treadSize=read(pfd.fd,mInputBufferData,
- sizeof(structinput_event)*INPUT_BUFFER_SIZE);
- if(readSize<0){
- if(errno!=EAGAIN&&errno!=EINTR){
- LOGW("couldnotgetevent(errno=%d)",errno);
- }
- }elseif((readSize%sizeof(structinput_event))!=0){
- LOGE("couldnotgetevent(wrongsize:%d)",readSize);
- }else{
- mInputBufferCount=readSize/sizeof(structinput_event);
- mInputBufferIndex=0;
- }
- }
- }
- ......
- mInputDeviceIndex=0;
- //Pollforevents.Mindthewakelockdance!
- //Weholdawakelockatalltimesexceptduringpoll().Thisworksduetosome
- //subtlechoreography.Whenadevicedriverhaspending(unread)events,itacquires
- //akernelwakelock.However,oncethelastpendingeventhasbeenread,thedevice
- //driverwillreleasethekernelwakelock.Topreventthesystemfromgoingtosleep
- //whenthishappens,theEventHubholdsontoitsownuserwakelockwhiletheclient
- //isprocessingevents.Thusthesystemcanonlysleepiftherearenoevents
- //pendingorcurrentlybeingprocessed.
- release_wake_lock(WAKE_LOCK_ID);
- intpollResult=poll(mFDs,mFDCount,-1);
- acquire_wake_lock(PARTIAL_WAKE_LOCK,WAKE_LOCK_ID);
- if(pollResult<=0){
- if(errno!=EINTR){
- LOGW("pollfailed(errno=%d)\n",errno);
- usleep(100000);
- }
- }
- }
- }
首先,如果是第一次进入到这个函数中时,成员变量mOpened的值为false,于是就会调用openPlatformInput函数来打开系统输入设备,在本文中,我们主要讨论的输入设备就是键盘了。打开了这些输入设备文件后,就可以对这些输入设备进行是监控了。如果不是第一次进入到这个函数,那么就会分析当前有没有输入事件发生,如果有,就返回这个事件,否则就会进入等待状态,等待下一次输入事件的发生。在我们这个场景中,就是等待下一次键盘事件的发生了。
我们先分析openPlatformInput函数的实现,然后回过头来分析这个getEvent函数的具体的实现。
Step 19. EventHub.openPlatformInput
这个函数定义在frameworks/base/libs/ui/EventHub.cpp文件中:
- boolEventHub::openPlatformInput(void)
- {
- ......
- res=scanDir(device_path);
- if(res<0){
- LOGE("scandirfailedfor%s\n",device_path);
- }
- returntrue;
- }
- staticconstchar*device_path="/dev/input";
Step 20.EventHub.scanDir
这个函数定义在frameworks/base/libs/ui/EventHub.cpp文件中:
- intEventHub::scanDir(constchar*dirname)
- {
- chardevname[PATH_MAX];
- char*filename;
- DIR*dir;
- structdirent*de;
- dir=opendir(dirname);
- if(dir==NULL)
- return-1;
- strcpy(devname,dirname);
- filename=devname+strlen(devname);
- *filename++='/';
- while((de=readdir(dir))){
- if(de->d_name[0]=='.'&&
- (de->d_name[1]=='\0'||
- (de->d_name[1]=='.'&&de->d_name[2]=='\0')))
- continue;
- strcpy(filename,de->d_name);
- openDevice(devname);
- }
- closedir(dir);
- return0;
- }
Step 21.EventHub.openDevice
这个函数定义在frameworks/base/libs/ui/EventHub.cpp文件中:
- intEventHub::openDevice(constchar*deviceName){
- intversion;
- intfd;
- structpollfd*new_mFDs;
- device_t**new_devices;
- char**new_device_names;
- charname[80];
- charlocation[80];
- charidstr[80];
- structinput_idid;
- LOGV("Openingdevice:%s",deviceName);
- AutoMutex_l(mLock);
- fd=open(deviceName,O_RDWR);
- if(fd<0){
- LOGE("couldnotopen%s,%s\n",deviceName,strerror(errno));
- return-1;
- }
- ......
- intdevid=0;
- while(devid<mNumDevicesById){
- if(mDevicesById[devid].device==NULL){
- break;
- }
- devid++;
- }
- ......
- mDevicesById[devid].seq=(mDevicesById[devid].seq+(1<<SEQ_SHIFT))&SEQ_MASK;
- if(mDevicesById[devid].seq==0){
- mDevicesById[devid].seq=1<<SEQ_SHIFT;
- }
- new_mFDs=(pollfd*)realloc(mFDs,sizeof(mFDs[0])*(mFDCount+1));
- new_devices=(device_t**)realloc(mDevices,sizeof(mDevices[0])*(mFDCount+1));
- if(new_mFDs==NULL||new_devices==NULL){
- LOGE("outofmemory");
- return-1;
- }
- mFDs=new_mFDs;
- mDevices=new_devices;
- ......
- device_t*device=newdevice_t(devid|mDevicesById[devid].seq,deviceName,name);
- if(device==NULL){
- LOGE("outofmemory");
- return-1;
- }
- device->fd=fd;
- mFDs[mFDCount].fd=fd;
- mFDs[mFDCount].events=POLLIN;
- mFDs[mFDCount].revents=0;
- //Figureoutthekindsofeventsthedevicereports.
- uint8_tkey_bitmask[sizeof_bit_array(KEY_MAX+1)];
- memset(key_bitmask,0,sizeof(key_bitmask));
- LOGV("Gettingkeys...");
- if(ioctl(fd,EVIOCGBIT(EV_KEY,sizeof(key_bitmask)),key_bitmask)>=0){
- //Seeifthisisakeyboard.Ignoreeverythinginthebuttonrangeexceptfor
- //gamepadswhicharealsoconsideredkeyboards.
- if(containsNonZeroByte(key_bitmask,0,sizeof_bit_array(BTN_MISC))
- ||containsNonZeroByte(key_bitmask,sizeof_bit_array(BTN_GAMEPAD),
- sizeof_bit_array(BTN_DIGI))
- ||containsNonZeroByte(key_bitmask,sizeof_bit_array(KEY_OK),
- sizeof_bit_array(KEY_MAX+1))){
- device->classes|=INPUT_DEVICE_CLASS_KEYBOARD;
- device->keyBitmask=newuint8_t[sizeof(key_bitmask)];
- if(device->keyBitmask!=NULL){
- memcpy(device->keyBitmask,key_bitmask,sizeof(key_bitmask));
- }else{
- deletedevice;
- LOGE("outofmemoryallocatingkeybitmask");
- return-1;
- }
- }
- }
- ......
- if((device->classes&INPUT_DEVICE_CLASS_KEYBOARD)!=0){
- chartmpfn[sizeof(name)];
- charkeylayoutFilename[300];
- //amoredescriptivename
- device->name=name;
- //replaceallthespaceswithunderscores
- strcpy(tmpfn,name);
- for(char*p=strchr(tmpfn,'');p&&*p;p=strchr(tmpfn,''))
- *p='_';
- //findthe.klfileweneedforthisdevice
- constchar*root=getenv("ANDROID_ROOT");
- snprintf(keylayoutFilename,sizeof(keylayoutFilename),
- "%s/usr/keylayout/%s.kl",root,tmpfn);
- booldefaultKeymap=false;
- if(access(keylayoutFilename,R_OK)){
- snprintf(keylayoutFilename,sizeof(keylayoutFilename),
- "%s/usr/keylayout/%s",root,"qwerty.kl");
- defaultKeymap=true;
- }
- status_tstatus=device->layoutMap->load(keylayoutFilename);
- if(status){
- LOGE("Error%dloadingkeylayout.",status);
- }
- //telltheworldaboutthedevname(thedescriptivename)
- if(!mHaveFirstKeyboard&&!defaultKeymap&&strstr(name,"-keypad")){
- //thebuilt-inkeyboardhasawell-knowndeviceIDof0,
- //thisdevicebetternotgoaway.
- mHaveFirstKeyboard=true;
- mFirstKeyboardId=device->id;
- property_set("hw.keyboards.0.devname",name);
- }else{
- //ensuremFirstKeyboardIdissetto-something-.
- if(mFirstKeyboardId==0){
- mFirstKeyboardId=device->id;
- }
- }
- charpropName[100];
- sprintf(propName,"hw.keyboards.%u.devname",device->id);
- property_set(propName,name);
- //'Q'keysupport=cheaptestofwhetherthisisanalpha-capablekbd
- if(hasKeycodeLocked(device,AKEYCODE_Q)){
- device->classes|=INPUT_DEVICE_CLASS_ALPHAKEY;
- }
- //SeeifthisdevicehasaDPAD.
- if(hasKeycodeLocked(device,AKEYCODE_DPAD_UP)&&
- hasKeycodeLocked(device,AKEYCODE_DPAD_DOWN)&&
- hasKeycodeLocked(device,AKEYCODE_DPAD_LEFT)&&
- hasKeycodeLocked(device,AKEYCODE_DPAD_RIGHT)&&
- hasKeycodeLocked(device,AKEYCODE_DPAD_CENTER)){
- device->classes|=INPUT_DEVICE_CLASS_DPAD;
- }
- //Seeifthisdevicehasagamepad.
- for(size_ti=0;i<sizeof(GAMEPAD_KEYCODES)/sizeof(GAMEPAD_KEYCODES[0]);i++){
- if(hasKeycodeLocked(device,GAMEPAD_KEYCODES[i])){
- device->classes|=INPUT_DEVICE_CLASS_GAMEPAD;
- break;
- }
- }
- LOGI("Newkeyboard:device->id=0x%xdevname='%s'propName='%s'keylayout='%s'\n",
- device->id,name,propName,keylayoutFilename);
- }
- ......
- mDevicesById[devid].device=device;
- device->next=mOpeningDevices;
- mOpeningDevices=device;
- mDevices[mFDCount]=device;
- mFDCount++;
- return0;
- }
- fd=open(deviceName,O_RDWR);
- mDevicesById[devid].seq=(mDevicesById[devid].seq+(1<<SEQ_SHIFT))&SEQ_MASK;
- if(mDevicesById[devid].seq==0){
- mDevicesById[devid].seq=1<<SEQ_SHIFT;
- }
- mDevicesById[devid].seq=(mDevicesById[devid].seq+(1<<SEQ_SHIFT))&SEQ_MASK;
- if(mDevicesById[devid].seq==0){
- mDevicesById[devid].seq=1<<SEQ_SHIFT;
- }
- new_mFDs=(pollfd*)realloc(mFDs,sizeof(mFDs[0])*(mFDCount+1));
- new_devices=(device_t**)realloc(mDevices,sizeof(mDevices[0])*(mFDCount+1));
- if(new_mFDs==NULL||new_devices==NULL){
- LOGE("outofmemory");
- return-1;
- }
- mFDs=new_mFDs;
- mDevices=new_devices;
- ......
- device_t*device=newdevice_t(devid|mDevicesById[devid].seq,deviceName,name);
- if(device==NULL){
- LOGE("outofmemory");
- return-1;
- }
- device->fd=fd;
同时,这个设备文件还会保存在数组mFDs中:
- mFDs[mFDCount].fd=fd;
- mFDs[mFDCount].events=POLLIN;
- mFDs[mFDCount].revents=0;
- //Figureoutthekindsofeventsthedevicereports.
- uint8_tkey_bitmask[sizeof_bit_array(KEY_MAX+1)];
- memset(key_bitmask,0,sizeof(key_bitmask));
- LOGV("Gettingkeys...");
- if(ioctl(fd,EVIOCGBIT(EV_KEY,sizeof(key_bitmask)),key_bitmask)>=0){
- //Seeifthisisakeyboard.Ignoreeverythinginthebuttonrangeexceptfor
- //gamepadswhicharealsoconsideredkeyboards.
- if(containsNonZeroByte(key_bitmask,0,sizeof_bit_array(BTN_MISC))
- ||containsNonZeroByte(key_bitmask,sizeof_bit_array(BTN_GAMEPAD),
- sizeof_bit_array(BTN_DIGI))
- ||containsNonZeroByte(key_bitmask,sizeof_bit_array(KEY_OK),
- sizeof_bit_array(KEY_MAX+1))){
- device->classes|=INPUT_DEVICE_CLASS_KEYBOARD;
- device->keyBitmask=newuint8_t[sizeof(key_bitmask)];
- if(device->keyBitmask!=NULL){
- memcpy(device->keyBitmask,key_bitmask,sizeof(key_bitmask));
- }else{
- deletedevice;
- LOGE("outofmemoryallocatingkeybitmask");
- return-1;
- }
- }
- }
如果是键盘设备,初始化工作还未完成,还要继续设置键盘的布局等信息:
- if((device->classes&INPUT_DEVICE_CLASS_KEYBOARD)!=0){
- chartmpfn[sizeof(name)];
- charkeylayoutFilename[300];
- //amoredescriptivename
- device->name=name;
- //replaceallthespaceswithunderscores
- strcpy(tmpfn,name);
- for(char*p=strchr(tmpfn,'');p&&*p;p=strchr(tmpfn,''))
- *p='_';
- //findthe.klfileweneedforthisdevice
- constchar*root=getenv("ANDROID_ROOT");
- snprintf(keylayoutFilename,sizeof(keylayoutFilename),
- "%s/usr/keylayout/%s.kl",root,tmpfn);
- booldefaultKeymap=false;
- if(access(keylayoutFilename,R_OK)){
- snprintf(keylayoutFilename,sizeof(keylayoutFilename),
- "%s/usr/keylayout/%s",root,"qwerty.kl");
- defaultKeymap=true;
- }
- status_tstatus=device->layoutMap->load(keylayoutFilename);
- if(status){
- LOGE("Error%dloadingkeylayout.",status);
- }
- //telltheworldaboutthedevname(thedescriptivename)
- if(!mHaveFirstKeyboard&&!defaultKeymap&&strstr(name,"-keypad")){
- //thebuilt-inkeyboardhasawell-knowndeviceIDof0,
- //thisdevicebetternotgoaway.
- mHaveFirstKeyboard=true;
- mFirstKeyboardId=device->id;
- property_set("hw.keyboards.0.devname",name);
- }else{
- //ensuremFirstKeyboardIdissetto-something-.
- if(mFirstKeyboardId==0){
- mFirstKeyboardId=device->id;
- }
- }
- charpropName[100];
- sprintf(propName,"hw.keyboards.%u.devname",device->id);
- property_set(propName,name);
- //'Q'keysupport=cheaptestofwhetherthisisanalpha-capablekbd
- if(hasKeycodeLocked(device,AKEYCODE_Q)){
- device->classes|=INPUT_DEVICE_CLASS_ALPHAKEY;
- }
- //SeeifthisdevicehasaDPAD.
- if(hasKeycodeLocked(device,AKEYCODE_DPAD_UP)&&
- hasKeycodeLocked(device,AKEYCODE_DPAD_DOWN)&&
- hasKeycodeLocked(device,AKEYCODE_DPAD_LEFT)&&
- hasKeycodeLocked(device,AKEYCODE_DPAD_RIGHT)&&
- hasKeycodeLocked(device,AKEYCODE_DPAD_CENTER)){
- device->classes|=INPUT_DEVICE_CLASS_DPAD;
- }
- //Seeifthisdevicehasagamepad.
- for(size_ti=0;i<sizeof(GAMEPAD_KEYCODES)/sizeof(GAMEPAD_KEYCODES[0]);i++){
- if(hasKeycodeLocked(device,GAMEPAD_KEYCODES[i])){
- device->classes|=INPUT_DEVICE_CLASS_GAMEPAD;
- break;
- }
- }
- LOGI("Newkeyboard:device->id=0x%xdevname='%s'propName='%s'keylayout='%s'\n",
- device->id,name,propName,keylayoutFilename);
- }
回到Step 18中,我们继续分析EventHub.getEvent函数的实现。
在中间的for循环里面,首先会检查当前是否有输入设备被关闭,如果有,就返回一个设备移除的事件给调用方:
- //Reportanydevicesthathadlastbeenadded/removed.
- if(mClosingDevices!=NULL){
- device_t*device=mClosingDevices;
- LOGV("Reportingdeviceclosed:id=0x%x,name=%s\n",
- device->id,device->path.string());
- mClosingDevices=device->next;
- if(device->id==mFirstKeyboardId){
- outEvent->deviceId=0;
- }else{
- outEvent->deviceId=device->id;
- }
- outEvent->type=DEVICE_REMOVED;
- outEvent->when=systemTime(SYSTEM_TIME_MONOTONIC);
- deletedevice;
- mNeedToSendFinishedDeviceScan=true;
- returntrue;
- }
- if(mOpeningDevices!=NULL){
- device_t*device=mOpeningDevices;
- LOGV("Reportingdeviceopened:id=0x%x,name=%s\n",
- device->id,device->path.string());
- mOpeningDevices=device->next;
- if(device->id==mFirstKeyboardId){
- outEvent->deviceId=0;
- }else{
- outEvent->deviceId=device->id;
- }
- outEvent->type=DEVICE_ADDED;
- outEvent->when=systemTime(SYSTEM_TIME_MONOTONIC);
- mNeedToSendFinishedDeviceScan=true;
- returntrue;
- }
- if(mNeedToSendFinishedDeviceScan){
- mNeedToSendFinishedDeviceScan=false;
- outEvent->type=FINISHED_DEVICE_SCAN;
- outEvent->when=systemTime(SYSTEM_TIME_MONOTONIC);
- returntrue;
- }
- //Grabthenextinputevent.
- for(;;){
- //Consumebufferedinputevents,ifany.
- if(mInputBufferIndex<mInputBufferCount){
- conststructinput_event&iev=mInputBufferData[mInputBufferIndex++];
- constdevice_t*device=mDevices[mInputDeviceIndex];
- LOGV("%sgot:t0=%d,t1=%d,type=%d,code=%d,v=%d",device->path.string(),
- (int)iev.time.tv_sec,(int)iev.time.tv_usec,iev.type,iev.code,iev.value);
- if(device->id==mFirstKeyboardId){
- outEvent->deviceId=0;
- }else{
- outEvent->deviceId=device->id;
- }
- outEvent->type=iev.type;
- outEvent->scanCode=iev.code;
- if(iev.type==EV_KEY){
- status_terr=device->layoutMap->map(iev.code,
- &outEvent->keyCode,&outEvent->flags);
- LOGV("iev.code=%dkeyCode=%dflags=0x%08xerr=%d\n",
- iev.code,outEvent->keyCode,outEvent->flags,err);
- if(err!=0){
- outEvent->keyCode=AKEYCODE_UNKNOWN;
- outEvent->flags=0;
- }
- }else{
- outEvent->keyCode=iev.code;
- }
- outEvent->value=iev.value;
- //Useaneventtimestampinthesametimebaseas
- //java.lang.System.nanoTime()andandroid.os.SystemClock.uptimeMillis()
- //asexpectedbytherestofthesystem.
- outEvent->when=systemTime(SYSTEM_TIME_MONOTONIC);
- returntrue;
- }
- //Finishreadingalleventsfromdevicesidentifiedinpreviouspoll().
- //ThiscodeassumesthatmInputDeviceIndexisinitially0andthatthe
- //reventsmemberofpollfdisinitializedto0whenthedeviceisfirstadded.
- //SincemFDs[0]isusedforinotify,weprocessregulareventsstartingatindex1.
- mInputDeviceIndex+=1;
- if(mInputDeviceIndex>=mFDCount){
- break;
- }
- conststructpollfd&pfd=mFDs[mInputDeviceIndex];
- if(pfd.revents&POLLIN){
- int32_treadSize=read(pfd.fd,mInputBufferData,
- sizeof(structinput_event)*INPUT_BUFFER_SIZE);
- if(readSize<0){
- if(errno!=EAGAIN&&errno!=EINTR){
- LOGW("couldnotgetevent(errno=%d)",errno);
- }
- }elseif((readSize%sizeof(structinput_event))!=0){
- LOGE("couldnotgetevent(wrongsize:%d)",readSize);
- }else{
- mInputBufferCount=readSize/sizeof(structinput_event);
- mInputBufferIndex=0;
- }
- }
- }
- intpollResult=poll(mFDs,mFDCount,-1);
这里的mFDs包含了我们所要监控的输入设备的打开文件描述符,这是在前面的openPlatformInput函数中初始化的。
Step 22. poll
这是一个Linux系统的文件操作系统调用,它用来查询指定的文件列表是否有有可读写的,如果有,就马上返回,否则的话,就阻塞线程,并等待驱动程序唤醒,重新调用poll函数,或超时返回。在我们的这个场景中,就是要查询是否有键盘事件发生,如果有的话,就返回,否则的话,当前线程就睡眠等待键盘事件的发生了。
这样,InputManager的启动过程就分析完了,下面我们再分析应用程序注册键盘消息接收通道的过程。
2.应用程序注册键盘消息接收通道的过程分析
InputManager启动以后,就开始负责监控键盘输入事件了。当InputManager监控到键盘输入事件时,它应该把这个键盘事件分发给谁呢?当然是要把这个键盘消息分发给当前激活的Activity窗口了,不过,当前激活的Activity窗口还需要主动注册一个键盘消息接收通道到InputManager中去,InputManager才能把这个键盘消息分发给它处理。那么,当前被激活的Activity窗口又是什么时候去注册这个键盘消息接收通道的呢?在前面一篇文章Android应用程序启动过程源代码分析中,我们分析Android应用程序的启动过程时,在Step 33中分析到ActivityThread类的handleLaunchActivity函数中,我们曾经说过,当函数handleLaunchActivity调用performLaunchActivity函数来加载这个完毕应用程序的默认Activity后,再次回到handleLaunchActivity函数时,会调用handleResumeActivity函数来使这个Activity进入Resumed状态。在调用handleResumeActivity函数的过程中,ActivityThread会通过android.view.WindowManagerImpl类为该Activity创建一个ViewRoot实例,并且会通过调用ViewRoot类的setView成员函数把与该Activity关联的View设置到这个ViewRoot中去,而Activity正是通过ViewRoot类的setView成员函数来注册键盘消息接收通道的。
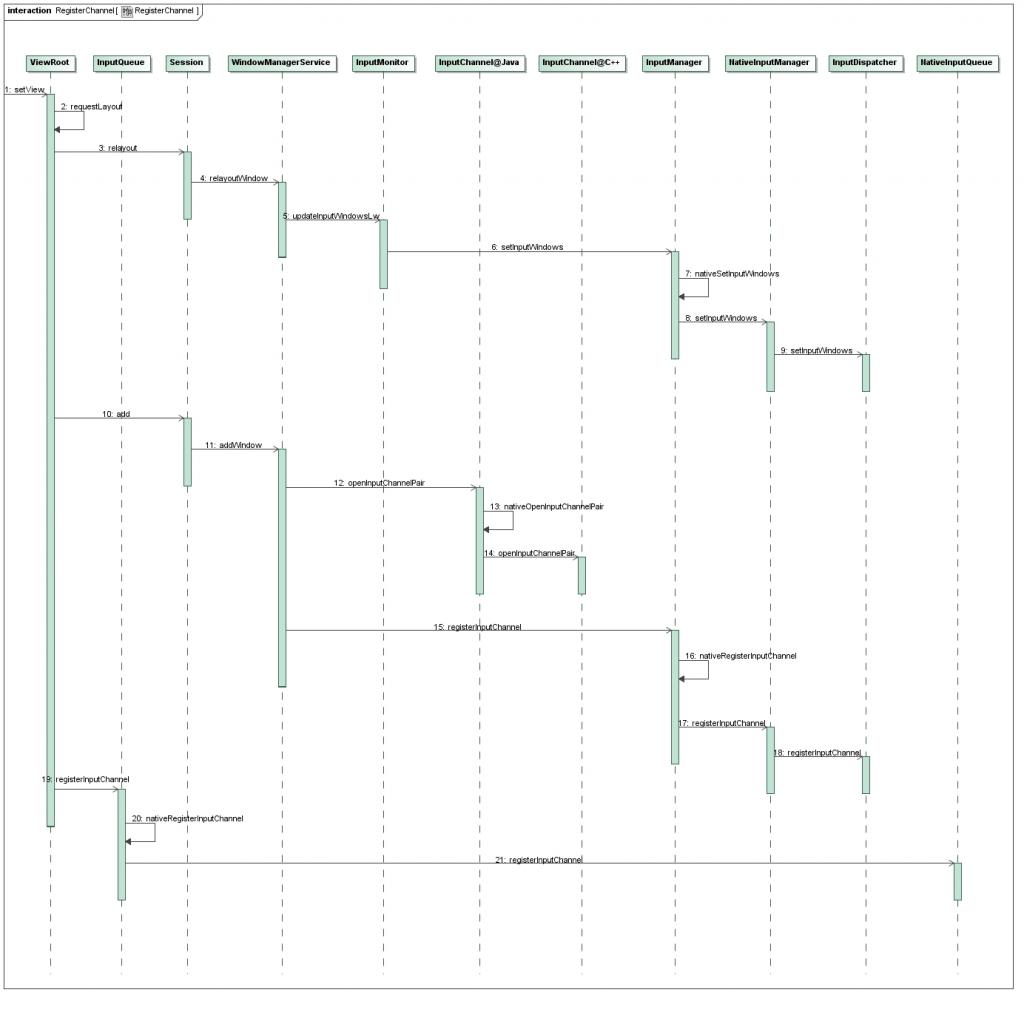
有了这些背影知识后,接下来,我们就可以从ViewRoot.setView函数开始分析应用程序注册键盘消息接收通道的过程了。首先看一下这个注册过程的序列图,然后再详细分析每一个步骤:
Step 1. ViewRoot.setView
这个函数定义在frameworks/base/core/java/android/view/ViewRoot.java文件中:
- publicfinalclassViewRootextendsHandlerimplementsViewParent,
- View.AttachInfo.Callbacks{
- ......
- publicvoidsetView(Viewview,WindowManager.LayoutParamsattrs,
- ViewpanelParentView){
- ......
- synchronized(this){
- if(mView==null){
- ......
- //Schedulethefirstlayout-before-addingtothewindow
- //manager,tomakesurewedotherelayoutbeforereceiving
- //anyothereventsfromthesystem.
- requestLayout();
- mInputChannel=newInputChannel();
- try{
- res=sWindowSession.add(mWindow,mWindowAttributes,
- getHostVisibility(),mAttachInfo.mContentInsets,
- mInputChannel);
- }catch(RemoteExceptione){
- ......
- }finally{
- ......
- }
- ......
- if(viewinstanceofRootViewSurfaceTaker){
- mInputQueueCallback=
- ((RootViewSurfaceTaker)view).willYouTakeTheInputQueue();
- }
- if(mInputQueueCallback!=null){
- mInputQueue=newInputQueue(mInputChannel);
- mInputQueueCallback.onInputQueueCreated(mInputQueue);
- }else{
- InputQueue.registerInputChannel(mInputChannel,mInputHandler,
- Looper.myQueue());
- }
- ......
- }
- }
- }
- }
这个函数中与注册键盘消息接收通道(InputChannel)相关的逻辑主要有三处,一是调用requestLayout函数来通知InputManager,这个Activity窗口是当前被激活的窗口,二是调用sWindowSession(WindowManagerService内部类Session的远程接口)的add成员函数来把键盘消息接收通道的一端注册在InputManager中,三是调用InputQueue的registerInputChannel成员函数来把键盘消息接收通道的另一端注册在本应用程序的消息循环(Looper)中。这样,当InputManager监控到有键盘消息时,就会先找到当前被激活的窗口,然后找到其在InputManager中对应的键盘消息接收通道,通过这个通道在InputManager中的一端来通知在应用程序消息循环中的另一端,就把键盘消息分发给当前激活的Activity窗口了。
在接下来的内容中,我们首先描述requestLayout函数是如何告诉InputManager当前的Activity窗口便是激活窗口的,接着再回过头来分析应用程序是如何把键盘消息接收通道的一端注册到InputManager中去的,最后分析应用程序是如何键盘消息接收通道的另一端注册到本应用程序的消息循环中去了。
Step 2.ViewRoot.requestLayout
这个函数定义在frameworks/base/core/java/android/view/ViewRoot.java文件中:
- publicfinalclassViewRootextendsHandlerimplementsViewParent,
- View.AttachInfo.Callbacks{
- ......
- publicvoidrequestLayout(){
- ......
- mLayoutRequested=true;
- scheduleTraversals();
- }
- ......
- }
Step 3.WindowManagerService.Session.relayout
这个函数定义在frameworks/base/services/java/com/android/server/WindowManagerService.java文件中:
- publicclassWindowManagerServiceextendsIWindowManager.Stub
- implementsWatchdog.Monitor{
- ......
- privatefinalclassSessionextendsIWindowSession.Stub
- implementsIBinder.DeathRecipient{
- ......
- publicintrelayout(IWindowwindow,WindowManager.LayoutParamsattrs,
- intrequestedWidth,intrequestedHeight,intviewFlags,
- booleaninsetsPending,RectoutFrame,RectoutContentInsets,
- RectoutVisibleInsets,ConfigurationoutConfig,SurfaceoutSurface){
- //Log.d(TAG,">>>>>>ENTEREDrelayoutfrom"+Binder.getCallingPid());
- intres=relayoutWindow(this,window,attrs,
- requestedWidth,requestedHeight,viewFlags,insetsPending,
- outFrame,outContentInsets,outVisibleInsets,outConfig,outSurface);
- //Log.d(TAG,"<<<<<<EXITINGrelayoutto"+Binder.getCallingPid());
- returnres;
- }
- ......
- }
- ......
- }
这个函数只是简单地调用WindowManagerService的成员函数relayoutWIndow来进一步处理。
Step 4.WindowManagerService.relayoutWIndow
这个函数定义在frameworks/base/services/java/com/android/server/WindowManagerService.java文件中:
- publicclassWindowManagerServiceextendsIWindowManager.Stub
- implementsWatchdog.Monitor{
- ......
- publicintrelayoutWindow(Sessionsession,IWindowclient,
- WindowManager.LayoutParamsattrs,intrequestedWidth,
- intrequestedHeight,intviewVisibility,booleaninsetsPending,
- RectoutFrame,RectoutContentInsets,RectoutVisibleInsets,
- ConfigurationoutConfig,SurfaceoutSurface){
- ......
- synchronized(mWindowMap){
- ......
- mInputMonitor.updateInputWindowsLw();
- }
- ......
- }
- ......
- }
Step 5.InputMonitor.updateInputWindowsLw
这个函数定义在frameworks/base/services/java/com/android/server/WindowManagerService.java文件中:
- publicclassWindowManagerServiceextendsIWindowManager.Stub
- implementsWatchdog.Monitor{
- ......
- finalclassInputMonitor{
- ......
- /*Updatesthecachedwindowinformationprovidedtotheinputdispatcher.*/
- publicvoidupdateInputWindowsLw(){
- //Populatetheinputwindowlistwithinformationaboutallofthewindowsthat
- //couldpotentiallyreceiveinput.
- //Asanoptimization,wecouldtrytoprunethelistofwindowsbutthisturns
- //outtobedifficultbecauseonlythenativecodeknowsforsurewhichwindow
- //currentlyhastouchfocus.
- finalArrayList<WindowState>windows=mWindows;
- finalintN=windows.size();
- for(inti=N-1;i>=0;i--){
- finalWindowStatechild=windows.get(i);
- if(child.mInputChannel==null||child.mRemoved){
- //Skipthiswindowbecauseitcannotpossiblyreceiveinput.
- continue;
- }
- ......
- //Addawindowtoourlistofinputwindows.
- finalInputWindowinputWindow=mTempInputWindows.add();
- ......
- }
- //Sendwindowstonativecode.
- mInputManager.setInputWindows(mTempInputWindows.toNullTerminatedArray());
- ......
- }
- ......
- }
- ......
- }
Step 6.InputManager.setInputWindows
这个函数定义在frameworks/base/services/java/com/android/server/InputManager.java文件中:
- publicclassInputManager{
- ......
- publicvoidsetInputWindows(InputWindow[]windows){
- nativeSetInputWindows(windows);
- }
- ......
- }
Step 7.InputManager.nativeSetInputWindows
这个函数定义在frameworks/base/services/jni/com_android_server_InputManager.cpp文件中:
- staticvoidandroid_server_InputManager_nativeSetInputWindows(JNIEnv*env,jclassclazz,
- jobjectArraywindowObjArray){
- if(checkInputManagerUnitialized(env)){
- return;
- }
- gNativeInputManager->setInputWindows(env,windowObjArray);
- }
Step 8.NativeInputManager.setInputWindows
这个函数定义在frameworks/base/services/jni/com_android_server_InputManager.cpp文件中:
- voidNativeInputManager::setInputWindows(JNIEnv*env,jobjectArraywindowObjArray){
- Vector<InputWindow>windows;
- jsizelength=env->GetArrayLength(windowObjArray);
- for(jsizei=0;i<length;i++){
- jobjectinputTargetObj=env->GetObjectArrayElement(windowObjArray,i);
- if(!inputTargetObj){
- break;//foundnullelementindicatingendofusedportionofthearray
- }
- windows.push();
- InputWindow&window=windows.editTop();
- boolvalid=populateWindow(env,inputTargetObj,window);
- if(!valid){
- windows.pop();
- }
- env->DeleteLocalRef(inputTargetObj);
- }
- mInputManager->getDispatcher()->setInputWindows(windows);
- }
Step 9. InputDispatcher.setInputWindows
这个函数定义在frameworks/base/libs/ui/InputDispatcher.cpp文件中:
- voidInputDispatcher::setInputWindows(constVector<InputWindow>&inputWindows){
- ......
- {//acquirelock
- AutoMutex_l(mLock);
- //Clearoldwindowpointers.
- sp<InputChannel>oldFocusedWindowChannel;
- if(mFocusedWindow){
- oldFocusedWindowChannel=mFocusedWindow->inputChannel;
- mFocusedWindow=NULL;
- }
- mWindows.clear();
- //Loopovernewwindowsandrebuildthenecessarywindowpointersfor
- //trackingfocusandtouch.
- mWindows.appendVector(inputWindows);
- size_tnumWindows=mWindows.size();
- for(size_ti=0;i<numWindows;i++){
- constInputWindow*window=&mWindows.itemAt(i);
- if(window->hasFocus){
- mFocusedWindow=window;
- break;
- }
- }
- ......
- }//releaselock
- ......
- }
这样,InputManager就把当前激活的Activity窗口保存在InputDispatcher中了,后面就可以把键盘消息分发给它来处理。
回到Step 1中的ViewRoot.setView函数中,接下来就调用下面语句来注册键盘消息接收通道的一端到InputManager中去:
- mInputChannel=newInputChannel();
- try{
- res=sWindowSession.add(mWindow,mWindowAttributes,
- getHostVisibility(),mAttachInfo.mContentInsets,
- mInputChannel);
- }catch(RemoteExceptione){
- ......
- }finally{
- ......
- }
Step 10.WindowManagerService.Session.add
这个函数定义在frameworks/base/services/java/com/android/server/WindowManagerService.java文件中:
- publicclassWindowManagerServiceextendsIWindowManager.Stub
- implementsWatchdog.Monitor{
- ......
- privatefinalclassSessionextendsIWindowSession.Stub
- implementsIBinder.DeathRecipient{
- ......
- publicintadd(IWindowwindow,WindowManager.LayoutParamsattrs,
- intviewVisibility,RectoutContentInsets,InputChanneloutInputChannel){
- returnaddWindow(this,window,attrs,viewVisibility,outContentInsets,
- outInputChannel);
- }
- ......
- }
- ......
- }
Step 11.WindowManagerService.addWindow
这个函数定义在frameworks/base/services/java/com/android/server/WindowManagerService.java文件中:
- publicclassWindowManagerServiceextendsIWindowManager.Stub
- implementsWatchdog.Monitor{
- ......
- publicintaddWindow(Sessionsession,IWindowclient,
- WindowManager.LayoutParamsattrs,intviewVisibility,
- RectoutContentInsets,InputChanneloutInputChannel){
- ......
- WindowStatewin=null;
- synchronized(mWindowMap){
- ......
- win=newWindowState(session,client,token,
- attachedWindow,attrs,viewVisibility);
- ......
- if(outInputChannel!=null){
- Stringname=win.makeInputChannelName();
- InputChannel[]inputChannels=InputChannel.openInputChannelPair(name);
- win.mInputChannel=inputChannels[0];
- inputChannels[1].transferToBinderOutParameter(outInputChannel);
- mInputManager.registerInputChannel(win.mInputChannel);
- }
- ......
- }
- ......
- }
- ......
- }
- inputChannels[1].transferToBinderOutParameter(outInputChannel);
创建输入通道之前,WindowManagerService会为当前Activity窗口创建一个WindowState对象win,用来记录这个Activity窗口的状态信息。当创建这对输入管道成功以后,也会把其中的一个管道保存在这个WindowState对象win的成员变量mInputChannel中,后面要注销这个管道的时候,就是从这个WindownState对象中取回这个管道的:
- win.mInputChannel=inputChannels[0];
接下来我们就看一下InputChannel.openInputChannelPair函数的实现。
Step 12.InputChannel.openInputChannelPair
这个函数定义在frameworks/base/core/java/android/view/InputChannel.java文件中:
- publicfinalclassInputChannelimplementsParcelable{
- ......
- /**
- *Createsanewinputchannelpair.Onechannelshouldbeprovidedtotheinput
- *dispatcherandtheothertotheapplication'sinputqueue.
- *@paramnameThedescriptive(non-unique)nameofthechannelpair.
- *@returnApairofinputchannels.Theyaresymmetricandindistinguishable.
- */
- publicstaticInputChannel[]openInputChannelPair(Stringname){
- ......
- returnnativeOpenInputChannelPair(name);
- }
- ......
- }
Step 13.InputChannel.nativeOpenInputChannelPair
这个函数定义在frameworks/base/core/jni/android_view_InputChannel.cpp文件中:
- staticjobjectArrayandroid_view_InputChannel_nativeOpenInputChannelPair(JNIEnv*env,
- jclassclazz,jstringnameObj){
- constchar*nameChars=env->GetStringUTFChars(nameObj,NULL);
- String8name(nameChars);
- env->ReleaseStringUTFChars(nameObj,nameChars);
- sp<InputChannel>serverChannel;
- sp<InputChannel>clientChannel;
- status_tresult=InputChannel::openInputChannelPair(name,serverChannel,clientChannel);
- if(result){
- LOGE("Couldnotopeninputchannelpair.status=%d",result);
- jniThrowRuntimeException(env,"Couldnotopeninputchannelpair.");
- returnNULL;
- }
- //TODOmorerobusterrorchecking
- jobjectserverChannelObj=android_view_InputChannel_createInputChannel(env,
- newNativeInputChannel(serverChannel));
- jobjectclientChannelObj=android_view_InputChannel_createInputChannel(env,
- newNativeInputChannel(clientChannel));
- jobjectArraychannelPair=env->NewObjectArray(2,gInputChannelClassInfo.clazz,NULL);
- env->SetObjectArrayElement(channelPair,0,serverChannelObj);
- env->SetObjectArrayElement(channelPair,1,clientChannelObj);
- returnchannelPair;
- }
Step 14.InputChannel.openInputChannelPair
这个函数定义在frameworks/base/libs/ui/InputTransport.cpp文件中:
- status_tInputChannel::openInputChannelPair(constString8&name,
- sp<InputChannel>&outServerChannel,sp<InputChannel>&outClientChannel){
- status_tresult;
- intserverAshmemFd=ashmem_create_region(name.string(),DEFAULT_MESSAGE_BUFFER_SIZE);
- if(serverAshmemFd<0){
- ......
- }else{
- result=ashmem_set_prot_region(serverAshmemFd,PROT_READ|PROT_WRITE);
- if(result<0){
- ......
- }else{
- //Dupthefiledescriptorbecausetheserverandclientinputchannelobjectsthat
- //arereturnedmayhavedifferentlifetimesbuttheysharethesamesharedmemoryregion.
- intclientAshmemFd;
- clientAshmemFd=dup(serverAshmemFd);
- if(clientAshmemFd<0){
- ......
- }else{
- intforward[2];
- if(pipe(forward)){
- ......
- }else{
- intreverse[2];
- if(pipe(reverse)){
- ......
- }else{
- String8serverChannelName=name;
- serverChannelName.append("(server)");
- outServerChannel=newInputChannel(serverChannelName,
- serverAshmemFd,reverse[0],forward[1]);
- String8clientChannelName=name;
- clientChannelName.append("(client)");
- outClientChannel=newInputChannel(clientChannelName,
- clientAshmemFd,forward[0],reverse[1]);
- returnOK;
- }
- ......
- }
- ......
- }
- }
- }
- ......
- }
- InputChannel::InputChannel(constString8&name,int32_tashmemFd,int32_treceivePipeFd,
- int32_tsendPipeFd):
- mName(name),mAshmemFd(ashmemFd),mReceivePipeFd(receivePipeFd),mSendPipeFd(sendPipeFd){
- ......
- }
具体来说,Server端和Client端的InputChannel分别是这样构成的:
Server Input Channel: ashmem - reverse(read) - forward(write)
Client Input Channel: ashmem - forward(read) - reverse(write)
前面我们在Android应用程序消息处理机制(Looper、Handler)分析一文中学习Android应用程序的消息处理机制时知道,管道可以用作进程间通信,其中一个进程在管道的读端等待新的内空可读,另一个进程在管道的写端写入新的内容以唤醒在管道读端等待的进程,这样就实现了进程间通信。在我们这个情景中,Client端可以在前向管道(forward pipe)的读端睡眠等待新的内容可读,而Server端可以通过向前向管道(forward
pipe)的写端写入新的内容来唤醒Client端,同样,把前向管道(forward pipe)换成反向管道(reverse pipe),也能实现Client端唤醒Server端。在后面我们分析InputDispatcher分发键盘消息时,会看到它们的用法。
有了这些背景知识后,相信上面的openInputChannelPair的代码就容易理解了,这里就不再详述了。
创建好了这两个输入通道后,回到Step 11中的WindowManagerService.addWindow函数中,一方面它把刚才创建的Client端的输入通道通过outInputChannel参数返回到应用程序中:
- inputChannels[1].transferToBinderOutParameter(outInputChannel);
另一方面,它还要把刚才创建的Server端的输入通道注册到InputManager中:
- mInputManager.registerInputChannel(win.mInputChannel);
这个函数定义在frameworks/base/services/java/com/android/server/InputManager.java文件中:
- publicclassInputManager{
- ......
- /**
- *Registersaninputchannelsothatitcanbeusedasaninputeventtarget.
- *@paraminputChannelTheinputchanneltoregister.
- */
- publicvoidregisterInputChannel(InputChannelinputChannel){
- if(inputChannel==null){
- thrownewIllegalArgumentException("inputChannelmustnotbenull.");
- }
- nativeRegisterInputChannel(inputChannel,false);
- }
- ......
- }
Step 16.InputManager.nativeRegisterInputChannel
这个函数定义在frameworks/base/services/jni/com_android_server_InputManager.cpp 文件中:
- staticvoidandroid_server_InputManager_nativeRegisterInputChannel(JNIEnv*env,jclassclazz,
- jobjectinputChannelObj,jbooleanmonitor){
- ......
- sp<InputChannel>inputChannel=android_view_InputChannel_getInputChannel(env,
- inputChannelObj);
- ......
- status_tstatus=gNativeInputManager->registerInputChannel(
- env,inputChannel,inputChannelObj,monitor);
- ......
- }
Step 17. NativeInputManager.registerInputChannel
这个函数定义在frameworks/base/services/jni/com_android_server_InputManager.cpp 文件中:
- status_tNativeInputManager::registerInputChannel(JNIEnv*env,
- constsp<InputChannel>&inputChannel,jobjectinputChannelObj,boolmonitor){
- ......
- status=mInputManager->getDispatcher()->registerInputChannel(inputChannel,monitor);
- ......
- }
Step 18.InputDispatcher.registerInputChannel
这个函数定义在frameworks/base/libs/ui/InputDispatcher.cpp文件中:
- status_tInputDispatcher::registerInputChannel(constsp<InputChannel>&inputChannel,boolmonitor){
- ......
- {//acquirelock
- AutoMutex_l(mLock);
- if(getConnectionIndexLocked(inputChannel)>=0){
- LOGW("Attemptedtoregisteralreadyregisteredinputchannel'%s'",
- inputChannel->getName().string());
- returnBAD_VALUE;
- }
- sp<Connection>connection=newConnection(inputChannel);
- status_tstatus=connection->initialize();
- if(status){
- LOGE("Failedtoinitializeinputpublisherforinputchannel'%s',status=%d",
- inputChannel->getName().string(),status);
- returnstatus;
- }
- int32_treceiveFd=inputChannel->getReceivePipeFd();
- mConnectionsByReceiveFd.add(receiveFd,connection);
- if(monitor){
- mMonitoringChannels.push(inputChannel);
- }
- mLooper->addFd(receiveFd,0,ALOOPER_EVENT_INPUT,handleReceiveCallback,this);
- runCommandsLockedInterruptible();
- }//releaselock
- returnOK;
- }
道的读端描述符。回忆一下Step 14中的InputChannel.openInputChannelPair函数,我们创建了一个Server端的InputChannel,就是对应这里的inputChannel了,这个inputChannel的Receive Pipe Fd就是我们前面说的反向管道的读端描述符了。有了这个Receive Pipe Fd后,就以它作为Key值来把前面创建的Connection对象保存在InputDispatcher中,这样就基本完成键盘消息接收通道的注册了。但是,注册的工作还未完成,最后,还要把这个Receive Pipe Fd添加到InputDispatcher的成员变量mLooper中去,这里的成员变量mLooper的类型为Looper,我们在前面介绍InputManager的启动过程的Step 15中已经见过了,这里就不再详述了,不过这里仍然值得介绍一下它的addFd函数。
在前面一篇文章Android应用程序消息处理机制(Looper、Handler)分析中,我们在介绍到Android应用程序的消息循环一节时,曾经说过,在Looper类内部,会创建一个管道,然后Looper会睡眠在这个管道的读端,等待另外一个线程来往这个管道的写端写入新的内容,从而唤醒等待在这个管道读端的线程,除此之外,Looper还可以同时睡眠等待在其它的文件描述符上,因为它是通过Linux系统的epoll机制来批量等待指定的文件有新的内容可读的。这些其它的文件描述符就是通过Looper类的addFd成函数添加进去的了,在添加的时候,还可以指定回调函数,即当这个文件描述符所指向的文件有新的内容可读时,Looper就会调用这个hanldeReceiveCallback函数,有兴趣的读者可以自己研究一下Looper类的addFd函数的实现,它位于frameworks/base/libs/utils/Looper.cpp文件中。
分析到这里,Server端的InputChannel就注册完成了。回忆一下前面介绍InputManager启动过程的Step 14,这时InputDispatcherThread同时睡眠在InputDispatcher的成员变量mLooper内部的管道的读端以及这里的Server端InputChannel里面的反向管道的读端上,mLooper内部的管道的读端等待键盘事件的发生而被唤醒,而Server端InputChannel里面的反向管道的读端等待Client端InputChannel里面的反向管道的写端被写入新的内容而被唤醒。
Server端的InputChannel注册完成后,回到Step 11中的WindowManagerService.addWindow函数,接下来就是把Client端的InputChannel转换成addWindow的参数outInputChannel中,然后返回到Step 1中的ViewRoot.setView函数中,继续执行Client端的InputChannel的注册过程,即为应用程序这一侧注册键盘消息接收通道:
- if(viewinstanceofRootViewSurfaceTaker){
- mInputQueueCallback=
- ((RootViewSurfaceTaker)view).willYouTakeTheInputQueue();
- }
- if(mInputQueueCallback!=null){
- mInputQueue=newInputQueue(mInputChannel);
- mInputQueueCallback.onInputQueueCreated(mInputQueue);
- }else{
- InputQueue.registerInputChannel(mInputChannel,mInputHandler,
- Looper.myQueue());
- }
这里的变量view一般不为RootViewSurfaceTaker的实例,因此,最后会执行下面语句:
- InputQueue.registerInputChannel(mInputChannel,mInputHandler,
- Looper.myQueue());
Step 19. InputQueue.registerInputChannel
这个函数定义在frameworks/base/core/java/android/view/InputQueue.java文件中:
- publicfinalclassInputQueue{
- ......
- publicstaticvoidregisterInputChannel(InputChannelinputChannel,InputHandlerinputHandler,
- MessageQueuemessageQueue){
- ......
- synchronized(sLock){
- ......
- nativeRegisterInputChannel(inputChannel,inputHandler,messageQueue);
- }
- }
- ......
- }
Step 20.InputQueue.nativeRegisterInputChannel
这个函数定义在frameworks/base/core/jni/android_view_InputQueue.cpp文件中:
- staticvoidandroid_view_InputQueue_nativeRegisterInputChannel(JNIEnv*env,jclassclazz,
- jobjectinputChannelObj,jobjectinputHandlerObj,jobjectmessageQueueObj){
- status_tstatus=gNativeInputQueue.registerInputChannel(
- env,inputChannelObj,inputHandlerObj,messageQueueObj);
- ......
- }
Step 21. NativeInputQueue.registerInputChannel
这个函数定义在frameworks/base/core/jni/android_view_InputQueue.cpp文件中:
- status_tNativeInputQueue::registerInputChannel(JNIEnv*env,jobjectinputChannelObj,
- jobjectinputHandlerObj,jobjectmessageQueueObj){
- sp<InputChannel>inputChannel=android_view_InputChannel_getInputChannel(env,
- inputChannelObj);
- ......
- sp<Looper>looper=android_os_MessageQueue_getLooper(env,messageQueueObj);
- {//acquirelock
- AutoMutex_l(mLock);
- if(getConnectionIndex(inputChannel)>=0){
- LOGW("Attemptedtoregisteralreadyregisteredinputchannel'%s'",
- inputChannel->getName().string());
- returnBAD_VALUE;
- }
- uint16_tconnectionId=mNextConnectionId++;
- sp<Connection>connection=newConnection(connectionId,inputChannel,looper);
- status_tresult=connection->inputConsumer.initialize();
- if(result){
- LOGW("Failedtoinitializeinputconsumerforinputchannel'%s',status=%d",
- inputChannel->getName().string(),result);
- returnresult;
- }
- connection->inputHandlerObjGlobal=env->NewGlobalRef(inputHandlerObj);
- int32_treceiveFd=inputChannel->getReceivePipeFd();
- mConnectionsByReceiveFd.add(receiveFd,connection);
- looper->addFd(receiveFd,0,ALOOPER_EVENT_INPUT,handleReceiveCallback,this);
- }//releaselock
- ......
- returnOK;
- }
介绍到这里,应用程序注册键盘消息接收通道的过程就分析完成了。这个过程比较复杂,这里小结一下:
A. 即将会被激活的Activity窗口,会通知InputManager,它是当前激活的窗口,因此,一旦发生键盘事件的时候,InputManager就把这个键盘事件抛给这个Activity处理;
B. 应用程序会为这个Activity窗口和InputManager之间创建一个键盘消息接收通道,这个通道的一端由一个Server端的InputChannel构成,另一端由Client端的InputChannel构成,Server端的InputChannel注册在由InputManager所管理的InputDispatcher中,而Client端的InputChannel注册在由应用程序主线程的消息循环对象Looper中;
C. 注册在InputDispatcher中的InputChannel由一个反向管道的读端和一个前向管道的写端组成,而注册在应用程序主线程的消息循环对象Looper中的InputChannel由这个前向管道的读端和反向管道的写端组成,这种交叉结构使得当有键盘事件发生时,InputDispatcher可以把这个事件通知给应用程序。
应用程序注册好键盘消息接收通道后,接下来就开始分析InputManager分发键盘消息给应用程序的过程了。
3.InputManager分发键盘消息给应用程序的过程分析
在分析InputManager分发键盘消息给应用程序的过程之前,我们先假设现在没有键盘事件发生,因此,InputManager中的InputReader正在睡眠等待键盘事件的发生,而InputManager中的InputDispatcher正在等待InputReader从睡眠中醒过来并且唤醒它,而应用程序也正在消息循环中等待InputDispatcher从睡眠中醒过来并且唤醒它。这时候,用户按下键盘中的一个键,于是,一系列唤醒的事件就依次发生了,一直到应用程序中正在显示的Activity得到通知,有键盘事件发生了。我们先来看这个过程的序列图,然后再详细分析每一个步骤:

Step 1. InputReader.pollOnce
Step 2. EventHub.getEvent
这两个函数分别定义在frameworks/base/libs/ui/InputReader.cpp和frameworks/base/libs/ui/EventHub.cpp文件中,前面我们在分析InputManager的启动过程的Step 17和Step 18时,已经看到过这两个函数了。InputReaderThread线程会不民地循环调用InputReader.pollOnce函数来读入键盘事件,而实际的键盘事件读入操作是由EventHub.getEvent函数来进行的。如果当前没有键盘事件发生,InputReaderThread线程就会睡眠在EventHub.getEvent函数上,而当键盘事件发生后,就会把这个事件封装成一个RawEvent对象,然后返回到pollOnce函数中,执行process函数进一步处理:
- voidInputReader::loopOnce(){
- RawEventrawEvent;
- mEventHub->getEvent(&rawEvent);
- ......
- process(&rawEvent);
- }
这个函数定义在frameworks/base/libs/ui/InputReader.cpp文件中:
- voidInputReader::process(constRawEvent*rawEvent){
- switch(rawEvent->type){
- caseEventHubInterface::DEVICE_ADDED:
- addDevice(rawEvent->deviceId);
- break;
- caseEventHubInterface::DEVICE_REMOVED:
- removeDevice(rawEvent->deviceId);
- break;
- caseEventHubInterface::FINISHED_DEVICE_SCAN:
- handleConfigurationChanged(rawEvent->when);
- break;
- default:
- consumeEvent(rawEvent);
- break;
- }
- }
当键盘事件发生时,rawEvent->type的值为EV_KEY,这是一个宏定义,具体可以参考bionic/libc/kernel/common/linux/input.h文件:
- #defineEV_KEY0x01
Step 4.InputReader.consumeEvent
这个函数定义在frameworks/base/libs/ui/InputReader.cpp文件中:
- voidInputReader::consumeEvent(constRawEvent*rawEvent){
- int32_tdeviceId=rawEvent->deviceId;
- {//acquiredeviceregistryreaderlock
- RWLock::AutoRLock_rl(mDeviceRegistryLock);
- ssize_tdeviceIndex=mDevices.indexOfKey(deviceId);
- if(deviceIndex<0){
- LOGW("DiscardingeventforunknowndeviceId%d.",deviceId);
- return;
- }
- InputDevice*device=mDevices.valueAt(deviceIndex);
- if(device->isIgnored()){
- //LOGD("DiscardingeventforignoreddeviceId%d.",deviceId);
- return;
- }
- device->process(rawEvent);
- }//releasedeviceregistryreaderlock
- }
Step 5. InputDevice.process
这个函数定义在frameworks/base/libs/ui/InputReader.cpp文件中:
- voidInputDevice::process(constRawEvent*rawEvent){
- size_tnumMappers=mMappers.size();
- for(size_ti=0;i<numMappers;i++){
- InputMapper*mapper=mMappers[i];
- mapper->process(rawEvent);
- }
- }
Step 6.KeyboardInputMapper.process
这个函数定义在frameworks/base/libs/ui/InputReader.cpp文件中:
- voidKeyboardInputMapper::process(constRawEvent*rawEvent){
- switch(rawEvent->type){
- caseEV_KEY:{
- int32_tscanCode=rawEvent->scanCode;
- if(isKeyboardOrGamepadKey(scanCode)){
- processKey(rawEvent->when,rawEvent->value!=0,rawEvent->keyCode,scanCode,
- rawEvent->flags);
- }
- break;
- }
- }
- }
Step 7.KeyboardInputMapper.processKey
这个函数定义在frameworks/base/libs/ui/InputReader.cpp文件中:
- voidKeyboardInputMapper::processKey(nsecs_twhen,booldown,int32_tkeyCode,
- int32_tscanCode,uint32_tpolicyFlags){
- int32_tnewMetaState;
- nsecs_tdownTime;
- boolmetaStateChanged=false;
- {//acquirelock
- AutoMutex_l(mLock);
- if(down){
- //Rotatekeycodesaccordingtoorientationifneeded.
- //Note:getDisplayInfoisnon-reentrantsowecancontinueholdingthelock.
- if(mAssociatedDisplayId>=0){
- int32_torientation;
- if(!getPolicy()->getDisplayInfo(mAssociatedDisplayId,NULL,NULL,&orientation)){
- return;
- }
- keyCode=rotateKeyCode(keyCode,orientation);
- }
- //Addkeydown.
- ssize_tkeyDownIndex=findKeyDownLocked(scanCode);
- if(keyDownIndex>=0){
- //keyrepeat,besuretousesamekeycodeasbeforeincaseofrotation
- keyCode=mLocked.keyDowns.itemAt(keyDownIndex).keyCode;
- }else{
- //keydown
- if((policyFlags&POLICY_FLAG_VIRTUAL)
- &&mContext->shouldDropVirtualKey(when,getDevice(),keyCode,scanCode)){
- return;
- }
- mLocked.keyDowns.push();
- KeyDown&keyDown=mLocked.keyDowns.editTop();
- keyDown.keyCode=keyCode;
- keyDown.scanCode=scanCode;
- }
- mLocked.downTime=when;
- }else{
- //Removekeydown.
- ssize_tkeyDownIndex=findKeyDownLocked(scanCode);
- if(keyDownIndex>=0){
- //keyup,besuretousesamekeycodeasbeforeincaseofrotation
- keyCode=mLocked.keyDowns.itemAt(keyDownIndex).keyCode;
- mLocked.keyDowns.removeAt(size_t(keyDownIndex));
- }else{
- //keywasnotactuallydown
- LOGI("Droppingkeyupfromdevice%sbecausethekeywasnotdown."
- "keyCode=%d,scanCode=%d",
- getDeviceName().string(),keyCode,scanCode);
- return;
- }
- }
- int32_toldMetaState=mLocked.metaState;
- newMetaState=updateMetaState(keyCode,down,oldMetaState);
- if(oldMetaState!=newMetaState){
- mLocked.metaState=newMetaState;
- metaStateChanged=true;
- }
- downTime=mLocked.downTime;
- }//releaselock
- if(metaStateChanged){
- getContext()->updateGlobalMetaState();
- }
- getDispatcher()->notifyKey(when,getDeviceId(),AINPUT_SOURCE_KEYBOARD,policyFlags,
- down?AKEY_EVENT_ACTION_DOWN:AKEY_EVENT_ACTION_UP,
- AKEY_EVENT_FLAG_FROM_SYSTEM,keyCode,scanCode,newMetaState,downTime);
- }
- //Rotatekeycodesaccordingtoorientationifneeded.
- //Note:getDisplayInfoisnon-reentrantsowecancontinueholdingthelock.
- if(mAssociatedDisplayId>=0){
- int32_torientation;
- if(!getPolicy()->getDisplayInfo(mAssociatedDisplayId,NULL,NULL,&orientation)){
- return;
- }
- keyCode=rotateKeyCode(keyCode,orientation);
- }
- //Addkeydown.
- ssize_tkeyDownIndex=findKeyDownLocked(scanCode);
- if(keyDownIndex>=0){
- //keyrepeat,besuretousesamekeycodeasbeforeincaseofrotation
- keyCode=mLocked.keyDowns.itemAt(keyDownIndex).keyCode;
- }else{
- //keydown
- if((policyFlags&POLICY_FLAG_VIRTUAL)
- &&mContext->shouldDropVirtualKey(when,getDevice(),keyCode,scanCode)){
- return;
- }
- mLocked.keyDowns.push();
- KeyDown&keyDown=mLocked.keyDowns.editTop();
- keyDown.keyCode=keyCode;
- keyDown.scanCode=scanCode;
- }
如果是松开键盘上的某个键,就把它从mLocked.keyDowns里面删除:
- //Removekeydown.
- ssize_tkeyDownIndex=findKeyDownLocked(scanCode);
- if(keyDownIndex>=0){
- //keyup,besuretousesamekeycodeasbeforeincaseofrotation
- keyCode=mLocked.keyDowns.itemAt(keyDownIndex).keyCode;
- mLocked.keyDowns.removeAt(size_t(keyDownIndex));
- }else{
- //keywasnotactuallydown
- LOGI("Droppingkeyupfromdevice%sbecausethekeywasnotdown."
- "keyCode=%d,scanCode=%d",
- getDeviceName().string(),keyCode,scanCode);
- return;
- }
最后,KeyboardInputMappger函数通知InputDispatcher,有键盘事件发生了:
- getDispatcher()->notifyKey(when,getDeviceId(),AINPUT_SOURCE_KEYBOARD,policyFlags,
- down?AKEY_EVENT_ACTION_DOWN:AKEY_EVENT_ACTION_UP,
- AKEY_EVENT_FLAG_FROM_SYSTEM,keyCode,scanCode,newMetaState,downTime);
这个函数定义在frameworks/base/libs/ui/InputDispatcher.cpp文件中:
- voidInputDispatcher::notifyKey(nsecs_teventTime,int32_tdeviceId,int32_tsource,
- uint32_tpolicyFlags,int32_taction,int32_tflags,
- int32_tkeyCode,int32_tscanCode,int32_tmetaState,nsecs_tdownTime){
- ......
- if(!validateKeyEvent(action)){
- return;
- }
- /*Accordingtohttp://source.android.com/porting/keymaps_keyboard_input.html
- *Keydefinitions:KeydefinitionsfollowthesyntaxkeySCANCODEKEYCODE[FLAGS...],
- *whereSCANCODEisanumber,KEYCODEisdefinedinyourspecifickeylayoutfile
- *(android.keylayout.xxx),andpotentialFLAGSaredefinedasfollows:
- *SHIFT:Whilepressed,theshiftkeymodifierisset
- *ALT:Whilepressed,thealtkeymodifierisset
- *CAPS:Whilepressed,thecapslockkeymodifierisset
- *SinceKeyEvent.javadoesn'tcheckifCaplockisONandwedon'thavea
- *modiferstateforcaplock,wewillnotsupportit.
- */
- if(policyFlags&POLICY_FLAG_ALT){
- metaState|=AMETA_ALT_ON|AMETA_ALT_LEFT_ON;
- }
- if(policyFlags&POLICY_FLAG_ALT_GR){
- metaState|=AMETA_ALT_ON|AMETA_ALT_RIGHT_ON;
- }
- if(policyFlags&POLICY_FLAG_SHIFT){
- metaState|=AMETA_SHIFT_ON|AMETA_SHIFT_LEFT_ON;
- }
- policyFlags|=POLICY_FLAG_TRUSTED;
- mPolicy->interceptKeyBeforeQueueing(eventTime,deviceId,action,/*byref*/flags,
- keyCode,scanCode,/*byref*/policyFlags);
- boolneedWake;
- {//acquirelock
- AutoMutex_l(mLock);
- int32_trepeatCount=0;
- KeyEntry*newEntry=mAllocator.obtainKeyEntry(eventTime,
- deviceId,source,policyFlags,action,flags,keyCode,scanCode,
- metaState,repeatCount,downTime);
- needWake=enqueueInboundEventLocked(newEntry);
- }//releaselock
- if(needWake){
- mLooper->wake();
- }
- }
- staticboolisValidKeyAction(int32_taction){
- switch(action){
- caseAKEY_EVENT_ACTION_DOWN:
- caseAKEY_EVENT_ACTION_UP:
- returntrue;
- default:
- returnfalse;
- }
- }
- staticboolvalidateKeyEvent(int32_taction){
- if(!isValidKeyAction(action)){
- LOGE("Keyeventhasinvalidactioncode0x%x",action);
- returnfalse;
- }
- returntrue;
- }
参数action检查通过后,还通过policyFlags参数来检查一下同时是否有ALT和SHIFT键被按下:
- if(policyFlags&POLICY_FLAG_ALT){
- metaState|=AMETA_ALT_ON|AMETA_ALT_LEFT_ON;
- }
- if(policyFlags&POLICY_FLAG_ALT_GR){
- metaState|=AMETA_ALT_ON|AMETA_ALT_RIGHT_ON;
- }
- if(policyFlags&POLICY_FLAG_SHIFT){
- metaState|=AMETA_SHIFT_ON|AMETA_SHIFT_LEFT_ON;
- }
- boolInputDispatcher::enqueueInboundEventLocked(EventEntry*entry){
- boolneedWake=mInboundQueue.isEmpty();
- mInboundQueue.enqueueAtTail(entry);
- switch(entry->type){
- caseEventEntry::TYPE_KEY:{
- KeyEntry*keyEntry=static_cast<KeyEntry*>(entry);
- if(isAppSwitchKeyEventLocked(keyEntry)){
- if(keyEntry->action==AKEY_EVENT_ACTION_DOWN){
- mAppSwitchSawKeyDown=true;
- }elseif(keyEntry->action==AKEY_EVENT_ACTION_UP){
- if(mAppSwitchSawKeyDown){
- <spanstyle="white-space:pre"></span>......
- mAppSwitchDueTime=keyEntry->eventTime+APP_SWITCH_TIMEOUT;
- mAppSwitchSawKeyDown=false;
- needWake=true;
- }
- }
- }
- break;
- }
- }
- returnneedWake;
- }
回到前面的notifyKey函数中,根据enqueueInboundEventLocked函数的返回值来决定是否要唤醒InputDispatccherThread线程:
- if(needWake){
- mLooper->wake();
- }
Step 9. Looper.wake
这个函数定义在frameworks/base/libs/utils/Looper.cpp文件中,在前面一篇文章Android应用程序消息处理机制(Looper、Handler)分析中,我们已经分析过这个函数了,这里不再详述,简单来说,它的作用就是用来唤醒睡眠在Looper对象内部的管道读端的线程,在我们的这个场景中,睡眠在Looper对象内部的管道读端的线程就是InputDispatccherThread线程了。
从上面InputManager启动过程的Step 15中,我们知道,此时InputDispatccherThread线程正在InputDispatcher类的dispatchOnceb函数中通过调用mLooper->loopOnce函数进入睡眠状态。当它被唤醒以后,它就会从InputDispatcher类的dispatchOnceb函数返回到InputDispatcherThread类的threadLoop函数,而InputDispatcherThread类的threadLoop函数是循环执行的,于是,它又会再次进入到InputDispatcher类的dispatchOnce函数来处理当前发生的键盘事件。
Step 10.InputDispatcher.dispatchOnce
这个函数定义在frameworks/base/libs/ui/InputDispatcher.cpp文件中:
- voidInputDispatcher::dispatchOnce(){
- nsecs_tkeyRepeatTimeout=mPolicy->getKeyRepeatTimeout();
- nsecs_tkeyRepeatDelay=mPolicy->getKeyRepeatDelay();
- nsecs_tnextWakeupTime=LONG_LONG_MAX;
- {//acquirelock
- AutoMutex_l(mLock);
- dispatchOnceInnerLocked(keyRepeatTimeout,keyRepeatDelay,&nextWakeupTime);
- ......
- }//releaselock
- ......
- }
Step 11.InputDispatcher.dispatchOnceInnerLocked
这个函数定义在frameworks/base/libs/ui/InputDispatcher.cpp文件中:
- voidInputDispatcher::dispatchOnceInnerLocked(nsecs_tkeyRepeatTimeout,
- nsecs_tkeyRepeatDelay,nsecs_t*nextWakeupTime){
- ......
- //Readytostartanewevent.
- //Ifwedon'talreadyhaveapendingevent,gograbone.
- if(!mPendingEvent){
- if(mInboundQueue.isEmpty()){
- ......
- }else{
- //Inboundqueuehasatleastoneentry.
- EventEntry*entry=mInboundQueue.headSentinel.next;
- ......
- mInboundQueue.dequeue(entry);
- mPendingEvent=entry;
- }
- ......
- }
- ......
- switch(mPendingEvent->type){
- ......
- caseEventEntry::TYPE_KEY:{
- KeyEntry*typedEntry=static_cast<KeyEntry*>(mPendingEvent);
- ......
- done=dispatchKeyLocked(currentTime,typedEntry,keyRepeatTimeout,
- &dropReason,nextWakeupTime);
- break;
- }
- ......
- }
- ......
- }
我们忽略了这个函数的次要逻辑,主要关注键盘事件的主要处理流程。首先,如果前面发生的键盘事件都已经处理完毕,那么这里的mPendingEvent就为NULL,又因为前面我们把刚刚发生的键盘事件加入了mInboundQueue队列,因此,这里mInboundQueue不为NULL,于是,这里就把mInboundQueue队列中的键盘事件取出来,放在mPendingEvent变量中:
- mInboundQueue.dequeue(entry);
- mPendingEvent=entry;
Step 12.InputDispatcher.dispatchKeyLocked
这个函数定义在frameworks/base/libs/ui/InputDispatcher.cpp文件中:
- boolInputDispatcher::dispatchKeyLocked(
- nsecs_tcurrentTime,KeyEntry*entry,nsecs_tkeyRepeatTimeout,
- DropReason*dropReason,nsecs_t*nextWakeupTime){
- ......
- //Identifytargets.
- if(!mCurrentInputTargetsValid){
- int32_tinjectionResult=findFocusedWindowTargetsLocked(currentTime,
- entry,nextWakeupTime);
- ......
- }
- //Dispatchthekey.
- dispatchEventToCurrentInputTargetsLocked(currentTime,entry,false);
- returntrue;
- }
我们先来看一InputDispatcher是如何找到当前激活的Activity窗口的,然后再分析它把键盘事件分发给当前激活Activity窗口的过程。
Step 13.InputDispatcher.findFocusedWindowTargetsLocked
这个函数定义在frameworks/base/libs/ui/InputDispatcher.cpp文件中:
- int32_tInputDispatcher::findFocusedWindowTargetsLocked(nsecs_tcurrentTime,
- constEventEntry*entry,nsecs_t*nextWakeupTime){
- mCurrentInputTargets.clear();
- int32_tinjectionResult;
- //Ifthereisnocurrentlyfocusedwindowandnofocusedapplication
- //thendroptheevent.
- if(!mFocusedWindow){
- if(mFocusedApplication){
- ......
- injectionResult=handleTargetsNotReadyLocked(currentTime,entry,
- mFocusedApplication,NULL,nextWakeupTime);
- gotoUnresponsive;
- }
- ......
- injectionResult=INPUT_EVENT_INJECTION_FAILED;
- gotoFailed;
- }
- //Checkpermissions.
- if(!checkInjectionPermission(mFocusedWindow,entry->injectionState)){
- injectionResult=INPUT_EVENT_INJECTION_PERMISSION_DENIED;
- gotoFailed;
- }
- //Ifthecurrentlyfocusedwindowispausedthenkeepwaiting.
- if(mFocusedWindow->paused){
- ......
- injectionResult=handleTargetsNotReadyLocked(currentTime,entry,
- mFocusedApplication,mFocusedWindow,nextWakeupTime);
- gotoUnresponsive;
- }
- //Ifthecurrentlyfocusedwindowisstillworkingonpreviouseventsthenkeepwaiting.
- if(!isWindowFinishedWithPreviousInputLocked(mFocusedWindow)){
- ......
- injectionResult=handleTargetsNotReadyLocked(currentTime,entry,
- mFocusedApplication,mFocusedWindow,nextWakeupTime);
- gotoUnresponsive;
- }
- //Success!Outputtargets.
- injectionResult=INPUT_EVENT_INJECTION_SUCCEEDED;
- addWindowTargetLocked(mFocusedWindow,InputTarget::FLAG_FOREGROUND,BitSet32(0));
- ......
- returninjectionResult;
- }
第二个if语句检查权限问题,原来,这个键盘事件除了是由硬件触发的外,也可以由其它进程注入进来的,如果这个键盘事件是由其它进程注入进来的,那么entry->injectState就不为NULL,它里面包含了事件注册者的进程ID和用户ID,于是,这里就会调用checkInjectionPermission来检查这个事件注入者的进程ID和用户ID,看看它是否具有这个权限。这里我们不考虑这种情况,因此,这里的entry->injectState为NULL,于是,这个if语句的检查也通过了。
第三个if语句检查当前激活的Activity窗口是否是处于paused状态,如果是的话,也不用进一步处理了。一般情况下,当前激活的Activity窗口都是处于resumed状态的,于是,这个if语句的检查也通过了。
第四个if语句检查当前激活的Activity窗口是否还正在处理前一个键盘事件,如果是的话,那就要等待它处理完前一个键盘事件后再来处理新的键盘事件了。这里我们也假设当前激活的Activity窗口不是正在处理前面的键盘事件,因此,这个if语句的检查也通过了。
最后,就调用addWindowTargetLocked函数把当前激活的Activity窗口添加到InputDispatcher类的mCurrentInputTargets成员变量中去。
Step 14.InputDispatcher.addWindowTargetLocked
这个函数定义在frameworks/base/libs/ui/InputDispatcher.cpp文件中:
- voidInputDispatcher::addWindowTargetLocked(constInputWindow*window,int32_ttargetFlags,
- BitSet32pointerIds){
- mCurrentInputTargets.push();
- InputTarget&target=mCurrentInputTargets.editTop();
- target.inputChannel=window->inputChannel;
- target.flags=targetFlags;
- target.xOffset=-window->frameLeft;
- target.yOffset=-window->frameTop;
- target.pointerIds=pointerIds;
- }
回到Step 12中的dispatchKeyLocked函数,它接下来就调用dispatchEventToCurrentInputTargetsLocked来进一步处理了。
Step 15.InputDispatcher.dispatchEventToCurrentInputTargetsLocked
这个函数定义在frameworks/base/libs/ui/InputDispatcher.cpp文件中:
- voidInputDispatcher::dispatchEventToCurrentInputTargetsLocked(nsecs_tcurrentTime,
- EventEntry*eventEntry,boolresumeWithAppendedMotionSample){
- ......
- for(size_ti=0;i<mCurrentInputTargets.size();i++){
- constInputTarget&inputTarget=mCurrentInputTargets.itemAt(i);
- ssize_tconnectionIndex=getConnectionIndexLocked(inputTarget.inputChannel);
- if(connectionIndex>=0){
- sp<Connection>connection=mConnectionsByReceiveFd.valueAt(connectionIndex);
- prepareDispatchCycleLocked(currentTime,connection,eventEntry,&inputTarget,
- resumeWithAppendedMotionSample);
- }else{
- ......
- }
- }
前面我们在分析应用程序注册键盘消息接收通道的过程时,在Step 18中(InputDispatcher.registerInputChannel),把Server端的InputChannel封装成了一个Connection,然后以这个InputChannel中的Receive Pipe Fd作为键值把这个Connection对象保存在mConnectionsByReceiveFd中。这里,既然我们已经通过mCurrentInputTargets得到了表示当前需要接收键盘事件的Activity窗口的InputTarget对象,而且这个InputTarget对象的inputChannel就表示当初在InputDispatcher中注册的Server端InputChannel,因此,这里就可以把这个Connection对象取出来,最后调用prepareDispatchCycleLocked函数来进一步处理。
Step 16.InputDispatcher.prepareDispatchCycleLocked
这个函数定义在frameworks/base/libs/ui/InputDispatcher.cpp文件中:
- voidInputDispatcher::prepareDispatchCycleLocked(nsecs_tcurrentTime,
- constsp<Connection>&connection,EventEntry*eventEntry,constInputTarget*inputTarget,
- boolresumeWithAppendedMotionSample){
- ......
- //Resumethedispatchcyclewithafreshlyappendedmotionsample.
- //Firstwecheckthatthelastdispatchentryintheoutboundqueueisforthesame
- //motioneventtowhichweappendedthemotionsample.Ifwefindsuchadispatch
- //entry,andifitiscurrentlyinprogressthenwetrytostreamthenewsample.
- boolwasEmpty=connection->outboundQueue.isEmpty();
- if(!wasEmpty&&resumeWithAppendedMotionSample){
- ......
- return;
- }
- //Thisisanewevent.
- //Enqueueanewdispatchentryontotheoutboundqueueforthisconnection.
- DispatchEntry*dispatchEntry=mAllocator.obtainDispatchEntry(eventEntry,//incrementsref
- inputTarget->flags,inputTarget->xOffset,inputTarget->yOffset);
- ......
- //Enqueuethedispatchentry.
- connection->outboundQueue.enqueueAtTail(dispatchEntry);
- //Iftheoutboundqueuewaspreviouslyempty,startthedispatchcyclegoing.
- if(wasEmpty){
- ......
- startDispatchCycleLocked(currentTime,connection);
- }
- }
在开始处理键盘事件之前,这个函数会检查一下传进来的参数connection中的outboundQueue事件队列是否为空,如果不为空,就要看看当前要处理的事件和outboundQueue队列中的最后一个事件是不是同一个motion事件,如果是的话,并且从上面传进来的resumeWithAppendedMotionSample参数为true,这时候就要以流水线的方式来处理这些motion事件了。在我们这个情景中,要处理的是键盘事件,因此在上面Step 12中传进来的resumeWithAppendedMotionSample参数为false,因此,我们略过这种情况。
接下来,就会把当前的键盘事件封装成一个DispatchEntry对象,然后添加到connection对象的outboundQueue队列中去,表示当前键盘事件是一个待处理的键盘事件。
当connection中的outboundQueue事件队列不为空,即wasEmpty为false时,说明当前这个Activity窗口正在处键盘事件了,因此,就不需要调用startDispatchCycleLocked来启动Activity窗口来处理这个事件了,因为一旦这个Activity窗口正在处键盘事件,它就会一直处理下去,直到它里的connection对象的outboundQueue为空为止。当connection中的outboundQueue事件队列为空时,就需要调用startDispatchCycleLocked来通知这个Activity窗口来执行键盘事件处理的流程了。
Step 17.InputDispatcher.startDispatchCycleLocked
这个函数定义在frameworks/base/libs/ui/InputDispatcher.cpp文件中:
- voidInputDispatcher::startDispatchCycleLocked(nsecs_tcurrentTime,
- constsp<Connection>&connection){
- ......
- DispatchEntry*dispatchEntry=connection->outboundQueue.headSentinel.next;
- //Markthedispatchentryasinprogress.
- dispatchEntry->inProgress=true;
- //Updatetheconnection'sinputstate.
- EventEntry*eventEntry=dispatchEntry->eventEntry;
- ......
- //Publishtheevent.
- status_tstatus;
- switch(eventEntry->type){
- caseEventEntry::TYPE_KEY:{
- KeyEntry*keyEntry=static_cast<KeyEntry*>(eventEntry);
- //Applytargetflags.
- int32_taction=keyEntry->action;
- int32_tflags=keyEntry->flags;
- //Publishthekeyevent.
- status=connection->inputPublisher.publishKeyEvent(keyEntry->deviceId,keyEntry->source,
- action,flags,keyEntry->keyCode,keyEntry->scanCode,
- keyEntry->metaState,keyEntry->repeatCount,keyEntry->downTime,
- keyEntry->eventTime);
- ......
- break;
- }
- ......
- }
- //Sendthedispatchsignal.
- status=connection->inputPublisher.sendDispatchSignal();
- ......
- }
Step 18. InputPublisher.publishKeyEvent
这个函数定义在frameworks/base/libs/ui/InputTransport.cpp文件中:
- status_tInputPublisher::publishKeyEvent(
- int32_tdeviceId,
- int32_tsource,
- int32_taction,
- int32_tflags,
- int32_tkeyCode,
- int32_tscanCode,
- int32_tmetaState,
- int32_trepeatCount,
- nsecs_tdownTime,
- nsecs_teventTime){
- ......
- status_tresult=publishInputEvent(AINPUT_EVENT_TYPE_KEY,deviceId,source);
- if(result<0){
- returnresult;
- }
- mSharedMessage->key.action=action;
- mSharedMessage->key.flags=flags;
- mSharedMessage->key.keyCode=keyCode;
- mSharedMessage->key.scanCode=scanCode;
- mSharedMessage->key.metaState=metaState;
- mSharedMessage->key.repeatCount=repeatCount;
- mSharedMessage->key.downTime=downTime;
- mSharedMessage->key.eventTime=eventTime;
- returnOK;
- }
这个匿名共享内存是什么时候创建的呢?前面我们在分析应用程序注册键盘消息接收通道的过程时,在Step 18中(InputDispatcher.registerInputChannel),在把Server端的InputChannel封装成一个 Connection对象时,会调用它的initialize成员函数来执行一些初始化工作,就是在这个时候创建这个匿名共享内存的了:
- sp<Connection>connection=newConnection(inputChannel);
- status_tstatus=connection->initialize();
- status_tInputPublisher::initialize(){
- ......
- intashmemFd=mChannel->getAshmemFd();
- intresult=ashmem_get_size_region(ashmemFd);
- ......
- mAshmemSize=(size_t)result;
- mSharedMessage=static_cast<InputMessage*>(mmap(NULL,mAshmemSize,
- PROT_READ|PROT_WRITE,MAP_SHARED,ashmemFd,0));
- ......
- mPinned=true;
- mSharedMessage->consumed=false;
- returnreset();
- }
这个匿名共享内存mSharedMessage的作用是什么呢?原来,在InputChannel中,前向管道和反向管道的作用只是用来在Server端和Client端之间相互通知有事件发生了,但是具体是什么样的事件,还需要去读取这个匿名共享内存的内容才知道。前面我们在分析应用程序注册键盘消息接收通道的过程时,在Step 14中(InputChannel.openInputChannelPair)创建Server端和Client端的InputChannel对时,创建一个匿名共享内存,这个匿名共享内存有两个文件描述符同时指向它,其中一个放在Server端的InputChannel中,另外一个放在Client端的InputChannel中。这样,当InputDispatcher通过Server端的InputChannel的前向管道来通知Client端有键盘事件发生时,Client端只要通过它的InputChannel中的匿名共享内存文件描述符去读取匿名共享内存中的内容,就可以知道发生了什么事情了。有关匿名共享内存的相关知识,请参考Android系统匿名共享内存Ashmem(Anonymous Shared Memory)简要介绍和学习计划一文。
回到Step 17中,接下来就是调用InputPublisher的成员函数sendDispatchSignal来通知Activity窗口处理键盘事件了。
Step 19.InputPublishe.sendDispatchSignal
这个函数定义在frameworks/base/libs/ui/InputTransport.cpp文件中:
- status_tInputPublisher::sendDispatchSignal(){
- ......
- mWasDispatched=true;
- returnmChannel->sendSignal(INPUT_SIGNAL_DISPATCH);
- }
Step 20. InputChannel.sendSignal
这个函数定义在frameworks/base/libs/ui/InputTransport.cpp文件中:
- status_tInputChannel::sendSignal(charsignal){
- ssize_tnWrite;
- do{
- nWrite=::write(mSendPipeFd,&signal,1);
- }while(nWrite==-1&&errno==EINTR);
- if(nWrite==1){
- ......
- returnOK;
- }
- return-errno;
- }
在前面分析应用程序注册键盘消息接收通道过程的Step 21中,我们也说过,当应用程序的主线程因为这个InputChannel中的前向管道的写端唤醒时,NativeInputQueue的成员函数handleReceiveCallback就会被回调,因此,接下来,应用程序的主线程就会被唤醒,然后执行NativeInputQueue的成员函数handleReceiveCallback。
Step 21.NativeInputQueue.handleReceiveCallback
这个函数定义在frameworks/base/core/jni/android_view_InputQueue.cpp文件中:
- intNativeInputQueue::handleReceiveCallback(intreceiveFd,intevents,void*data){
- NativeInputQueue*q=static_cast<NativeInputQueue*>(data);
- JNIEnv*env=AndroidRuntime::getJNIEnv();
- sp<Connection>connection;
- InputEvent*inputEvent;
- jobjectinputHandlerObjLocal;
- jlongfinishedToken;
- {//acquirelock
- AutoMutex_l(q->mLock);
- ssize_tconnectionIndex=q->mConnectionsByReceiveFd.indexOfKey(receiveFd);
- ......
- connection=q->mConnectionsByReceiveFd.valueAt(connectionIndex);
- ......
- status_tstatus=connection->inputConsumer.receiveDispatchSignal();
- if(status){
- ......
- return0;//removethecallback
- }
- ......
- status=connection->inputConsumer.consume(&connection->inputEventFactory,&inputEvent);
- ......
- finishedToken=generateFinishedToken(receiveFd,connection->id,connection->messageSeqNum);
- inputHandlerObjLocal=env->NewLocalRef(connection->inputHandlerObjGlobal);
- }//releaselock
- ......
- int32_tinputEventType=inputEvent->getType();
- jobjectinputEventObj;
- jmethodIDdispatchMethodId;
- switch(inputEventType){
- caseAINPUT_EVENT_TYPE_KEY:
- ......
- inputEventObj=android_view_KeyEvent_fromNative(env,
- static_cast<KeyEvent*>(inputEvent));
- dispatchMethodId=gInputQueueClassInfo.dispatchKeyEvent;
- break;
- }
- ......
- }
- ......
- env->CallStaticVoidMethod(gInputQueueClassInfo.clazz,
- dispatchMethodId,inputHandlerObjLocal,inputEventObj,
- jlong(finishedToken));
- ......
- return1;
- }
在InputChannel内部中,分别有一个InputPublisher对象和一个InputConsumer对象,对于Server端的InputChannel来说,它使用的是InputPublisher对象,通过它进行键盘消息的分发,而对于Client端的InputChannel来说,它使用的是InputConsumer对象,通过它进行键盘消息的读取。
获得了这个InputConsumer对象后首先是调用它的receiveDispatchSignal来确认是否是接收到了键盘消息的通知,如果是的话,再调用它的consume函数来把键盘事件读取出来,最后,调用Java层的回调对象InputQueue的DispatchKeyEvent来处理这个键盘事件。下面,我们就依次来分析这些过程。
Step 22.InputConsumer.receiveDispatchSignal
这个函数定义在frameworks/base/libs/ui/InputTransport.cpp文件中:
- status_tInputConsumer::receiveDispatchSignal(){
- ......
- charsignal;
- status_tresult=mChannel->receiveSignal(&signal);
- if(result){
- returnresult;
- }
- if(signal!=INPUT_SIGNAL_DISPATCH){
- ......
- returnUNKNOWN_ERROR;
- }
- returnOK;
- }
InputChannel类的receiveSignal函数也是定义在frameworks/base/libs/ui/InputTransport.cpp文件中:
- status_tInputChannel::receiveSignal(char*outSignal){
- ssize_tnRead;
- do{
- nRead=::read(mReceivePipeFd,outSignal,1);
- }while(nRead==-1&&errno==EINTR);
- if(nRead==1){
- ......
- returnOK;
- }
- ......
- return-errno;
- }
这个函数定义在frameworks/base/libs/ui/InputTransport.cpp文件中:
- status_tInputConsumer::consume(InputEventFactoryInterface*factory,InputEvent**outEvent){
- ......
- *outEvent=NULL;
- intashmemFd=mChannel->getAshmemFd();
- intresult=ashmem_pin_region(ashmemFd,0,0);
- ......
- if(mSharedMessage->consumed){
- ......
- returnINVALID_OPERATION;
- }
- //Acquirebut*neverrelease*thesemaphore.Contentiononthesemaphoreisusedtosignal
- //tothepublisherthatthemessagehasbeenconsumed(orisintheprocessofbeing
- //consumed).Eventuallythepublisherwillreinitializethesemaphoreforthenextmessage.
- result=sem_wait(&mSharedMessage->semaphore);
- ......
- mSharedMessage->consumed=true;
- switch(mSharedMessage->type){
- caseAINPUT_EVENT_TYPE_KEY:{
- KeyEvent*keyEvent=factory->createKeyEvent();
- if(!keyEvent)returnNO_MEMORY;
- populateKeyEvent(keyEvent);
- *outEvent=keyEvent;
- break;
- }
- ......
- }
- returnOK;
- }
回到Step 21中的handleReceiveCallback函数中,从InputConsumer中获得了键盘事件的内容(保存在本地变量inputEvent中)后,就开始要通知Java层的应用程序了。在前面分析应用程序注册键盘消息接收通道的过程时,在Step 21中(NativeInputQueue.registerInputChannel),会把传进来的对象inputHandlerObj保存在Connection对象中:
- connection->inputHandlerObjGlobal=env->NewGlobalRef(inputHandlerObj);
- inputHandlerObjLocal=env->NewLocalRef(connection->inputHandlerObjGlobal);
- dispatchMethodId=gInputQueueClassInfo.dispatchKeyEvent;
- inputEventObj=android_view_KeyEvent_fromNative(env,
- static_cast<KeyEvent*>(inputEvent));
- env->CallStaticVoidMethod(gInputQueueClassInfo.clazz,
- dispatchMethodId,inputHandlerObjLocal,inputEventObj,
- jlong(finishedToken));
这个函数定义在frameworks/base/core/java/android/view/InputQueue.java文件中:
- publicfinalclassInputQueue{
- ......
- privatestaticvoiddispatchKeyEvent(InputHandlerinputHandler,
- KeyEventevent,longfinishedToken){
- RunnablefinishedCallback=FinishedCallback.obtain(finishedToken);
- inputHandler.handleKey(event,finishedCallback);
- }
- ......
- }
这里的inputHandler对象是在前面分析应用程序注册键盘消息接收通道的过程时,在Step 1(ViewRoot.setView)中传进来的:
- InputQueue.registerInputChannel(mInputChannel,mInputHandler,
- Looper.myQueue());
Step 25. InputHandler.handleKey
这个函数定义在frameworks/base/core/java/android/view/ViewRoot.java文件中:
- publicfinalclassViewRootextendsHandlerimplementsViewParent,
- View.AttachInfo.Callbacks{
- ......
- privatefinalInputHandlermInputHandler=newInputHandler(){
- publicvoidhandleKey(KeyEventevent,RunnablefinishedCallback){
- startInputEvent(finishedCallback);
- dispatchKey(event,true);
- }
- ......
- };
- ......
- }
- publicfinalclassViewRootextendsHandlerimplementsViewParent,
- View.AttachInfo.Callbacks{
- ......
- privatevoidstartInputEvent(RunnablefinishedCallback){
- ......
- mFinishedCallback=finishedCallback;
- }
- ......
- }
Step 26.ViewRoot.dispatchKey
这个函数定义在frameworks/base/core/java/android/view/ViewRoot.java文件中:
- publicfinalclassViewRootextendsHandlerimplementsViewParent,
- View.AttachInfo.Callbacks{
- ......
- privatevoiddispatchKey(KeyEventevent,booleansendDone){
- ......
- Messagemsg=obtainMessage(DISPATCH_KEY);
- msg.obj=event;
- msg.arg1=sendDone?1:0;
- ......
- sendMessageAtTime(msg,event.getEventTime());
- }
- ......
- }
Step 27.ViewRoot.deliverKeyEvent
这个函数定义在frameworks/base/core/java/android/view/ViewRoot.java文件中:
- publicfinalclassViewRootextendsHandlerimplementsViewParent,
- View.AttachInfo.Callbacks{
- ......
- privatevoiddeliverKeyEvent(KeyEventevent,booleansendDone){
- //IfmViewisnull,wejustconsumethekeyeventbecauseitdoesn't
- //makesensetodoanythingelsewithit.
- booleanhandled=mView!=null
- ?mView.dispatchKeyEventPreIme(event):true;
- ......
- //Ifitispossibleforthiswindowtointeractwiththeinput
- //methodwindow,thenwewanttofirstdispatchourkeyevents
- //totheinputmethod.
- if(mLastWasImTarget){
- InputMethodManagerimm=InputMethodManager.peekInstance();
- if(imm!=null&&mView!=null){
- ......
- imm.dispatchKeyEvent(mView.getContext(),seq,event,
- mInputMethodCallback);
- return;
- }
- }
- ......
- }
- ......
- }
Step 28. InputMethodManager.dispatchKeyEvent
这个函数定义在frameworks/base/core/java/android/view/inputmethod/InputMethodManager.java文件中。这是一个输入法相关的类,我们这里就不关注了,只要知道当输入法处理完成之后,它就会调用ViewRoot类的mInputMehtodCallback对象的finishedEvent成员函数。
Step 29. InputMethodCallack.finishedEvent
这个函数定义在frameworks/base/core/java/android/view/ViewRoot.java文件中:
- publicfinalclassViewRootextendsHandlerimplementsViewParent,
- View.AttachInfo.Callbacks{
- ......
- staticclassInputMethodCallbackextendsIInputMethodCallback.Stub{
- privateWeakReference<ViewRoot>mViewRoot;
- publicInputMethodCallback(ViewRootviewRoot){
- mViewRoot=newWeakReference<ViewRoot>(viewRoot);
- }
- publicvoidfinishedEvent(intseq,booleanhandled){
- finalViewRootviewRoot=mViewRoot.get();
- if(viewRoot!=null){
- viewRoot.dispatchFinishedEvent(seq,handled);
- }
- }
- ......
- }
- ......
- }
Step 30.ViewRoot.dispatchFinishedEvent
这个函数定义在frameworks/base/core/java/android/view/ViewRoot.java文件中:
- publicfinalclassViewRootextendsHandlerimplementsViewParent,
- View.AttachInfo.Callbacks{
- ......
- publicvoiddispatchFinishedEvent(intseq,booleanhandled){
- Messagemsg=obtainMessage(FINISHED_EVENT);
- msg.arg1=seq;
- msg.arg2=handled?1:0;
- sendMessage(msg);
- }
- ......
- }
Step 31.ViewRoot.handleFinishedEvent
这个函数定义在frameworks/base/core/java/android/view/ViewRoot.java文件中:
- publicfinalclassViewRootextendsHandlerimplementsViewParent,
- View.AttachInfo.Callbacks{
- ......
- voidhandleFinishedEvent(intseq,booleanhandled){
- finalKeyEventevent=(KeyEvent)retrievePendingEvent(seq);
- ......
- if(event!=null){
- finalbooleansendDone=seq>=0;
- if(!handled){
- deliverKeyEventToViewHierarchy(event,sendDone);
- return;
- }elseif(sendDone){
- ......
- }else{
- ......
- }
- }
- }
- ......
- }
Step 32.ViewRoot.deliverKeyEventToViewHierarchy
这个函数定义在frameworks/base/core/java/android/view/ViewRoot.java文件中:
- publicfinalclassViewRootextendsHandlerimplementsViewParent,
- View.AttachInfo.Callbacks{
- ......
- privatevoiddeliverKeyEventToViewHierarchy(KeyEventevent,booleansendDone){
- try{
- if(mView!=null&&mAdded){
- ......
- booleankeyHandled=mView.dispatchKeyEvent(event);
- }
- ......
- }finally{
- if(sendDone){
- finishInputEvent();
- }
- }
- }
- ......
- }
ViewRoot类的成员变量mView的类型为DecorView,它是由ActivityThread类第一次Resume当前的Activity窗口时创建的,具体可以参考ActivityThread类的handleResumeActivity成员函数,这里就不关注了。
Step 33. DecorView.dispatchKeyEvent
这个函数定义在frameworks/base/policy/src/com/android/internal/policy/impl/PhoneWindow.java文件中,它是PhoneWindow类的一个内部类:
- publicclassPhoneWindowextendsWindowimplementsMenuBuilder.Callback{
- ......
- privatefinalclassDecorViewextendsFrameLayoutimplementsRootViewSurfaceTaker{
- ......
- @Override
- publicbooleandispatchKeyEvent(KeyEventevent){
- ......
- finalCallbackcb=getCallback();
- finalbooleanhandled=cb!=null&&mFeatureId<0?cb.dispatchKeyEvent(event)
- :super.dispatchKeyEvent(event);
- ......
- }
- ......
- }
- ......
- }
Step 34. Activity.dispatchKeyEvent
这个函数定义在frameworks/base/core/java/android/app/Activity.java文件中:
- publicclassActivityextendsContextThemeWrapper
- implementsLayoutInflater.Factory,
- Window.Callback,KeyEvent.Callback,
- OnCreateContextMenuListener,ComponentCallbacks{
- ......
- publicbooleandispatchKeyEvent(KeyEventevent){
- ......
- Viewdecor=mDecor;
- if(decor==null)decor=win.getDecorView();
- returnevent.dispatch(this,decor!=null
- ?decor.getKeyDispatcherState():null,this);
- }
- ......
- }
Step 35. KeyEvent.dispatch
这个函数定义在frameworks/base/core/java/android/view/KeyEvent.java文件中:
- publicclassKeyEventextendsInputEventimplementsParcelable{
- ......
- publicfinalbooleandispatch(Callbackreceiver,DispatcherStatestate,
- Objecttarget){
- switch(mAction){
- caseACTION_DOWN:{
- ......
- booleanres=receiver.onKeyDown(mKeyCode,this);
- ......
- returnres;
- }
- caseACTION_UP:
- ......
- returnreceiver.onKeyUp(mKeyCode,this);
- caseACTION_MULTIPLE:
- finalintcount=mRepeatCount;
- finalintcode=mKeyCode;
- if(receiver.onKeyMultiple(code,count,this)){
- returntrue;
- }
- ......
- returnfalse;
- }
- returnfalse;
- }
- ......
- }
Activity窗口处理完这个键盘事件后,层层返回,最后回到Step 32中,调用finishInputEvent事件来处理一些手尾工,下面我们将会看到这些手尾工是什么。
Step 36. ViewRoot.finishInputEvent
这个函数定义在frameworks/base/core/java/android/view/ViewRoot.java文件中:
- publicfinalclassViewRootextendsHandlerimplementsViewParent,
- View.AttachInfo.Callbacks{
- ......
- privatevoidfinishInputEvent(){
- ......
- if(mFinishedCallback!=null){
- mFinishedCallback.run();
- mFinishedCallback=null;
- }else{
- ......
- }
- }
- ......
- }
ViewRoot类里面的成员变量mFinishedCallback是在前面Step 25中由InputQueue设置的,它是一个Runnable对象,实际类型是定义在InputQueue的内部类FinishedCallback,因此,这里调用它的run方法时,接下来就会调用InputQueue的内部类FinishedCallback的run成员函数:
- publicfinalclassInputQueue{
- ......
- privatestaticclassFinishedCallbackimplementsRunnable{
- ......
- publicvoidrun(){
- synchronized(sLock){
- ......
- nativeFinished(mFinishedToken);
- ......
- }
- }
- ......
- }
- ......
- }
Step 37. InputQueue.nativeFinished
这个函数定义在frameworks/base/core/jni/android_view_InputQueue.cpp文件中:
- staticvoidandroid_view_InputQueue_nativeFinished(JNIEnv*env,jclassclazz,
- jlongfinishedToken){
- status_tstatus=gNativeInputQueue.finished(
- env,finishedToken,false/*ignoreSpuriousFinish*/);
- ......
- }
Step 38. NativeInputQueue.finished
这个函数定义在frameworks/base/core/jni/android_view_InputQueue.cpp文件中:
- status_tNativeInputQueue::finished(JNIEnv*env,jlongfinishedToken,boolignoreSpuriousFinish){
- int32_treceiveFd;
- uint16_tconnectionId;
- uint16_tmessageSeqNum;
- parseFinishedToken(finishedToken,&receiveFd,&connectionId,&messageSeqNum);
- {//acquirelock
- AutoMutex_l(mLock);
- ssize_tconnectionIndex=mConnectionsByReceiveFd.indexOfKey(receiveFd);
- ......
- sp<Connection>connection=mConnectionsByReceiveFd.valueAt(connectionIndex);
- ......
- connection->messageInProgress=false;
- status_tstatus=connection->inputConsumer.sendFinishedSignal();
- ......
- }//releaselock
- returnOK;
- }
- finishedToken=generateFinishedToken(receiveFd,connection->id,connection->messageSeqNum);
- jlongNativeInputQueue::generateFinishedToken(int32_treceiveFd,uint16_tconnectionId,
- uint16_tmessageSeqNum){
- return(jlong(receiveFd)<<32)|(jlong(connectionId)<<16)|jlong(messageSeqNum);
- }
因此,在上面的finished函数里面,首先就是要对参数值finishedToken进行解码,把receiveFd、connectionId和messageSeqNum三个值分别取回来:
- parseFinishedToken(finishedToken,&receiveFd,&connectionId,&messageSeqNum);
- voidNativeInputQueue::parseFinishedToken(jlongfinishedToken,
- int32_t*outReceiveFd,uint16_t*outConnectionId,uint16_t*outMessageIndex){
- *outReceiveFd=int32_t(finishedToken>>32);
- *outConnectionId=uint16_t(finishedToken>>16);
- *outMessageIndex=uint16_t(finishedToken);
- }
- ssize_tconnectionIndex=mConnectionsByReceiveFd.indexOfKey(receiveFd);
- ......
- sp<Connection>connection=mConnectionsByReceiveFd.valueAt(connectionIndex);
- status_tstatus=connection->inputConsumer.sendFinishedSignal();
Step 39. InputConsumer.sendFinishedSignal
这个函数定义在frameworks/base/libs/ui/InputTransport.cpp文件中:
- status_tInputConsumer::sendFinishedSignal(){
- ......
- returnmChannel->sendSignal(INPUT_SIGNAL_FINISHED);
- }
前面我们在分析应用程序注册键盘消息接收通道的过程时,在Step 18(InputDispatcher.registerInputChannel)中,说到InputDispatcher把一个反向管道的读端文件描述符添加到WindowManagerService所运行的线程中的Looper对象中去,然后就会在这个反向管道的读端上睡眠等待有这个管道有新的内容可读。现在,InputConsumer往这个反向管道写入新的内容了,于是,InputDispatcher就被唤醒过来了,唤醒过来后,它所调用的函数是InputDispatcher.handleReceiveCallback函数,这与前面的Step 21的逻辑是一样的。
Step 40. InputDispatcher.handleReceiveCallack
这个函数定义在frameworks/base/libs/ui/InputDispatcher.cpp文件中:
- intInputDispatcher::handleReceiveCallback(intreceiveFd,intevents,void*data){
- InputDispatcher*d=static_cast<InputDispatcher*>(data);
- {//acquirelock
- AutoMutex_l(d->mLock);
- ssize_tconnectionIndex=d->mConnectionsByReceiveFd.indexOfKey(receiveFd);
- ......
- nsecs_tcurrentTime=now();
- sp<Connection>connection=d->mConnectionsByReceiveFd.valueAt(connectionIndex);
- ......
- status_tstatus=connection->inputPublisher.receiveFinishedSignal();
- if(status){
- ......
- return0;//removethecallback
- }
- d->finishDispatchCycleLocked(currentTime,connection);
- ......
- return1;
- }//releaselock
- }
- ssize_tconnectionIndex=d->mConnectionsByReceiveFd.indexOfKey(receiveFd);
- ......
- sp<Connection>connection=d->mConnectionsByReceiveFd.valueAt(connectionIndex);
Step 41. InputPublisher.receiverFinishedSignal
这个函数定义在frameworks/base/libs/ui/InputTransport.cpp文件中:
- status_tInputPublisher::receiveFinishedSignal(){
- ....
- charsignal;
- status_tresult=mChannel->receiveSignal(&signal);
- if(result){
- returnresult;
- }
- if(signal!=INPUT_SIGNAL_FINISHED){
- .......
- returnUNKNOWN_ERROR;
- }
- returnOK;
- }
回到前面的Step 40中,确认了是真的收到了键盘事件处理完成的信号后,就调用InputDispatcher的finishDispatchCycleLocked函数来执行一些善后工作了。
Step 42. InputDispatcher.finishDispatchCycleLocked
这个函数定义在frameworks/base/libs/ui/InputDispatcher.cpp文件中:
- voidInputDispatcher::finishDispatchCycleLocked(nsecs_tcurrentTime,
- constsp<Connection>&connection){
- ......
- //Notifyothersystemcomponents.
- onDispatchCycleFinishedLocked(currentTime,connection);
- //Resetthepublishersincetheeventhasbeenconsumed.
- //Wedothisnowsothatthepublishercanreleasesomeofitsinternalresources
- //whilewaitingforthenextdispatchcycletobegin.
- status_tstatus=connection->inputPublisher.reset();
- ......
- startNextDispatchCycleLocked(currentTime,connection);
- }
一是通知其它系统,InputDispatcher完成了一次键盘事件的处理:
- //Notifyothersystemcomponents.
- onDispatchCycleFinishedLocked(currentTime,connection);
- //Resetthepublishersincetheeventhasbeenconsumed.
- //Wedothisnowsothatthepublishercanreleasesomeofitsinternalresources
- //whilewaitingforthenextdispatchcycletobegin.
- status_tstatus=connection->inputPublisher.reset();
- startNextDispatchCycleLocked(currentTime,connection);
至此,InputManager分发键盘消息给应用程序的过程就分析完成了,这是一个比较复杂的过程,不过,只要我们抓住主要的线索,就不难理解了,现在我们就小结一下这个过程的四个主要线索:
A. 键盘事件发生,InputManager中的InputReader被唤醒,此前InputReader睡眠在/dev/input/event0这个设备文件上;
B.InputReader被唤醒后,它接着唤醒InputManager中的InputDispatcher,此前InputDispatcher睡眠在InputManager所运行的线程中的Looper对象里面的管道的读端上;
C. InputDispatcher被唤醒后,它接着唤醒应用程序的主线程来处理这个键盘事件,此前应用程序的主线程睡眠在Client端InputChannel中的前向管道的读端上;
D. 应用程序处理处理键盘事件之后,它接着唤醒InputDispatcher来执行善后工作,此前InputDispatcher睡眠在Server端InputChannel的反向管道的读端上,注意这里与第二个线索处的区别。
4.应用程序注销键盘消息接收通道的过程分析
当Activity窗口创建时,它会向InputManager注册键盘消息接收通道,而当Activity窗口销毁时,它就会向InputManager注销前面注册的键盘消息接收通道了,本节内容就来看看应用程序注销键盘消息接收通道的过程。
当我们按下键盘上的Back键时,当前激活的Activity窗口就会被失去焦点,但是这时候它还没有被销毁,它的状态被设置为Stopped;当新的Activity窗口即将要显示时,它会通知WindowManagerService,这时候WindowManagerService就会处理当前处理Stopped状态的Activity窗口了,要执行的操作就是销毁它们了,在销毁的时候,就会注销它们之前所注册的键盘消息接收通道。
新的Activity窗口通知WindowManagerService它即将要显示的过程比较复杂,但是它与我们本节要介绍的内容不是很相关,因此,这里就略过大部过程了,我们从ActvitiyRecord的windowsVisible函数开始分析。注意,这里的ActivityRecord是新的Activity窗口在ActivityManangerService的代表,而那些处于Stopped状态的Activity窗口
会放在ActivityStack类的一个等待可见的mWaitingVisibleActivities列表里面,事实于,对于那些Stopped状态的Activity窗口来说,它们是等待销毁,而不是等待可见。
像前面一样,我们先来看一张应用程序注销键盘消息接收通道的过程的序列图,然后根据这个序列图来详细分析互一个步骤:

Step 1. ActivityRecord.windowsVisible
这个函数定义在frameworks/base/services/java/com/android/server/am/ActivityRecord.java文件中:
- classActivityRecordextendsIApplicationToken.Stub{
- ......
- booleannowVisible;//isthisactivity'swindowvisible?
- booleanidle;//hastheactivitygoneidle?
- ......
- publicvoidwindowsVisible(){
- synchronized(service){
- ......
- if(!nowVisible){
- nowVisible=true;
- if(!idle){
- .......
- }else{
- //Ifthisactivitywasalreadyidle,thenwenowneedto
- //makesureweperformthefullstopofanyactivities
- //thatarewaitingtodoso.Thisisbecausewewon't
- //dothatwhiletheyarestillwaitingforthisoneto
- //becomevisible.
- finalintN=stack.mWaitingVisibleActivities.size();
- if(N>0){
- for(inti=0;i<N;i++){
- ActivityRecordr=(ActivityRecord)
- stack.mWaitingVisibleActivities.get(i);
- r.waitingVisible=false;
- ......
- }
- stack.mWaitingVisibleActivities.clear();
- Messagemsg=Message.obtain();
- msg.what=ActivityStack.IDLE_NOW_MSG;
- stack.mHandler.sendMessage(msg);
- }
- }
- ......
- }
- }
- }
- ......
- }
- finalintN=stack.mWaitingVisibleActivities.size();
- if(N>0){
- for(inti=0;i<N;i++){
- ActivityRecordr=(ActivityRecord)
- stack.mWaitingVisibleActivities.get(i);
- r.waitingVisible=false;
- ......
- }
- stack.mWaitingVisibleActivities.clear();
- Messagemsg=Message.obtain();
- msg.what=ActivityStack.IDLE_NOW_MSG;
- stack.mHandler.sendMessage(msg);
- }
Step 2. ActivityStack.activityIdleInternal
这个函数定义在frameworks/base/services/java/com/android/server/am/ActivityStack.java文件中:
- publicclassActivityStack{
- ......
- finalvoidactivityIdleInternal(IBindertoken,booleanfromTimeout,
- Configurationconfig){
- ......
- ArrayList<ActivityRecord>stops=null;
- ......
- intNS=0;
- ......
- synchronized(mService){
- ......
- //Atomicallyretrievealloftheotherthingstodo.
- stops=processStoppingActivitiesLocked(true);
- NS=stops!=null?stops.size():0;
- ......
- }
- inti;
- ......
- //Stopanyactivitiesthatarescheduledtodosobuthavebeen
- //waitingforthenextonetostart.
- for(i=0;i<NS;i++){
- ActivityRecordr=(ActivityRecord)stops.get(i);
- synchronized(mService){
- if(r.finishing){
- finishCurrentActivityLocked(r,FINISH_IMMEDIATELY);
- }else{
- ......
- }
- }
- }
- ......
- }
- ......
- }
Step 3.ActivityStack.finishCurrentActivityLocked
这个函数定义在frameworks/base/services/java/com/android/server/am/ActivityStack.java文件中:
- publicclassActivityStack{
- ......
- privatefinalActivityRecordfinishCurrentActivityLocked(ActivityRecordr,
- intmode){
- ......
- returnfinishCurrentActivityLocked(r,index,mode);
- }
- privatefinalActivityRecordfinishCurrentActivityLocked(ActivityRecordr,
- intindex,intmode){
- ......
- //makesuretherecordiscleanedoutofotherplaces.
- mStoppingActivities.remove(r);
- mWaitingVisibleActivities.remove(r);
- ......
- finalActivityStateprevState=r.state;
- r.state=ActivityState.FINISHING;
- if(mode==FINISH_IMMEDIATELY
- ||prevState==ActivityState.STOPPED
- ||prevState==ActivityState.INITIALIZING){
- //Ifthisactivityisalreadystopped,wecanjustfinish
- //itrightnow.
- returndestroyActivityLocked(r,true)?null:r;
- }else{
- ......
- }
- returnr;
- }
- ......
- }
Step 4.ActivityStack.destroyActivityLocked
这个函数定义在frameworks/base/services/java/com/android/server/am/ActivityStack.java文件中:
- publicclassActivityStack{
- ......
- finalbooleandestroyActivityLocked(ActivityRecordr,
- booleanremoveFromApp){
- ......
- booleanremovedFromHistory=false;
- ......
- finalbooleanhadApp=r.app!=null;
- if(hadApp){
- ......
- try{
- ......
- r.app.thread.scheduleDestroyActivity(r,r.finishing,
- r.configChangeFlags);
- }catch(Exceptione){
- ......
- }
- ......
- }else{
- ......
- }
- ......
- returnremovedFromHistory;
- }
- ......
- }
- r.app.thread.scheduleDestroyActivity(r,r.finishing,
- r.configChangeFlags);
Step 5.ApplicationThread.scheduleDestroyActivity
这个函数定义在frameworks/base/core/java/android/app/ActivityThread.java文件中:
- publicfinalclassActivityThread{
- ......
- privatefinalclassApplicationThreadextendsApplicationThreadNative{
- ......
- publicfinalvoidscheduleDestroyActivity(IBindertoken,booleanfinishing,
- intconfigChanges){
- queueOrSendMessage(H.DESTROY_ACTIVITY,token,finishing?1:0,
- configChanges);
- }
- ......
- }
- ......
- }
Step 6.ActivityThread.handleDestroyActivity
这个函数定义在frameworks/base/core/java/android/app/ActivityThread.java文件中:
- publicfinalclassActivityThread{
- ......
- privatefinalvoidhandleDestroyActivity(IBindertoken,booleanfinishing,
- intconfigChanges,booleangetNonConfigInstance){
- ......
- ActivityClientRecordr=performDestroyActivity(token,finishing,
- configChanges,getNonConfigInstance);
- if(r!=null){
- WindowManagerwm=r.activity.getWindowManager();
- Viewv=r.activity.mDecor;
- if(v!=null){
- ......
- if(r.activity.mWindowAdded){
- wm.removeViewImmediate(v);
- }
- ......
- }
- ......
- }
- ......
- }
- ......
- }
Step 7.LocalWindowManager.removeViewImmediate
这个函数定义在frameworks/base/core/java/android/view/Window.java文件中:
- publicabstractclassWindow{
- ......
- privateclassLocalWindowManagerimplementsWindowManager{
- ......
- publicfinalvoidremoveViewImmediate(Viewview){
- mWindowManager.removeViewImmediate(view);
- }
- ......
- privatefinalWindowManagermWindowManager;
- }
- ......
- }
Step 8.WndowManagerImpl.removeViewImmediate
这个函数定义在frameworks/base/core/java/android/view/WindowManagerImpl.java文件中:
- publicclassWindowManagerImplimplementsWindowManager{
- ......
- publicvoidremoveViewImmediate(Viewview){
- synchronized(this){
- intindex=findViewLocked(view,true);
- ViewRootroot=mRoots[index];
- ......
- root.die(true);
- ......
- }
- }
- ......
- }
Step 9. ViewRoot.die
这个函数定义在frameworks/base/core/java/android/view/ViewRoot.java文件中:
- publicfinalclassViewRootextendsHandlerimplementsViewParent,
- View.AttachInfo.Callbacks{
- ......
- publicvoiddie(booleanimmediate){
- if(immediate){
- doDie();
- }else{
- ......
- }
- }
- ......
- }
Step 10.ViewRoot.doDie
这个函数定义在frameworks/base/core/java/android/view/ViewRoot.java文件中:
- publicfinalclassViewRootextendsHandlerimplementsViewParent,
- View.AttachInfo.Callbacks{
- ......
- voiddoDie(){
- ......
- synchronized(this){
- ......
- if(mAdded){
- mAdded=false;
- dispatchDetachedFromWindow();
- }
- }
- }
- ......
- }
Step 11.ViewRoot.ispatchDetachedFromWindow
这个函数定义在frameworks/base/core/java/android/view/ViewRoot.java文件中:
- publicfinalclassViewRootextendsHandlerimplementsViewParent,
- View.AttachInfo.Callbacks{
- ......
- voiddispatchDetachedFromWindow(){
- ......
- if(mInputChannel!=null){
- if(mInputQueueCallback!=null){
- ......
- }else{
- InputQueue.unregisterInputChannel(mInputChannel);
- }
- }
- try{
- sWindowSession.remove(mWindow);
- }catch(RemoteExceptione){
- }
- ......
- }
- ......
- }
我们先来看注销注册在应用程序这一侧的Client端InputChannel,然后再回过头来分析注销注册在InputManager这一侧的Server端InputChannel。
Step 12.InputQueue.unregisterInputChannel
这个函数定义在frameworks/base/core/java/android/view/InputQueue.java文件中:
- publicfinalclassInputQueue{
- ......
- publicstaticvoidunregisterInputChannel(InputChannelinputChannel){
- ......
- synchronized(sLock){
- ......
- nativeUnregisterInputChannel(inputChannel);
- }
- }
- ......
- }
Step 13.InputQueue.nativeUnregisterInputChannel
这个函数定义在frameworks/base/core/jni/android_view_InputQueue.cpp文件中:
- staticvoidandroid_view_InputQueue_nativeUnregisterInputChannel(JNIEnv*env,jclassclazz,
- jobjectinputChannelObj){
- status_tstatus=gNativeInputQueue.unregisterInputChannel(env,inputChannelObj);
- ......
- }
Step 14.NativeInputQueue.unregisterInputChannel
这个函数定义在frameworks/base/core/jni/android_view_InputQueue.cpp文件中:
- status_tNativeInputQueue::unregisterInputChannel(JNIEnv*env,jobjectinputChannelObj){
- sp<InputChannel>inputChannel=android_view_InputChannel_getInputChannel(env,
- inputChannelObj);
- ......
- {//acquirelock
- AutoMutex_l(mLock);
- ssize_tconnectionIndex=getConnectionIndex(inputChannel);
- ......
- sp<Connection>connection=mConnectionsByReceiveFd.valueAt(connectionIndex);
- mConnectionsByReceiveFd.removeItemsAt(connectionIndex);
- connection->status=Connection::STATUS_ZOMBIE;
- connection->looper->removeFd(inputChannel->getReceivePipeFd());
- env->DeleteGlobalRef(connection->inputHandlerObjGlobal);
- connection->inputHandlerObjGlobal=NULL;
- ......
- }//releaselock
- ......
- returnOK;
- }
- ssize_tconnectionIndex=getConnectionIndex(inputChannel);
- ......
- sp<Connection>connection=mConnectionsByReceiveFd.valueAt(connectionIndex);
- mConnectionsByReceiveFd.removeItemsAt(connectionIndex);
- connection->looper->removeFd(inputChannel->getReceivePipeFd());
最后将Connection对象中的回调对象inputHandlerOjbGlobal对象删除:
- env->DeleteGlobalRef(connection->inputHandlerObjGlobal);
- connection->inputHandlerObjGlobal=NULL;
注册在应用程序这一侧的Client端InputChannel被注销以后,回到前面的Step 11中,我们继续分析注销注册在InputManager这一侧的Server端InputChannel。
Step 15. WindowManagerService.Session.remove
这个函数定义在frameworks/base/services/java/com/android/server/WindowManagerService.java文件中:
- publicclassWindowManagerServiceextendsIWindowManager.Stub
- implementsWatchdog.Monitor{
- ......
- privatefinalclassSessionextendsIWindowSession.Stub
- implementsIBinder.DeathRecipient{
- ......
- publicvoidremove(IWindowwindow){
- removeWindow(this,window);
- }
- ......
- }
- ......
- }
Step 16.WindowManagerService.removeWindow
这个函数定义在frameworks/base/services/java/com/android/server/WindowManagerService.java文件中:
- publicclassWindowManagerServiceextendsIWindowManager.Stub
- implementsWatchdog.Monitor{
- ......
- publicvoidremoveWindow(Sessionsession,IWindowclient){
- synchronized(mWindowMap){
- WindowStatewin=windowForClientLocked(session,client,false);
- if(win==null){
- return;
- }
- removeWindowLocked(session,win);
- }
- }
- ......
- }
回忆一下前面我们在分析应用程序注册键盘消息管道的过程时,在Step 11(WindowManagerService.addWindow)中,WindowManagerService为这个即将要激活的Activity窗口创建了一个WindowState对象win,创建的时候,使用了从ViewRoot中传过来的两个参数,分别是一个Session对象session和一个IWindow对象client。
在这个函数中,ViewRoot传过来的两个参数session和client和上面说的两个参数是一致的,因此,这个函数首先通过参数session和client得到一个WindowState对象win,然后调用removeWindowLocked来把它从WindowManagerService删除。
Step 17.WindowManagerService.removeWindowLocked
这个函数定义在frameworks/base/services/java/com/android/server/WindowManagerService.java文件中:
- publicclassWindowManagerServiceextendsIWindowManager.Stub
- implementsWatchdog.Monitor{
- ......
- publicvoidremoveWindowLocked(Sessionsession,WindowStatewin){
- ......
- win.disposeInputChannel();
- ......
- }
- ......
- }
Step 18. WindowState.disposeInputChannel
这个函数定义在frameworks/base/services/java/com/android/server/WindowManagerService.java文件中:
- publicclassWindowManagerServiceextendsIWindowManager.Stub
- implementsWatchdog.Monitor{
- ......
- privatefinalclassWindowStateimplementsWindowManagerPolicy.WindowState{
- ......
- voiddisposeInputChannel(){
- if(mInputChannel!=null){
- mInputManager.unregisterInputChannel(mInputChannel);
- mInputChannel.dispose();
- mInputChannel=null;
- }
- }
- ......
- }
- ......
- }
Step 19. InputManager.unregisterInputChannel
这个函数定义在frameworks/base/services/java/com/android/server/InputManager.java文件中:
- publicclassInputManager{
- ......
- publicvoidunregisterInputChannel(InputChannelinputChannel){
- ......
- nativeUnregisterInputChannel(inputChannel);
- }
- ......
- }
Step 20.InputManager.nativeUnregisterInputChannel
这个函数定义在frameworks/base/services/jni/com_android_server_InputManager.cpp文件中:
- staticvoidandroid_server_InputManager_nativeUnregisterInputChannel(JNIEnv*env,jclassclazz,
- jobjectinputChannelObj){
- ......
- sp<InputChannel>inputChannel=android_view_InputChannel_getInputChannel(env,
- inputChannelObj);
- ......
- status_tstatus=gNativeInputManager->unregisterInputChannel(env,inputChannel);
- ......
- }
Step 21.NativeInputManager.unregisterInputChannel
这个函数定义在frameworks/base/services/jni/com_android_server_InputManager.cpp文件中:
- status_tNativeInputManager::unregisterInputChannel(JNIEnv*env,
- constsp<InputChannel>&inputChannel){
- ......
- returnmInputManager->getDispatcher()->unregisterInputChannel(inputChannel);
- }
Step 22.InputDispatcher.unregisterInputChannel
这个函数定义在frameworks/base/libs/ui/InputDispatcher.cpp文件中:
- status_tInputDispatcher::unregisterInputChannel(constsp<InputChannel>&inputChannel){
- ......
- {//acquirelock
- AutoMutex_l(mLock);
- ssize_tconnectionIndex=getConnectionIndexLocked(inputChannel);
- ......
- sp<Connection>connection=mConnectionsByReceiveFd.valueAt(connectionIndex);
- mConnectionsByReceiveFd.removeItemsAt(connectionIndex);
- ......
- mLooper->removeFd(inputChannel->getReceivePipeFd());
- .....
- }//releaselock
- ......
- returnOK;
- }
- ssize_tconnectionIndex=getConnectionIndexLocked(inputChannel);
- ......
- sp<Connection>connection=mConnectionsByReceiveFd.valueAt(connectionIndex);
- mConnectionsByReceiveFd.removeItemsAt(connectionIndex);
这样,应用程序注销键盘消息接收通道的过程就分析完成了,整个应用程序键盘消息处理机制也分析完成了,这是一个比较复杂的过程,要完全理解它还需要花费一些努力和时间,不过,理解了这个过程之后,对Android应用程序框架层的理解就更进一步了。
在系统启动的时候,SystemServer会启动窗口管理服务WindowManagerService,WindowManagerService在启动的时候就会通过系统输入管理器InputManager来总负责监控键盘消息。这些键盘消息一般都是分发给当前激活的Activity窗口来处理的,因此,当前激活的Activity窗口在创建的时候,会到WindowManagerService中去注册一个接收键盘消息的通道,表明它要处理键盘消息,而当InputManager监控到有键盘消息时,就会分给给它处理。当当前激活的Activity窗口不再处于激活状态时,它也会到WindowManagerService中去反注册之前的键盘消息接收通道,这样,InputManager就不会再把键盘消息分发给它来处理。
由于本文的内容比较多,在接下面的章节中,我们将分为五个部分来详细描述Android应用程序获得键盘按键消息的过程,每一个部分都是具体描述键盘消息处理过程中的一个过程。结合上面的键盘消息处理框架,这四个过程分别是InputManager的启动过程、应用程序注册键盘消息接收通道的过程、InputManager分发键盘消息给应用程序的过程以及应用程序注销键盘消息接收通道的过程。为了更好地理解Android应用程序获得键盘按键消息的整个过程,建议读者首先阅读Android应用程序消息处理机制(Looper、Handler)分析一文,理解了Android应用程序的消息处理机制后,就能很好的把握本文的内容。
1. InputManager的启动过程分析
前面说过,Android系统的键盘事件是由InputManager来监控的,而InputManager是由窗口管理服务WindowManagerService来启动的。
从前面一篇文章Android系统进程Zygote启动过程的源代码分析中,我们知道在Android系统中,Zygote进程负责启动系统服务进程SystemServer,而系统服务进程SystemServer负责启动系统中的各种关键服务,例如我们在前面两篇文章Android应用程序安装过程源代码分析和Android系统默认Home应用程序(Launcher)的启动过程源代码分析中提到的Package管理服务PackageManagerService和Activity管理服务ActivityManagerService。这里我们所讨论的窗口管理服务WindowManagerService也是由SystemServer来启动的,具体的启动过程这里就不再详述了,具体可以参考PackageManagerService和ActivityManagerService的启动过程。
了解了WindowManagerService的启动过程之后,我们就可以继续分析InputManager的启动过程了。我们先来看一下InputManager启动过程的序列图,然后根据这个序列图来一步步分析它的启动过程:
Step 1. WindowManagerService.main
这个函数定义在frameworks/base/services/java/com/android/server/WindowManagerService.java文件中:
- publicclassWindowManagerServiceextendsIWindowManager.Stub
- implementsWatchdog.Monitor{
- ......
- publicstaticWindowManagerServicemain(Contextcontext,
- PowerManagerServicepm,booleanhaveInputMethods){
- WMThreadthr=newWMThread(context,pm,haveInputMethods);
- thr.start();
- synchronized(thr){
- while(thr.mService==null){
- try{
- thr.wait();
- }catch(InterruptedExceptione){
- }
- }
- returnthr.mService;
- }
- }
- ......
- }
Step 2. WMThread.run
这个函数定义在frameworks/base/services/java/com/android/server/WindowManagerService.java文件中:
- publicclassWindowManagerServiceextendsIWindowManager.Stub
- implementsWatchdog.Monitor{
- ......
- staticclassWMThreadextendsThread{
- ......
- publicvoidrun(){
- ......
- WindowManagerServices=newWindowManagerService(mContext,mPM,
- mHaveInputMethods);
- ......
- }
- }
- ......
- }
Step 3. WindowManagerService<init>
WindowManagerService类的构造函数定义在frameworks/base/services/java/com/android/server/WindowManagerService.java文件中:
- publicclassWindowManagerServiceextendsIWindowManager.Stub
- implementsWatchdog.Monitor{
- ......
- finalInputManagermInputManager;
- ......
- privateWindowManagerService(Contextcontext,PowerManagerServicepm,
- booleanhaveInputMethods){
- ......
- mInputManager=newInputManager(context,this);
- ......
- mInputManager.start();
- ......
- }
- ......
- }
Step 4. InputManager<init>@java
Java层的InputManager类的构造函数定义在frameworks/base/services/java/com/android/server/InputManager.java文件中:
- publicclassInputManager{
- ......
- publicInputManager(Contextcontext,WindowManagerServicewindowManagerService){
- this.mContext=context;
- this.mWindowManagerService=windowManagerService;
- this.mCallbacks=newCallbacks();
- init();
- }
- ......
- }
Step 5. InputManager.init
这个函数定义在frameworks/base/services/java/com/android/server/InputManager.java文件中:
- publicclassInputManager{
- ......
- privatevoidinit(){
- Slog.i(TAG,"Initializinginputmanager");
- nativeInit(mCallbacks);
- }
- ......
- }
Step 6. InputManager.nativeInit
这个函数定义在frameworks/base/services/jni$ vi com_android_server_InputManager.cpp文件中:
- staticvoidandroid_server_InputManager_nativeInit(JNIEnv*env,jclassclazz,
- jobjectcallbacks){
- if(gNativeInputManager==NULL){
- gNativeInputManager=newNativeInputManager(callbacks);
- }else{
- LOGE("Inputmanageralreadyinitialized.");
- jniThrowRuntimeException(env,"Inputmanageralreadyinitialized.");
- }
- }
Step 7. NativeInputManager<init>
NativeInputManager类的构造函数定义在frameworks/base/services/jni$ vi com_android_server_InputManager.cpp文件中:
- NativeInputManager::NativeInputManager(jobjectcallbacksObj):
- mFilterTouchEvents(-1),mFilterJumpyTouchEvents(-1),mVirtualKeyQuietTime(-1),
- mMaxEventsPerSecond(-1),
- mDisplayWidth(-1),mDisplayHeight(-1),mDisplayOrientation(ROTATION_0){
- JNIEnv*env=jniEnv();
- mCallbacksObj=env->NewGlobalRef(callbacksObj);
- sp<EventHub>eventHub=newEventHub();
- mInputManager=newInputManager(eventHub,this,this);
- }
Step 8. InputManager<init>@C++
C++层的InputManager类的构造函数定义在frameworks/base/libs/ui/InputManager.cpp文件中:
- InputManager::InputManager(
- constsp<EventHubInterface>&eventHub,
- constsp<InputReaderPolicyInterface>&readerPolicy,
- constsp<InputDispatcherPolicyInterface>&dispatcherPolicy){
- mDispatcher=newInputDispatcher(dispatcherPolicy);
- mReader=newInputReader(eventHub,readerPolicy,mDispatcher);
- initialize();
- }
Step 9. InputManager.initialize
这个函数定义在frameworks/base/libs/ui/InputManager.cpp文件中:
- voidInputManager::initialize(){
- mReaderThread=newInputReaderThread(mReader);
- mDispatcherThread=newInputDispatcherThread(mDispatcher);
- }
至此,InputManager的初始化工作就完成了,在回到Step 3中继续分析InputManager的进一步启动过程之前,我们先来作一个小结,看看这个初始化过程都做什么事情:
A. 在Java层中的WindowManagerService中创建了一个InputManager对象,由它来负责管理Android应用程序框架层的键盘消息处理;
B. 在C++层也相应地创建一个InputManager本地对象来负责监控键盘事件;
C. 在C++层中的InputManager对象中,分别创建了一个InputReader对象和一个InputDispatcher对象,前者负责读取系统中的键盘消息,后者负责把键盘消息分发出去;
D.InputReader对象和一个InputDispatcher对象分别是通过InputReaderThread线程实例和InputDispatcherThread线程实例来实键盘消息的读取和分发的。
有了这些对象之后,万事就俱备了,回到Step 3中,调用InputManager类的start函数来执行真正的启动操作。
Step 10. InputManager.start
这个函数定义在frameworks/base/services/java/com/android/server/InputManager.java文件中:
- publicclassInputManager{
- ......
- publicvoidstart(){
- Slog.i(TAG,"Startinginputmanager");
- nativeStart();
- }
- ......
- }
Step 11. InputManager.nativeStart
这个函数定义在frameworks/base/services/jni$ vi com_android_server_InputManager.cpp文件中:
- staticvoidandroid_server_InputManager_nativeStart(JNIEnv*env,jclassclazz){
- if(checkInputManagerUnitialized(env)){
- return;
- }
- status_tresult=gNativeInputManager->getInputManager()->start();
- if(result){
- jniThrowRuntimeException(env,"Inputmanagercouldnotbestarted.");
- }
- }
Step 12. InputManager.start
这个函数定义在frameworks/base/libs/ui/InputManager.cpp文件中:
- status_tInputManager::start(){
- status_tresult=mDispatcherThread->run("InputDispatcher",PRIORITY_URGENT_DISPLAY);
- if(result){
- LOGE("CouldnotstartInputDispatcherthreadduetoerror%d.",result);
- returnresult;
- }
- result=mReaderThread->run("InputReader",PRIORITY_URGENT_DISPLAY);
- if(result){
- LOGE("CouldnotstartInputReaderthreadduetoerror%d.",result);
- mDispatcherThread->requestExit();
- returnresult;
- }
- returnOK;
- }
我们先来分析InputDispatcherThread线程分发消息的过程,然后再回过头来分析InputReaderThread线程读取消息的过程。
Step 13.InputDispatcherThread.threadLoop
这个函数定义在frameworks/base/libs/ui/InputDispatcher.cpp文件中:
- boolInputDispatcherThread::threadLoop(){
- mDispatcher->dispatchOnce();
- returntrue;
- }
Step 14. InputDispatcher.dispatchOnce
这个函数定义在frameworks/base/libs/ui/InputDispatcher.cpp文件中:
- voidInputDispatcher::dispatchOnce(){
- nsecs_tkeyRepeatTimeout=mPolicy->getKeyRepeatTimeout();
- nsecs_tkeyRepeatDelay=mPolicy->getKeyRepeatDelay();
- nsecs_tnextWakeupTime=LONG_LONG_MAX;
- {//acquirelock
- AutoMutex_l(mLock);
- dispatchOnceInnerLocked(keyRepeatTimeout,keyRepeatDelay,&nextWakeupTime);
- if(runCommandsLockedInterruptible()){
- nextWakeupTime=LONG_LONG_MIN;//forcenextpolltowakeupimmediately
- }
- }//releaselock
- //Waitforcallbackortimeoutorwake.(makesureweroundup,notdown)
- nsecs_tcurrentTime=now();
- int32_ttimeoutMillis;
- if(nextWakeupTime>currentTime){
- uint64_ttimeout=uint64_t(nextWakeupTime-currentTime);
- timeout=(timeout+999999LL)/1000000LL;
- timeoutMillis=timeout>INT_MAX?-1:int32_t(timeout);
- }else{
- timeoutMillis=0;
- }
- mLooper->pollOnce(timeoutMillis);
- }
Step 15. Looper.pollOnce
这个函数定义在frameworks/base/libs/utils/Looper.cpp文件中,具体可以参考前面Android应用程序消息处理机制(Looper、Handler)分析一文,这里就不再详述了。总的来说,就是在Looper类中,会创建一个管道,当调用Looper类的pollOnce函数时,如果管道中没有内容可读,那么当前线程就会进入到空闲等待状态;当有键盘事件发生时,InputReader就会往这个管道中写入新的内容,这样就会唤醒前面正在等待键盘事件发生的线程。
InputDispatcher类分发消息的过程就暂时分析到这里,后面会有更进一步的分析,现在,我们回到Step 12中,接着分析InputReader类读取键盘事件的过程。在调用了InputReaderThread线程类的run就函数后,同样会进入到InputReaderThread线程类的threadLoop函数中去。
Step 16. InputReaderThread.threadLoop
这个函数定义在frameworks/base/libs/ui/InputReader.cpp文件中:
- boolInputReaderThread::threadLoop(){
- mReader->loopOnce();
- returntrue;
- }
Step 17. InputReader.loopOnce
这个函数定义在frameworks/base/libs/ui/InputReader.cpp文件中:
- voidInputReader::loopOnce(){
- RawEventrawEvent;
- mEventHub->getEvent(&rawEvent);
- #ifDEBUG_RAW_EVENTS
- LOGD("Inputevent:device=0x%xtype=0x%xscancode=%dkeycode=%dvalue=%d",
- rawEvent.deviceId,rawEvent.type,rawEvent.scanCode,rawEvent.keyCode,
- rawEvent.value);
- #endif
- process(&rawEvent);
- }
Step 18. EventHub.getEvent
这个函数定义在frameworks/base/libs/ui/EventHub.cpp文件中:
- boolEventHub::getEvent(RawEvent*outEvent)
- {
- outEvent->deviceId=0;
- outEvent->type=0;
- outEvent->scanCode=0;
- outEvent->keyCode=0;
- outEvent->flags=0;
- outEvent->value=0;
- outEvent->when=0;
- //NotethatweonlyallowonecallertogetEvent(),sodon'tneed
- //todolockinghere...onlywhenadding/removingdevices.
- if(!mOpened){
- mError=openPlatformInput()?NO_ERROR:UNKNOWN_ERROR;
- mOpened=true;
- mNeedToSendFinishedDeviceScan=true;
- }
- for(;;){
- //Reportanydevicesthathadlastbeenadded/removed.
- if(mClosingDevices!=NULL){
- device_t*device=mClosingDevices;
- LOGV("Reportingdeviceclosed:id=0x%x,name=%s\n",
- device->id,device->path.string());
- mClosingDevices=device->next;
- if(device->id==mFirstKeyboardId){
- outEvent->deviceId=0;
- }else{
- outEvent->deviceId=device->id;
- }
- outEvent->type=DEVICE_REMOVED;
- outEvent->when=systemTime(SYSTEM_TIME_MONOTONIC);
- deletedevice;
- mNeedToSendFinishedDeviceScan=true;
- returntrue;
- }
- if(mOpeningDevices!=NULL){
- device_t*device=mOpeningDevices;
- LOGV("Reportingdeviceopened:id=0x%x,name=%s\n",
- device->id,device->path.string());
- mOpeningDevices=device->next;
- if(device->id==mFirstKeyboardId){
- outEvent->deviceId=0;
- }else{
- outEvent->deviceId=device->id;
- }
- outEvent->type=DEVICE_ADDED;
- outEvent->when=systemTime(SYSTEM_TIME_MONOTONIC);
- mNeedToSendFinishedDeviceScan=true;
- returntrue;
- }
- if(mNeedToSendFinishedDeviceScan){
- mNeedToSendFinishedDeviceScan=false;
- outEvent->type=FINISHED_DEVICE_SCAN;
- outEvent->when=systemTime(SYSTEM_TIME_MONOTONIC);
- returntrue;
- }
- //Grabthenextinputevent.
- for(;;){
- //Consumebufferedinputevents,ifany.
- if(mInputBufferIndex<mInputBufferCount){
- conststructinput_event&iev=mInputBufferData[mInputBufferIndex++];
- constdevice_t*device=mDevices[mInputDeviceIndex];
- LOGV("%sgot:t0=%d,t1=%d,type=%d,code=%d,v=%d",device->path.string(),
- (int)iev.time.tv_sec,(int)iev.time.tv_usec,iev.type,iev.code,iev.value);
- if(device->id==mFirstKeyboardId){
- outEvent->deviceId=0;
- }else{
- outEvent->deviceId=device->id;
- }
- outEvent->type=iev.type;
- outEvent->scanCode=iev.code;
- if(iev.type==EV_KEY){
- status_terr=device->layoutMap->map(iev.code,
- &outEvent->keyCode,&outEvent->flags);
- LOGV("iev.code=%dkeyCode=%dflags=0x%08xerr=%d\n",
- iev.code,outEvent->keyCode,outEvent->flags,err);
- if(err!=0){
- outEvent->keyCode=AKEYCODE_UNKNOWN;
- outEvent->flags=0;
- }
- }else{
- outEvent->keyCode=iev.code;
- }
- outEvent->value=iev.value;
- //Useaneventtimestampinthesametimebaseas
- //java.lang.System.nanoTime()andandroid.os.SystemClock.uptimeMillis()
- //asexpectedbytherestofthesystem.
- outEvent->when=systemTime(SYSTEM_TIME_MONOTONIC);
- returntrue;
- }
- //Finishreadingalleventsfromdevicesidentifiedinpreviouspoll().
- //ThiscodeassumesthatmInputDeviceIndexisinitially0andthatthe
- //reventsmemberofpollfdisinitializedto0whenthedeviceisfirstadded.
- //SincemFDs[0]isusedforinotify,weprocessregulareventsstartingatindex1.
- mInputDeviceIndex+=1;
- if(mInputDeviceIndex>=mFDCount){
- break;
- }
- conststructpollfd&pfd=mFDs[mInputDeviceIndex];
- if(pfd.revents&POLLIN){
- int32_treadSize=read(pfd.fd,mInputBufferData,
- sizeof(structinput_event)*INPUT_BUFFER_SIZE);
- if(readSize<0){
- if(errno!=EAGAIN&&errno!=EINTR){
- LOGW("couldnotgetevent(errno=%d)",errno);
- }
- }elseif((readSize%sizeof(structinput_event))!=0){
- LOGE("couldnotgetevent(wrongsize:%d)",readSize);
- }else{
- mInputBufferCount=readSize/sizeof(structinput_event);
- mInputBufferIndex=0;
- }
- }
- }
- ......
- mInputDeviceIndex=0;
- //Pollforevents.Mindthewakelockdance!
- //Weholdawakelockatalltimesexceptduringpoll().Thisworksduetosome
- //subtlechoreography.Whenadevicedriverhaspending(unread)events,itacquires
- //akernelwakelock.However,oncethelastpendingeventhasbeenread,thedevice
- //driverwillreleasethekernelwakelock.Topreventthesystemfromgoingtosleep
- //whenthishappens,theEventHubholdsontoitsownuserwakelockwhiletheclient
- //isprocessingevents.Thusthesystemcanonlysleepiftherearenoevents
- //pendingorcurrentlybeingprocessed.
- release_wake_lock(WAKE_LOCK_ID);
- intpollResult=poll(mFDs,mFDCount,-1);
- acquire_wake_lock(PARTIAL_WAKE_LOCK,WAKE_LOCK_ID);
- if(pollResult<=0){
- if(errno!=EINTR){
- LOGW("pollfailed(errno=%d)\n",errno);
- usleep(100000);
- }
- }
- }
- }
首先,如果是第一次进入到这个函数中时,成员变量mOpened的值为false,于是就会调用openPlatformInput函数来打开系统输入设备,在本文中,我们主要讨论的输入设备就是键盘了。打开了这些输入设备文件后,就可以对这些输入设备进行是监控了。如果不是第一次进入到这个函数,那么就会分析当前有没有输入事件发生,如果有,就返回这个事件,否则就会进入等待状态,等待下一次输入事件的发生。在我们这个场景中,就是等待下一次键盘事件的发生了。
我们先分析openPlatformInput函数的实现,然后回过头来分析这个getEvent函数的具体的实现。
Step 19. EventHub.openPlatformInput
这个函数定义在frameworks/base/libs/ui/EventHub.cpp文件中:
- boolEventHub::openPlatformInput(void)
- {
- ......
- res=scanDir(device_path);
- if(res<0){
- LOGE("scandirfailedfor%s\n",device_path);
- }
- returntrue;
- }
- staticconstchar*device_path="/dev/input";
Step 20.EventHub.scanDir
这个函数定义在frameworks/base/libs/ui/EventHub.cpp文件中:
- intEventHub::scanDir(constchar*dirname)
- {
- chardevname[PATH_MAX];
- char*filename;
- DIR*dir;
- structdirent*de;
- dir=opendir(dirname);
- if(dir==NULL)
- return-1;
- strcpy(devname,dirname);
- filename=devname+strlen(devname);
- *filename++='/';
- while((de=readdir(dir))){
- if(de->d_name[0]=='.'&&
- (de->d_name[1]=='\0'||
- (de->d_name[1]=='.'&&de->d_name[2]=='\0')))
- continue;
- strcpy(filename,de->d_name);
- openDevice(devname);
- }
- closedir(dir);
- return0;
- }
Step 21.EventHub.openDevice
这个函数定义在frameworks/base/libs/ui/EventHub.cpp文件中:
- intEventHub::openDevice(constchar*deviceName){
- intversion;
- intfd;
- structpollfd*new_mFDs;
- device_t**new_devices;
- char**new_device_names;
- charname[80];
- charlocation[80];
- charidstr[80];
- structinput_idid;
- LOGV("Openingdevice:%s",deviceName);
- AutoMutex_l(mLock);
- fd=open(deviceName,O_RDWR);
- if(fd<0){
- LOGE("couldnotopen%s,%s\n",deviceName,strerror(errno));
- return-1;
- }
- ......
- intdevid=0;
- while(devid<mNumDevicesById){
- if(mDevicesById[devid].device==NULL){
- break;
- }
- devid++;
- }
- ......
- mDevicesById[devid].seq=(mDevicesById[devid].seq+(1<<SEQ_SHIFT))&SEQ_MASK;
- if(mDevicesById[devid].seq==0){
- mDevicesById[devid].seq=1<<SEQ_SHIFT;
- }
- new_mFDs=(pollfd*)realloc(mFDs,sizeof(mFDs[0])*(mFDCount+1));
- new_devices=(device_t**)realloc(mDevices,sizeof(mDevices[0])*(mFDCount+1));
- if(new_mFDs==NULL||new_devices==NULL){
- LOGE("outofmemory");
- return-1;
- }
- mFDs=new_mFDs;
- mDevices=new_devices;
- ......
- device_t*device=newdevice_t(devid|mDevicesById[devid].seq,deviceName,name);
- if(device==NULL){
- LOGE("outofmemory");
- return-1;
- }
- device->fd=fd;
- mFDs[mFDCount].fd=fd;
- mFDs[mFDCount].events=POLLIN;
- mFDs[mFDCount].revents=0;
- //Figureoutthekindsofeventsthedevicereports.
- uint8_tkey_bitmask[sizeof_bit_array(KEY_MAX+1)];
- memset(key_bitmask,0,sizeof(key_bitmask));
- LOGV("Gettingkeys...");
- if(ioctl(fd,EVIOCGBIT(EV_KEY,sizeof(key_bitmask)),key_bitmask)>=0){
- //Seeifthisisakeyboard.Ignoreeverythinginthebuttonrangeexceptfor
- //gamepadswhicharealsoconsideredkeyboards.
- if(containsNonZeroByte(key_bitmask,0,sizeof_bit_array(BTN_MISC))
- ||containsNonZeroByte(key_bitmask,sizeof_bit_array(BTN_GAMEPAD),
- sizeof_bit_array(BTN_DIGI))
- ||containsNonZeroByte(key_bitmask,sizeof_bit_array(KEY_OK),
- sizeof_bit_array(KEY_MAX+1))){
- device->classes|=INPUT_DEVICE_CLASS_KEYBOARD;
- device->keyBitmask=newuint8_t[sizeof(key_bitmask)];
- if(device->keyBitmask!=NULL){
- memcpy(device->keyBitmask,key_bitmask,sizeof(key_bitmask));
- }else{
- deletedevice;
- LOGE("outofmemoryallocatingkeybitmask");
- return-1;
- }
- }
- }
- ......
- if((device->classes&INPUT_DEVICE_CLASS_KEYBOARD)!=0){
- chartmpfn[sizeof(name)];
- charkeylayoutFilename[300];
- //amoredescriptivename
- device->name=name;
- //replaceallthespaceswithunderscores
- strcpy(tmpfn,name);
- for(char*p=strchr(tmpfn,'');p&&*p;p=strchr(tmpfn,''))
- *p='_';
- //findthe.klfileweneedforthisdevice
- constchar*root=getenv("ANDROID_ROOT");
- snprintf(keylayoutFilename,sizeof(keylayoutFilename),
- "%s/usr/keylayout/%s.kl",root,tmpfn);
- booldefaultKeymap=false;
- if(access(keylayoutFilename,R_OK)){
- snprintf(keylayoutFilename,sizeof(keylayoutFilename),
- "%s/usr/keylayout/%s",root,"qwerty.kl");
- defaultKeymap=true;
- }
- status_tstatus=device->layoutMap->load(keylayoutFilename);
- if(status){
- LOGE("Error%dloadingkeylayout.",status);
- }
- //telltheworldaboutthedevname(thedescriptivename)
- if(!mHaveFirstKeyboard&&!defaultKeymap&&strstr(name,"-keypad")){
- //thebuilt-inkeyboardhasawell-knowndeviceIDof0,
- //thisdevicebetternotgoaway.
- mHaveFirstKeyboard=true;
- mFirstKeyboardId=device->id;
- property_set("hw.keyboards.0.devname",name);
- }else{
- //ensuremFirstKeyboardIdissetto-something-.
- if(mFirstKeyboardId==0){
- mFirstKeyboardId=device->id;
- }
- }
- charpropName[100];
- sprintf(propName,"hw.keyboards.%u.devname",device->id);
- property_set(propName,name);
- //'Q'keysupport=cheaptestofwhetherthisisanalpha-capablekbd
- if(hasKeycodeLocked(device,AKEYCODE_Q)){
- device->classes|=INPUT_DEVICE_CLASS_ALPHAKEY;
- }
- //SeeifthisdevicehasaDPAD.
- if(hasKeycodeLocked(device,AKEYCODE_DPAD_UP)&&
- hasKeycodeLocked(device,AKEYCODE_DPAD_DOWN)&&
- hasKeycodeLocked(device,AKEYCODE_DPAD_LEFT)&&
- hasKeycodeLocked(device,AKEYCODE_DPAD_RIGHT)&&
- hasKeycodeLocked(device,AKEYCODE_DPAD_CENTER)){
- device->classes|=INPUT_DEVICE_CLASS_DPAD;
- }
- //Seeifthisdevicehasagamepad.
- for(size_ti=0;i<sizeof(GAMEPAD_KEYCODES)/sizeof(GAMEPAD_KEYCODES[0]);i++){
- if(hasKeycodeLocked(device,GAMEPAD_KEYCODES[i])){
- device->classes|=INPUT_DEVICE_CLASS_GAMEPAD;
- break;
- }
- }
- LOGI("Newkeyboard:device->id=0x%xdevname='%s'propName='%s'keylayout='%s'\n",
- device->id,name,propName,keylayoutFilename);
- }
- ......
- mDevicesById[devid].device=device;
- device->next=mOpeningDevices;
- mOpeningDevices=device;
- mDevices[mFDCount]=device;
- mFDCount++;
- return0;
- }
- fd=open(deviceName,O_RDWR);
- mDevicesById[devid].seq=(mDevicesById[devid].seq+(1<<SEQ_SHIFT))&SEQ_MASK;
- if(mDevicesById[devid].seq==0){
- mDevicesById[devid].seq=1<<SEQ_SHIFT;
- }
- mDevicesById[devid].seq=(mDevicesById[devid].seq+(1<<SEQ_SHIFT))&SEQ_MASK;
- if(mDevicesById[devid].seq==0){
- mDevicesById[devid].seq=1<<SEQ_SHIFT;
- }
- new_mFDs=(pollfd*)realloc(mFDs,sizeof(mFDs[0])*(mFDCount+1));
- new_devices=(device_t**)realloc(mDevices,sizeof(mDevices[0])*(mFDCount+1));
- if(new_mFDs==NULL||new_devices==NULL){
- LOGE("outofmemory");
- return-1;
- }
- mFDs=new_mFDs;
- mDevices=new_devices;
- ......
- device_t*device=newdevice_t(devid|mDevicesById[devid].seq,deviceName,name);
- if(device==NULL){
- LOGE("outofmemory");
- return-1;
- }
- device->fd=fd;
同时,这个设备文件还会保存在数组mFDs中:
- mFDs[mFDCount].fd=fd;
- mFDs[mFDCount].events=POLLIN;
- mFDs[mFDCount].revents=0;
- //Figureoutthekindsofeventsthedevicereports.
- uint8_tkey_bitmask[sizeof_bit_array(KEY_MAX+1)];
- memset(key_bitmask,0,sizeof(key_bitmask));
- LOGV("Gettingkeys...");
- if(ioctl(fd,EVIOCGBIT(EV_KEY,sizeof(key_bitmask)),key_bitmask)>=0){
- //Seeifthisisakeyboard.Ignoreeverythinginthebuttonrangeexceptfor
- //gamepadswhicharealsoconsideredkeyboards.
- if(containsNonZeroByte(key_bitmask,0,sizeof_bit_array(BTN_MISC))
- ||containsNonZeroByte(key_bitmask,sizeof_bit_array(BTN_GAMEPAD),
- sizeof_bit_array(BTN_DIGI))
- ||containsNonZeroByte(key_bitmask,sizeof_bit_array(KEY_OK),
- sizeof_bit_array(KEY_MAX+1))){
- device->classes|=INPUT_DEVICE_CLASS_KEYBOARD;
- device->keyBitmask=newuint8_t[sizeof(key_bitmask)];
- if(device->keyBitmask!=NULL){
- memcpy(device->keyBitmask,key_bitmask,sizeof(key_bitmask));
- }else{
- deletedevice;
- LOGE("outofmemoryallocatingkeybitmask");
- return-1;
- }
- }
- }
如果是键盘设备,初始化工作还未完成,还要继续设置键盘的布局等信息:
- if((device->classes&INPUT_DEVICE_CLASS_KEYBOARD)!=0){
- chartmpfn[sizeof(name)];
- charkeylayoutFilename[300];
- //amoredescriptivename
- device->name=name;
- //replaceallthespaceswithunderscores
- strcpy(tmpfn,name);
- for(char*p=strchr(tmpfn,'');p&&*p;p=strchr(tmpfn,''))
- *p='_';
- //findthe.klfileweneedforthisdevice
- constchar*root=getenv("ANDROID_ROOT");
- snprintf(keylayoutFilename,sizeof(keylayoutFilename),
- "%s/usr/keylayout/%s.kl",root,tmpfn);
- booldefaultKeymap=false;
- if(access(keylayoutFilename,R_OK)){
- snprintf(keylayoutFilename,sizeof(keylayoutFilename),
- "%s/usr/keylayout/%s",root,"qwerty.kl");
- defaultKeymap=true;
- }
- status_tstatus=device->layoutMap->load(keylayoutFilename);
- if(status){
- LOGE("Error%dloadingkeylayout.",status);
- }
- //telltheworldaboutthedevname(thedescriptivename)
- if(!mHaveFirstKeyboard&&!defaultKeymap&&strstr(name,"-keypad")){
- //thebuilt-inkeyboardhasawell-knowndeviceIDof0,
- //thisdevicebetternotgoaway.
- mHaveFirstKeyboard=true;
- mFirstKeyboardId=device->id;
- property_set("hw.keyboards.0.devname",name);
- }else{
- //ensuremFirstKeyboardIdissetto-something-.
- if(mFirstKeyboardId==0){
- mFirstKeyboardId=device->id;
- }
- }
- charpropName[100];
- sprintf(propName,"hw.keyboards.%u.devname",device->id);
- property_set(propName,name);
- //'Q'keysupport=cheaptestofwhetherthisisanalpha-capablekbd
- if(hasKeycodeLocked(device,AKEYCODE_Q)){
- device->classes|=INPUT_DEVICE_CLASS_ALPHAKEY;
- }
- //SeeifthisdevicehasaDPAD.
- if(hasKeycodeLocked(device,AKEYCODE_DPAD_UP)&&
- hasKeycodeLocked(device,AKEYCODE_DPAD_DOWN)&&
- hasKeycodeLocked(device,AKEYCODE_DPAD_LEFT)&&
- hasKeycodeLocked(device,AKEYCODE_DPAD_RIGHT)&&
- hasKeycodeLocked(device,AKEYCODE_DPAD_CENTER)){
- device->classes|=INPUT_DEVICE_CLASS_DPAD;
- }
- //Seeifthisdevicehasagamepad.
- for(size_ti=0;i<sizeof(GAMEPAD_KEYCODES)/sizeof(GAMEPAD_KEYCODES[0]);i++){
- if(hasKeycodeLocked(device,GAMEPAD_KEYCODES[i])){
- device->classes|=INPUT_DEVICE_CLASS_GAMEPAD;
- break;
- }
- }
- LOGI("Newkeyboard:device->id=0x%xdevname='%s'propName='%s'keylayout='%s'\n",
- device->id,name,propName,keylayoutFilename);
- }
回到Step 18中,我们继续分析EventHub.getEvent函数的实现。
在中间的for循环里面,首先会检查当前是否有输入设备被关闭,如果有,就返回一个设备移除的事件给调用方:
- //Reportanydevicesthathadlastbeenadded/removed.
- if(mClosingDevices!=NULL){
- device_t*device=mClosingDevices;
- LOGV("Reportingdeviceclosed:id=0x%x,name=%s\n",
- device->id,device->path.string());
- mClosingDevices=device->next;
- if(device->id==mFirstKeyboardId){
- outEvent->deviceId=0;
- }else{
- outEvent->deviceId=device->id;
- }
- outEvent->type=DEVICE_REMOVED;
- outEvent->when=systemTime(SYSTEM_TIME_MONOTONIC);
- deletedevice;
- mNeedToSendFinishedDeviceScan=true;
- returntrue;
- }
- if(mOpeningDevices!=NULL){
- device_t*device=mOpeningDevices;
- LOGV("Reportingdeviceopened:id=0x%x,name=%s\n",
- device->id,device->path.string());
- mOpeningDevices=device->next;
- if(device->id==mFirstKeyboardId){
- outEvent->deviceId=0;
- }else{
- outEvent->deviceId=device->id;
- }
- outEvent->type=DEVICE_ADDED;
- outEvent->when=systemTime(SYSTEM_TIME_MONOTONIC);
- mNeedToSendFinishedDeviceScan=true;
- returntrue;
- }
- if(mNeedToSendFinishedDeviceScan){
- mNeedToSendFinishedDeviceScan=false;
- outEvent->type=FINISHED_DEVICE_SCAN;
- outEvent->when=systemTime(SYSTEM_TIME_MONOTONIC);
- returntrue;
- }
- //Grabthenextinputevent.
- for(;;){
- //Consumebufferedinputevents,ifany.
- if(mInputBufferIndex<mInputBufferCount){
- conststructinput_event&iev=mInputBufferData[mInputBufferIndex++];
- constdevice_t*device=mDevices[mInputDeviceIndex];
- LOGV("%sgot:t0=%d,t1=%d,type=%d,code=%d,v=%d",device->path.string(),
- (int)iev.time.tv_sec,(int)iev.time.tv_usec,iev.type,iev.code,iev.value);
- if(device->id==mFirstKeyboardId){
- outEvent->deviceId=0;
- }else{
- outEvent->deviceId=device->id;
- }
- outEvent->type=iev.type;
- outEvent->scanCode=iev.code;
- if(iev.type==EV_KEY){
- status_terr=device->layoutMap->map(iev.code,
- &outEvent->keyCode,&outEvent->flags);
- LOGV("iev.code=%dkeyCode=%dflags=0x%08xerr=%d\n",
- iev.code,outEvent->keyCode,outEvent->flags,err);
- if(err!=0){
- outEvent->keyCode=AKEYCODE_UNKNOWN;
- outEvent->flags=0;
- }
- }else{
- outEvent->keyCode=iev.code;
- }
- outEvent->value=iev.value;
- //Useaneventtimestampinthesametimebaseas
- //java.lang.System.nanoTime()andandroid.os.SystemClock.uptimeMillis()
- //asexpectedbytherestofthesystem.
- outEvent->when=systemTime(SYSTEM_TIME_MONOTONIC);
- returntrue;
- }
- //Finishreadingalleventsfromdevicesidentifiedinpreviouspoll().
- //ThiscodeassumesthatmInputDeviceIndexisinitially0andthatthe
- //reventsmemberofpollfdisinitializedto0whenthedeviceisfirstadded.
- //SincemFDs[0]isusedforinotify,weprocessregulareventsstartingatindex1.
- mInputDeviceIndex+=1;
- if(mInputDeviceIndex>=mFDCount){
- break;
- }
- conststructpollfd&pfd=mFDs[mInputDeviceIndex];
- if(pfd.revents&POLLIN){
- int32_treadSize=read(pfd.fd,mInputBufferData,
- sizeof(structinput_event)*INPUT_BUFFER_SIZE);
- if(readSize<0){
- if(errno!=EAGAIN&&errno!=EINTR){
- LOGW("couldnotgetevent(errno=%d)",errno);
- }
- }elseif((readSize%sizeof(structinput_event))!=0){
- LOGE("couldnotgetevent(wrongsize:%d)",readSize);
- }else{
- mInputBufferCount=readSize/sizeof(structinput_event);
- mInputBufferIndex=0;
- }
- }
- }
- intpollResult=poll(mFDs,mFDCount,-1);
这里的mFDs包含了我们所要监控的输入设备的打开文件描述符,这是在前面的openPlatformInput函数中初始化的。
Step 22. poll
这是一个Linux系统的文件操作系统调用,它用来查询指定的文件列表是否有有可读写的,如果有,就马上返回,否则的话,就阻塞线程,并等待驱动程序唤醒,重新调用poll函数,或超时返回。在我们的这个场景中,就是要查询是否有键盘事件发生,如果有的话,就返回,否则的话,当前线程就睡眠等待键盘事件的发生了。
这样,InputManager的启动过程就分析完了,下面我们再分析应用程序注册键盘消息接收通道的过程。
2.应用程序注册键盘消息接收通道的过程分析
InputManager启动以后,就开始负责监控键盘输入事件了。当InputManager监控到键盘输入事件时,它应该把这个键盘事件分发给谁呢?当然是要把这个键盘消息分发给当前激活的Activity窗口了,不过,当前激活的Activity窗口还需要主动注册一个键盘消息接收通道到InputManager中去,InputManager才能把这个键盘消息分发给它处理。那么,当前被激活的Activity窗口又是什么时候去注册这个键盘消息接收通道的呢?在前面一篇文章Android应用程序启动过程源代码分析中,我们分析Android应用程序的启动过程时,在Step 33中分析到ActivityThread类的handleLaunchActivity函数中,我们曾经说过,当函数handleLaunchActivity调用performLaunchActivity函数来加载这个完毕应用程序的默认Activity后,再次回到handleLaunchActivity函数时,会调用handleResumeActivity函数来使这个Activity进入Resumed状态。在调用handleResumeActivity函数的过程中,ActivityThread会通过android.view.WindowManagerImpl类为该Activity创建一个ViewRoot实例,并且会通过调用ViewRoot类的setView成员函数把与该Activity关联的View设置到这个ViewRoot中去,而Activity正是通过ViewRoot类的setView成员函数来注册键盘消息接收通道的。
有了这些背影知识后,接下来,我们就可以从ViewRoot.setView函数开始分析应用程序注册键盘消息接收通道的过程了。首先看一下这个注册过程的序列图,然后再详细分析每一个步骤:
Step 1. ViewRoot.setView
这个函数定义在frameworks/base/core/java/android/view/ViewRoot.java文件中:
- publicfinalclassViewRootextendsHandlerimplementsViewParent,
- View.AttachInfo.Callbacks{
- ......
- publicvoidsetView(Viewview,WindowManager.LayoutParamsattrs,
- ViewpanelParentView){
- ......
- synchronized(this){
- if(mView==null){
- ......
- //Schedulethefirstlayout-before-addingtothewindow
- //manager,tomakesurewedotherelayoutbeforereceiving
- //anyothereventsfromthesystem.
- requestLayout();
- mInputChannel=newInputChannel();
- try{
- res=sWindowSession.add(mWindow,mWindowAttributes,
- getHostVisibility(),mAttachInfo.mContentInsets,
- mInputChannel);
- }catch(RemoteExceptione){
- ......
- }finally{
- ......
- }
- ......
- if(viewinstanceofRootViewSurfaceTaker){
- mInputQueueCallback=
- ((RootViewSurfaceTaker)view).willYouTakeTheInputQueue();
- }
- if(mInputQueueCallback!=null){
- mInputQueue=newInputQueue(mInputChannel);
- mInputQueueCallback.onInputQueueCreated(mInputQueue);
- }else{
- InputQueue.registerInputChannel(mInputChannel,mInputHandler,
- Looper.myQueue());
- }
- ......
- }
- }
- }
- }
这个函数中与注册键盘消息接收通道(InputChannel)相关的逻辑主要有三处,一是调用requestLayout函数来通知InputManager,这个Activity窗口是当前被激活的窗口,二是调用sWindowSession(WindowManagerService内部类Session的远程接口)的add成员函数来把键盘消息接收通道的一端注册在InputManager中,三是调用InputQueue的registerInputChannel成员函数来把键盘消息接收通道的另一端注册在本应用程序的消息循环(Looper)中。这样,当InputManager监控到有键盘消息时,就会先找到当前被激活的窗口,然后找到其在InputManager中对应的键盘消息接收通道,通过这个通道在InputManager中的一端来通知在应用程序消息循环中的另一端,就把键盘消息分发给当前激活的Activity窗口了。
在接下来的内容中,我们首先描述requestLayout函数是如何告诉InputManager当前的Activity窗口便是激活窗口的,接着再回过头来分析应用程序是如何把键盘消息接收通道的一端注册到InputManager中去的,最后分析应用程序是如何键盘消息接收通道的另一端注册到本应用程序的消息循环中去了。
Step 2.ViewRoot.requestLayout
这个函数定义在frameworks/base/core/java/android/view/ViewRoot.java文件中:
- publicfinalclassViewRootextendsHandlerimplementsViewParent,
- View.AttachInfo.Callbacks{
- ......
- publicvoidrequestLayout(){
- ......
- mLayoutRequested=true;
- scheduleTraversals();
- }
- ......
- }
Step 3.WindowManagerService.Session.relayout
这个函数定义在frameworks/base/services/java/com/android/server/WindowManagerService.java文件中:
- publicclassWindowManagerServiceextendsIWindowManager.Stub
- implementsWatchdog.Monitor{
- ......
- privatefinalclassSessionextendsIWindowSession.Stub
- implementsIBinder.DeathRecipient{
- ......
- publicintrelayout(IWindowwindow,WindowManager.LayoutParamsattrs,
- intrequestedWidth,intrequestedHeight,intviewFlags,
- booleaninsetsPending,RectoutFrame,RectoutContentInsets,
- RectoutVisibleInsets,ConfigurationoutConfig,SurfaceoutSurface){
- //Log.d(TAG,">>>>>>ENTEREDrelayoutfrom"+Binder.getCallingPid());
- intres=relayoutWindow(this,window,attrs,
- requestedWidth,requestedHeight,viewFlags,insetsPending,
- outFrame,outContentInsets,outVisibleInsets,outConfig,outSurface);
- //Log.d(TAG,"<<<<<<EXITINGrelayoutto"+Binder.getCallingPid());
- returnres;
- }
- ......
- }
- ......
- }
这个函数只是简单地调用WindowManagerService的成员函数relayoutWIndow来进一步处理。
Step 4.WindowManagerService.relayoutWIndow
这个函数定义在frameworks/base/services/java/com/android/server/WindowManagerService.java文件中:
- publicclassWindowManagerServiceextendsIWindowManager.Stub
- implementsWatchdog.Monitor{
- ......
- publicintrelayoutWindow(Sessionsession,IWindowclient,
- WindowManager.LayoutParamsattrs,intrequestedWidth,
- intrequestedHeight,intviewVisibility,booleaninsetsPending,
- RectoutFrame,RectoutContentInsets,RectoutVisibleInsets,
- ConfigurationoutConfig,SurfaceoutSurface){
- ......
- synchronized(mWindowMap){
- ......
- mInputMonitor.updateInputWindowsLw();
- }
- ......
- }
- ......
- }
Step 5.InputMonitor.updateInputWindowsLw
这个函数定义在frameworks/base/services/java/com/android/server/WindowManagerService.java文件中:
- publicclassWindowManagerServiceextendsIWindowManager.Stub
- implementsWatchdog.Monitor{
- ......
- finalclassInputMonitor{
- ......
- /*Updatesthecachedwindowinformationprovidedtotheinputdispatcher.*/
- publicvoidupdateInputWindowsLw(){
- //Populatetheinputwindowlistwithinformationaboutallofthewindowsthat
- //couldpotentiallyreceiveinput.
- //Asanoptimization,wecouldtrytoprunethelistofwindowsbutthisturns
- //outtobedifficultbecauseonlythenativecodeknowsforsurewhichwindow
- //currentlyhastouchfocus.
- finalArrayList<WindowState>windows=mWindows;
- finalintN=windows.size();
- for(inti=N-1;i>=0;i--){
- finalWindowStatechild=windows.get(i);
- if(child.mInputChannel==null||child.mRemoved){
- //Skipthiswindowbecauseitcannotpossiblyreceiveinput.
- continue;
- }
- ......
- //Addawindowtoourlistofinputwindows.
- finalInputWindowinputWindow=mTempInputWindows.add();
- ......
- }
- //Sendwindowstonativecode.
- mInputManager.setInputWindows(mTempInputWindows.toNullTerminatedArray());
- ......
- }
- ......
- }
- ......
- }
Step 6.InputManager.setInputWindows
这个函数定义在frameworks/base/services/java/com/android/server/InputManager.java文件中:
- publicclassInputManager{
- ......
- publicvoidsetInputWindows(InputWindow[]windows){
- nativeSetInputWindows(windows);
- }
- ......
- }
Step 7.InputManager.nativeSetInputWindows
这个函数定义在frameworks/base/services/jni/com_android_server_InputManager.cpp文件中:
- staticvoidandroid_server_InputManager_nativeSetInputWindows(JNIEnv*env,jclassclazz,
- jobjectArraywindowObjArray){
- if(checkInputManagerUnitialized(env)){
- return;
- }
- gNativeInputManager->setInputWindows(env,windowObjArray);
- }
Step 8.NativeInputManager.setInputWindows
这个函数定义在frameworks/base/services/jni/com_android_server_InputManager.cpp文件中:
- voidNativeInputManager::setInputWindows(JNIEnv*env,jobjectArraywindowObjArray){
- Vector<InputWindow>windows;
- jsizelength=env->GetArrayLength(windowObjArray);
- for(jsizei=0;i<length;i++){
- jobjectinputTargetObj=env->GetObjectArrayElement(windowObjArray,i);
- if(!inputTargetObj){
- break;//foundnullelementindicatingendofusedportionofthearray
- }
- windows.push();
- InputWindow&window=windows.editTop();
- boolvalid=populateWindow(env,inputTargetObj,window);
- if(!valid){
- windows.pop();
- }
- env->DeleteLocalRef(inputTargetObj);
- }
- mInputManager->getDispatcher()->setInputWindows(windows);
- }
Step 9. InputDispatcher.setInputWindows
这个函数定义在frameworks/base/libs/ui/InputDispatcher.cpp文件中:
- voidInputDispatcher::setInputWindows(constVector<InputWindow>&inputWindows){
- ......
- {//acquirelock
- AutoMutex_l(mLock);
- //Clearoldwindowpointers.
- sp<InputChannel>oldFocusedWindowChannel;
- if(mFocusedWindow){
- oldFocusedWindowChannel=mFocusedWindow->inputChannel;
- mFocusedWindow=NULL;
- }
- mWindows.clear();
- //Loopovernewwindowsandrebuildthenecessarywindowpointersfor
- //trackingfocusandtouch.
- mWindows.appendVector(inputWindows);
- size_tnumWindows=mWindows.size();
- for(size_ti=0;i<numWindows;i++){
- constInputWindow*window=&mWindows.itemAt(i);
- if(window->hasFocus){
- mFocusedWindow=window;
- break;
- }
- }
- ......
- }//releaselock
- ......
- }
这样,InputManager就把当前激活的Activity窗口保存在InputDispatcher中了,后面就可以把键盘消息分发给它来处理。
回到Step 1中的ViewRoot.setView函数中,接下来就调用下面语句来注册键盘消息接收通道的一端到InputManager中去:
- mInputChannel=newInputChannel();
- try{
- res=sWindowSession.add(mWindow,mWindowAttributes,
- getHostVisibility(),mAttachInfo.mContentInsets,
- mInputChannel);
- }catch(RemoteExceptione){
- ......
- }finally{
- ......
- }
Step 10.WindowManagerService.Session.add
这个函数定义在frameworks/base/services/java/com/android/server/WindowManagerService.java文件中:
- publicclassWindowManagerServiceextendsIWindowManager.Stub
- implementsWatchdog.Monitor{
- ......
- privatefinalclassSessionextendsIWindowSession.Stub
- implementsIBinder.DeathRecipient{
- ......
- publicintadd(IWindowwindow,WindowManager.LayoutParamsattrs,
- intviewVisibility,RectoutContentInsets,InputChanneloutInputChannel){
- returnaddWindow(this,window,attrs,viewVisibility,outContentInsets,
- outInputChannel);
- }
- ......
- }
- ......
- }
Step 11.WindowManagerService.addWindow
这个函数定义在frameworks/base/services/java/com/android/server/WindowManagerService.java文件中:
- publicclassWindowManagerServiceextendsIWindowManager.Stub
- implementsWatchdog.Monitor{
- ......
- publicintaddWindow(Sessionsession,IWindowclient,
- WindowManager.LayoutParamsattrs,intviewVisibility,
- RectoutContentInsets,InputChanneloutInputChannel){
- ......
- WindowStatewin=null;
- synchronized(mWindowMap){
- ......
- win=newWindowState(session,client,token,
- attachedWindow,attrs,viewVisibility);
- ......
- if(outInputChannel!=null){
- Stringname=win.makeInputChannelName();
- InputChannel[]inputChannels=InputChannel.openInputChannelPair(name);
- win.mInputChannel=inputChannels[0];
- inputChannels[1].transferToBinderOutParameter(outInputChannel);
- mInputManager.registerInputChannel(win.mInputChannel);
- }
- ......
- }
- ......
- }
- ......
- }
- inputChannels[1].transferToBinderOutParameter(outInputChannel);
创建输入通道之前,WindowManagerService会为当前Activity窗口创建一个WindowState对象win,用来记录这个Activity窗口的状态信息。当创建这对输入管道成功以后,也会把其中的一个管道保存在这个WindowState对象win的成员变量mInputChannel中,后面要注销这个管道的时候,就是从这个WindownState对象中取回这个管道的:
- win.mInputChannel=inputChannels[0];
接下来我们就看一下InputChannel.openInputChannelPair函数的实现。
Step 12.InputChannel.openInputChannelPair
这个函数定义在frameworks/base/core/java/android/view/InputChannel.java文件中:
- publicfinalclassInputChannelimplementsParcelable{
- ......
- /**
- *Createsanewinputchannelpair.Onechannelshouldbeprovidedtotheinput
- *dispatcherandtheothertotheapplication'sinputqueue.
- *@paramnameThedescriptive(non-unique)nameofthechannelpair.
- *@returnApairofinputchannels.Theyaresymmetricandindistinguishable.
- */
- publicstaticInputChannel[]openInputChannelPair(Stringname){
- ......
- returnnativeOpenInputChannelPair(name);
- }
- ......
- }
Step 13.InputChannel.nativeOpenInputChannelPair
这个函数定义在frameworks/base/core/jni/android_view_InputChannel.cpp文件中:
- staticjobjectArrayandroid_view_InputChannel_nativeOpenInputChannelPair(JNIEnv*env,
- jclassclazz,jstringnameObj){
- constchar*nameChars=env->GetStringUTFChars(nameObj,NULL);
- String8name(nameChars);
- env->ReleaseStringUTFChars(nameObj,nameChars);
- sp<InputChannel>serverChannel;
- sp<InputChannel>clientChannel;
- status_tresult=InputChannel::openInputChannelPair(name,serverChannel,clientChannel);
- if(result){
- LOGE("Couldnotopeninputchannelpair.status=%d",result);
- jniThrowRuntimeException(env,"Couldnotopeninputchannelpair.");
- returnNULL;
- }
- //TODOmorerobusterrorchecking
- jobjectserverChannelObj=android_view_InputChannel_createInputChannel(env,
- newNativeInputChannel(serverChannel));
- jobjectclientChannelObj=android_view_InputChannel_createInputChannel(env,
- newNativeInputChannel(clientChannel));
- jobjectArraychannelPair=env->NewObjectArray(2,gInputChannelClassInfo.clazz,NULL);
- env->SetObjectArrayElement(channelPair,0,serverChannelObj);
- env->SetObjectArrayElement(channelPair,1,clientChannelObj);
- returnchannelPair;
- }
Step 14.InputChannel.openInputChannelPair
这个函数定义在frameworks/base/libs/ui/InputTransport.cpp文件中:
- status_tInputChannel::openInputChannelPair(constString8&name,
- sp<InputChannel>&outServerChannel,sp<InputChannel>&outClientChannel){
- status_tresult;
- intserverAshmemFd=ashmem_create_region(name.string(),DEFAULT_MESSAGE_BUFFER_SIZE);
- if(serverAshmemFd<0){
- ......
- }else{
- result=ashmem_set_prot_region(serverAshmemFd,PROT_READ|PROT_WRITE);
- if(result<0){
- ......
- }else{
- //Dupthefiledescriptorbecausetheserverandclientinputchannelobjectsthat
- //arereturnedmayhavedifferentlifetimesbuttheysharethesamesharedmemoryregion.
- intclientAshmemFd;
- clientAshmemFd=dup(serverAshmemFd);
- if(clientAshmemFd<0){
- ......
- }else{
- intforward[2];
- if(pipe(forward)){
- ......
- }else{
- intreverse[2];
- if(pipe(reverse)){
- ......
- }else{
- String8serverChannelName=name;
- serverChannelName.append("(server)");
- outServerChannel=newInputChannel(serverChannelName,
- serverAshmemFd,reverse[0],forward[1]);
- String8clientChannelName=name;
- clientChannelName.append("(client)");
- outClientChannel=newInputChannel(clientChannelName,
- clientAshmemFd,forward[0],reverse[1]);
- returnOK;
- }
- ......
- }
- ......
- }
- }
- }
- ......
- }
- InputChannel::InputChannel(constString8&name,int32_tashmemFd,int32_treceivePipeFd,
- int32_tsendPipeFd):
- mName(name),mAshmemFd(ashmemFd),mReceivePipeFd(receivePipeFd),mSendPipeFd(sendPipeFd){
- ......
- }
具体来说,Server端和Client端的InputChannel分别是这样构成的:
Server Input Channel: ashmem - reverse(read) - forward(write)
Client Input Channel: ashmem - forward(read) - reverse(write)
前面我们在Android应用程序消息处理机制(Looper、Handler)分析一文中学习Android应用程序的消息处理机制时知道,管道可以用作进程间通信,其中一个进程在管道的读端等待新的内空可读,另一个进程在管道的写端写入新的内容以唤醒在管道读端等待的进程,这样就实现了进程间通信。在我们这个情景中,Client端可以在前向管道(forward pipe)的读端睡眠等待新的内容可读,而Server端可以通过向前向管道(forward
pipe)的写端写入新的内容来唤醒Client端,同样,把前向管道(forward pipe)换成反向管道(reverse pipe),也能实现Client端唤醒Server端。在后面我们分析InputDispatcher分发键盘消息时,会看到它们的用法。
有了这些背景知识后,相信上面的openInputChannelPair的代码就容易理解了,这里就不再详述了。
创建好了这两个输入通道后,回到Step 11中的WindowManagerService.addWindow函数中,一方面它把刚才创建的Client端的输入通道通过outInputChannel参数返回到应用程序中:
- inputChannels[1].transferToBinderOutParameter(outInputChannel);
另一方面,它还要把刚才创建的Server端的输入通道注册到InputManager中:
- mInputManager.registerInputChannel(win.mInputChannel);
这个函数定义在frameworks/base/services/java/com/android/server/InputManager.java文件中:
- publicclassInputManager{
- ......
- /**
- *Registersaninputchannelsothatitcanbeusedasaninputeventtarget.
- *@paraminputChannelTheinputchanneltoregister.
- */
- publicvoidregisterInputChannel(InputChannelinputChannel){
- if(inputChannel==null){
- thrownewIllegalArgumentException("inputChannelmustnotbenull.");
- }
- nativeRegisterInputChannel(inputChannel,false);
- }
- ......
- }
Step 16.InputManager.nativeRegisterInputChannel
这个函数定义在frameworks/base/services/jni/com_android_server_InputManager.cpp 文件中:
- staticvoidandroid_server_InputManager_nativeRegisterInputChannel(JNIEnv*env,jclassclazz,
- jobjectinputChannelObj,jbooleanmonitor){
- ......
- sp<InputChannel>inputChannel=android_view_InputChannel_getInputChannel(env,
- inputChannelObj);
- ......
- status_tstatus=gNativeInputManager->registerInputChannel(
- env,inputChannel,inputChannelObj,monitor);
- ......
- }
Step 17. NativeInputManager.registerInputChannel
这个函数定义在frameworks/base/services/jni/com_android_server_InputManager.cpp 文件中:
- status_tNativeInputManager::registerInputChannel(JNIEnv*env,
- constsp<InputChannel>&inputChannel,jobjectinputChannelObj,boolmonitor){
- ......
- status=mInputManager->getDispatcher()->registerInputChannel(inputChannel,monitor);
- ......
- }
Step 18.InputDispatcher.registerInputChannel
这个函数定义在frameworks/base/libs/ui/InputDispatcher.cpp文件中:
- status_tInputDispatcher::registerInputChannel(constsp<InputChannel>&inputChannel,boolmonitor){
- ......
- {//acquirelock
- AutoMutex_l(mLock);
- if(getConnectionIndexLocked(inputChannel)>=0){
- LOGW("Attemptedtoregisteralreadyregisteredinputchannel'%s'",
- inputChannel->getName().string());
- returnBAD_VALUE;
- }
- sp<Connection>connection=newConnection(inputChannel);
- status_tstatus=connection->initialize();
- if(status){
- LOGE("Failedtoinitializeinputpublisherforinputchannel'%s',status=%d",
- inputChannel->getName().string(),status);
- returnstatus;
- }
- int32_treceiveFd=inputChannel->getReceivePipeFd();
- mConnectionsByReceiveFd.add(receiveFd,connection);
- if(monitor){
- mMonitoringChannels.push(inputChannel);
- }
- mLooper->addFd(receiveFd,0,ALOOPER_EVENT_INPUT,handleReceiveCallback,this);
- runCommandsLockedInterruptible();
- }//releaselock
- returnOK;
- }
道的读端描述符。回忆一下Step 14中的InputChannel.openInputChannelPair函数,我们创建了一个Server端的InputChannel,就是对应这里的inputChannel了,这个inputChannel的Receive Pipe Fd就是我们前面说的反向管道的读端描述符了。有了这个Receive Pipe Fd后,就以它作为Key值来把前面创建的Connection对象保存在InputDispatcher中,这样就基本完成键盘消息接收通道的注册了。但是,注册的工作还未完成,最后,还要把这个Receive Pipe Fd添加到InputDispatcher的成员变量mLooper中去,这里的成员变量mLooper的类型为Looper,我们在前面介绍InputManager的启动过程的Step 15中已经见过了,这里就不再详述了,不过这里仍然值得介绍一下它的addFd函数。
在前面一篇文章Android应用程序消息处理机制(Looper、Handler)分析中,我们在介绍到Android应用程序的消息循环一节时,曾经说过,在Looper类内部,会创建一个管道,然后Looper会睡眠在这个管道的读端,等待另外一个线程来往这个管道的写端写入新的内容,从而唤醒等待在这个管道读端的线程,除此之外,Looper还可以同时睡眠等待在其它的文件描述符上,因为它是通过Linux系统的epoll机制来批量等待指定的文件有新的内容可读的。这些其它的文件描述符就是通过Looper类的addFd成函数添加进去的了,在添加的时候,还可以指定回调函数,即当这个文件描述符所指向的文件有新的内容可读时,Looper就会调用这个hanldeReceiveCallback函数,有兴趣的读者可以自己研究一下Looper类的addFd函数的实现,它位于frameworks/base/libs/utils/Looper.cpp文件中。
分析到这里,Server端的InputChannel就注册完成了。回忆一下前面介绍InputManager启动过程的Step 14,这时InputDispatcherThread同时睡眠在InputDispatcher的成员变量mLooper内部的管道的读端以及这里的Server端InputChannel里面的反向管道的读端上,mLooper内部的管道的读端等待键盘事件的发生而被唤醒,而Server端InputChannel里面的反向管道的读端等待Client端InputChannel里面的反向管道的写端被写入新的内容而被唤醒。
Server端的InputChannel注册完成后,回到Step 11中的WindowManagerService.addWindow函数,接下来就是把Client端的InputChannel转换成addWindow的参数outInputChannel中,然后返回到Step 1中的ViewRoot.setView函数中,继续执行Client端的InputChannel的注册过程,即为应用程序这一侧注册键盘消息接收通道:
- if(viewinstanceofRootViewSurfaceTaker){
- mInputQueueCallback=
- ((RootViewSurfaceTaker)view).willYouTakeTheInputQueue();
- }
- if(mInputQueueCallback!=null){
- mInputQueue=newInputQueue(mInputChannel);
- mInputQueueCallback.onInputQueueCreated(mInputQueue);
- }else{
- InputQueue.registerInputChannel(mInputChannel,mInputHandler,
- Looper.myQueue());
- }
这里的变量view一般不为RootViewSurfaceTaker的实例,因此,最后会执行下面语句:
- InputQueue.registerInputChannel(mInputChannel,mInputHandler,
- Looper.myQueue());
Step 19. InputQueue.registerInputChannel
这个函数定义在frameworks/base/core/java/android/view/InputQueue.java文件中:
- publicfinalclassInputQueue{
- ......
- publicstaticvoidregisterInputChannel(InputChannelinputChannel,InputHandlerinputHandler,
- MessageQueuemessageQueue){
- ......
- synchronized(sLock){
- ......
- nativeRegisterInputChannel(inputChannel,inputHandler,messageQueue);
- }
- }
- ......
- }
Step 20.InputQueue.nativeRegisterInputChannel
这个函数定义在frameworks/base/core/jni/android_view_InputQueue.cpp文件中:
- staticvoidandroid_view_InputQueue_nativeRegisterInputChannel(JNIEnv*env,jclassclazz,
- jobjectinputChannelObj,jobjectinputHandlerObj,jobjectmessageQueueObj){
- status_tstatus=gNativeInputQueue.registerInputChannel(
- env,inputChannelObj,inputHandlerObj,messageQueueObj);
- ......
- }
Step 21. NativeInputQueue.registerInputChannel
这个函数定义在frameworks/base/core/jni/android_view_InputQueue.cpp文件中:
- status_tNativeInputQueue::registerInputChannel(JNIEnv*env,jobjectinputChannelObj,
- jobjectinputHandlerObj,jobjectmessageQueueObj){
- sp<InputChannel>inputChannel=android_view_InputChannel_getInputChannel(env,
- inputChannelObj);
- ......
- sp<Looper>looper=android_os_MessageQueue_getLooper(env,messageQueueObj);
- {//acquirelock
- AutoMutex_l(mLock);
- if(getConnectionIndex(inputChannel)>=0){
- LOGW("Attemptedtoregisteralreadyregisteredinputchannel'%s'",
- inputChannel->getName().string());
- returnBAD_VALUE;
- }
- uint16_tconnectionId=mNextConnectionId++;
- sp<Connection>connection=newConnection(connectionId,inputChannel,looper);
- status_tresult=connection->inputConsumer.initialize();
- if(result){
- LOGW("Failedtoinitializeinputconsumerforinputchannel'%s',status=%d",
- inputChannel->getName().string(),result);
- returnresult;
- }
- connection->inputHandlerObjGlobal=env->NewGlobalRef(inputHandlerObj);
- int32_treceiveFd=inputChannel->getReceivePipeFd();
- mConnectionsByReceiveFd.add(receiveFd,connection);
- looper->addFd(receiveFd,0,ALOOPER_EVENT_INPUT,handleReceiveCallback,this);
- }//releaselock
- ......
- returnOK;
- }
介绍到这里,应用程序注册键盘消息接收通道的过程就分析完成了。这个过程比较复杂,这里小结一下:
A. 即将会被激活的Activity窗口,会通知InputManager,它是当前激活的窗口,因此,一旦发生键盘事件的时候,InputManager就把这个键盘事件抛给这个Activity处理;
B. 应用程序会为这个Activity窗口和InputManager之间创建一个键盘消息接收通道,这个通道的一端由一个Server端的InputChannel构成,另一端由Client端的InputChannel构成,Server端的InputChannel注册在由InputManager所管理的InputDispatcher中,而Client端的InputChannel注册在由应用程序主线程的消息循环对象Looper中;
C. 注册在InputDispatcher中的InputChannel由一个反向管道的读端和一个前向管道的写端组成,而注册在应用程序主线程的消息循环对象Looper中的InputChannel由这个前向管道的读端和反向管道的写端组成,这种交叉结构使得当有键盘事件发生时,InputDispatcher可以把这个事件通知给应用程序。
应用程序注册好键盘消息接收通道后,接下来就开始分析InputManager分发键盘消息给应用程序的过程了。
3.InputManager分发键盘消息给应用程序的过程分析
在分析InputManager分发键盘消息给应用程序的过程之前,我们先假设现在没有键盘事件发生,因此,InputManager中的InputReader正在睡眠等待键盘事件的发生,而InputManager中的InputDispatcher正在等待InputReader从睡眠中醒过来并且唤醒它,而应用程序也正在消息循环中等待InputDispatcher从睡眠中醒过来并且唤醒它。这时候,用户按下键盘中的一个键,于是,一系列唤醒的事件就依次发生了,一直到应用程序中正在显示的Activity得到通知,有键盘事件发生了。我们先来看这个过程的序列图,然后再详细分析每一个步骤:
Step 1. InputReader.pollOnce
Step 2. EventHub.getEvent
这两个函数分别定义在frameworks/base/libs/ui/InputReader.cpp和frameworks/base/libs/ui/EventHub.cpp文件中,前面我们在分析InputManager的启动过程的Step 17和Step 18时,已经看到过这两个函数了。InputReaderThread线程会不民地循环调用InputReader.pollOnce函数来读入键盘事件,而实际的键盘事件读入操作是由EventHub.getEvent函数来进行的。如果当前没有键盘事件发生,InputReaderThread线程就会睡眠在EventHub.getEvent函数上,而当键盘事件发生后,就会把这个事件封装成一个RawEvent对象,然后返回到pollOnce函数中,执行process函数进一步处理:
- voidInputReader::loopOnce(){
- RawEventrawEvent;
- mEventHub->getEvent(&rawEvent);
- ......
- process(&rawEvent);
- }
这个函数定义在frameworks/base/libs/ui/InputReader.cpp文件中:
- voidInputReader::process(constRawEvent*rawEvent){
- switch(rawEvent->type){
- caseEventHubInterface::DEVICE_ADDED:
- addDevice(rawEvent->deviceId);
- break;
- caseEventHubInterface::DEVICE_REMOVED:
- removeDevice(rawEvent->deviceId);
- break;
- caseEventHubInterface::FINISHED_DEVICE_SCAN:
- handleConfigurationChanged(rawEvent->when);
- break;
- default:
- consumeEvent(rawEvent);
- break;
- }
- }
当键盘事件发生时,rawEvent->type的值为EV_KEY,这是一个宏定义,具体可以参考bionic/libc/kernel/common/linux/input.h文件:
- #defineEV_KEY0x01
Step 4.InputReader.consumeEvent
这个函数定义在frameworks/base/libs/ui/InputReader.cpp文件中:
- voidInputReader::consumeEvent(constRawEvent*rawEvent){
- int32_tdeviceId=rawEvent->deviceId;
- {//acquiredeviceregistryreaderlock
- RWLock::AutoRLock_rl(mDeviceRegistryLock);
- ssize_tdeviceIndex=mDevices.indexOfKey(deviceId);
- if(deviceIndex<0){
- LOGW("DiscardingeventforunknowndeviceId%d.",deviceId);
- return;
- }
- InputDevice*device=mDevices.valueAt(deviceIndex);
- if(device->isIgnored()){
- //LOGD("DiscardingeventforignoreddeviceId%d.",deviceId);
- return;
- }
- device->process(rawEvent);
- }//releasedeviceregistryreaderlock
- }
Step 5. InputDevice.process
这个函数定义在frameworks/base/libs/ui/InputReader.cpp文件中:
- voidInputDevice::process(constRawEvent*rawEvent){
- size_tnumMappers=mMappers.size();
- for(size_ti=0;i<numMappers;i++){
- InputMapper*mapper=mMappers[i];
- mapper->process(rawEvent);
- }
- }
Step 6.KeyboardInputMapper.process
这个函数定义在frameworks/base/libs/ui/InputReader.cpp文件中:
- voidKeyboardInputMapper::process(constRawEvent*rawEvent){
- switch(rawEvent->type){
- caseEV_KEY:{
- int32_tscanCode=rawEvent->scanCode;
- if(isKeyboardOrGamepadKey(scanCode)){
- processKey(rawEvent->when,rawEvent->value!=0,rawEvent->keyCode,scanCode,
- rawEvent->flags);
- }
- break;
- }
- }
- }
Step 7.KeyboardInputMapper.processKey
这个函数定义在frameworks/base/libs/ui/InputReader.cpp文件中:
- voidKeyboardInputMapper::processKey(nsecs_twhen,booldown,int32_tkeyCode,
- int32_tscanCode,uint32_tpolicyFlags){
- int32_tnewMetaState;
- nsecs_tdownTime;
- boolmetaStateChanged=false;
- {//acquirelock
- AutoMutex_l(mLock);
- if(down){
- //Rotatekeycodesaccordingtoorientationifneeded.
- //Note:getDisplayInfoisnon-reentrantsowecancontinueholdingthelock.
- if(mAssociatedDisplayId>=0){
- int32_torientation;
- if(!getPolicy()->getDisplayInfo(mAssociatedDisplayId,NULL,NULL,&orientation)){
- return;
- }
- keyCode=rotateKeyCode(keyCode,orientation);
- }
- //Addkeydown.
- ssize_tkeyDownIndex=findKeyDownLocked(scanCode);
- if(keyDownIndex>=0){
- //keyrepeat,besuretousesamekeycodeasbeforeincaseofrotation
- keyCode=mLocked.keyDowns.itemAt(keyDownIndex).keyCode;
- }else{
- //keydown
- if((policyFlags&POLICY_FLAG_VIRTUAL)
- &&mContext->shouldDropVirtualKey(when,getDevice(),keyCode,scanCode)){
- return;
- }
- mLocked.keyDowns.push();
- KeyDown&keyDown=mLocked.keyDowns.editTop();
- keyDown.keyCode=keyCode;
- keyDown.scanCode=scanCode;
- }
- mLocked.downTime=when;
- }else{
- //Removekeydown.
- ssize_tkeyDownIndex=findKeyDownLocked(scanCode);
- if(keyDownIndex>=0){
- //keyup,besuretousesamekeycodeasbeforeincaseofrotation
- keyCode=mLocked.keyDowns.itemAt(keyDownIndex).keyCode;
- mLocked.keyDowns.removeAt(size_t(keyDownIndex));
- }else{
- //keywasnotactuallydown
- LOGI("Droppingkeyupfromdevice%sbecausethekeywasnotdown."
- "keyCode=%d,scanCode=%d",
- getDeviceName().string(),keyCode,scanCode);
- return;
- }
- }
- int32_toldMetaState=mLocked.metaState;
- newMetaState=updateMetaState(keyCode,down,oldMetaState);
- if(oldMetaState!=newMetaState){
- mLocked.metaState=newMetaState;
- metaStateChanged=true;
- }
- downTime=mLocked.downTime;
- }//releaselock
- if(metaStateChanged){
- getContext()->updateGlobalMetaState();
- }
- getDispatcher()->notifyKey(when,getDeviceId(),AINPUT_SOURCE_KEYBOARD,policyFlags,
- down?AKEY_EVENT_ACTION_DOWN:AKEY_EVENT_ACTION_UP,
- AKEY_EVENT_FLAG_FROM_SYSTEM,keyCode,scanCode,newMetaState,downTime);
- }
- //Rotatekeycodesaccordingtoorientationifneeded.
- //Note:getDisplayInfoisnon-reentrantsowecancontinueholdingthelock.
- if(mAssociatedDisplayId>=0){
- int32_torientation;
- if(!getPolicy()->getDisplayInfo(mAssociatedDisplayId,NULL,NULL,&orientation)){
- return;
- }
- keyCode=rotateKeyCode(keyCode,orientation);
- }
- //Addkeydown.
- ssize_tkeyDownIndex=findKeyDownLocked(scanCode);
- if(keyDownIndex>=0){
- //keyrepeat,besuretousesamekeycodeasbeforeincaseofrotation
- keyCode=mLocked.keyDowns.itemAt(keyDownIndex).keyCode;
- }else{
- //keydown
- if((policyFlags&POLICY_FLAG_VIRTUAL)
- &&mContext->shouldDropVirtualKey(when,getDevice(),keyCode,scanCode)){
- return;
- }
- mLocked.keyDowns.push();
- KeyDown&keyDown=mLocked.keyDowns.editTop();
- keyDown.keyCode=keyCode;
- keyDown.scanCode=scanCode;
- }
如果是松开键盘上的某个键,就把它从mLocked.keyDowns里面删除:
- //Removekeydown.
- ssize_tkeyDownIndex=findKeyDownLocked(scanCode);
- if(keyDownIndex>=0){
- //keyup,besuretousesamekeycodeasbeforeincaseofrotation
- keyCode=mLocked.keyDowns.itemAt(keyDownIndex).keyCode;
- mLocked.keyDowns.removeAt(size_t(keyDownIndex));
- }else{
- //keywasnotactuallydown
- LOGI("Droppingkeyupfromdevice%sbecausethekeywasnotdown."
- "keyCode=%d,scanCode=%d",
- getDeviceName().string(),keyCode,scanCode);
- return;
- }
最后,KeyboardInputMappger函数通知InputDispatcher,有键盘事件发生了:
- getDispatcher()->notifyKey(when,getDeviceId(),AINPUT_SOURCE_KEYBOARD,policyFlags,
- down?AKEY_EVENT_ACTION_DOWN:AKEY_EVENT_ACTION_UP,
- AKEY_EVENT_FLAG_FROM_SYSTEM,keyCode,scanCode,newMetaState,downTime);
这个函数定义在frameworks/base/libs/ui/InputDispatcher.cpp文件中:
- voidInputDispatcher::notifyKey(nsecs_teventTime,int32_tdeviceId,int32_tsource,
- uint32_tpolicyFlags,int32_taction,int32_tflags,
- int32_tkeyCode,int32_tscanCode,int32_tmetaState,nsecs_tdownTime){
- ......
- if(!validateKeyEvent(action)){
- return;
- }
- /*Accordingtohttp://source.android.com/porting/keymaps_keyboard_input.html
- *Keydefinitions:KeydefinitionsfollowthesyntaxkeySCANCODEKEYCODE[FLAGS...],
- *whereSCANCODEisanumber,KEYCODEisdefinedinyourspecifickeylayoutfile
- *(android.keylayout.xxx),andpotentialFLAGSaredefinedasfollows:
- *SHIFT:Whilepressed,theshiftkeymodifierisset
- *ALT:Whilepressed,thealtkeymodifierisset
- *CAPS:Whilepressed,thecapslockkeymodifierisset
- *SinceKeyEvent.javadoesn'tcheckifCaplockisONandwedon'thavea
- *modiferstateforcaplock,wewillnotsupportit.
- */
- if(policyFlags&POLICY_FLAG_ALT){
- metaState|=AMETA_ALT_ON|AMETA_ALT_LEFT_ON;
- }
- if(policyFlags&POLICY_FLAG_ALT_GR){
- metaState|=AMETA_ALT_ON|AMETA_ALT_RIGHT_ON;
- }
- if(policyFlags&POLICY_FLAG_SHIFT){
- metaState|=AMETA_SHIFT_ON|AMETA_SHIFT_LEFT_ON;
- }
- policyFlags|=POLICY_FLAG_TRUSTED;
- mPolicy->interceptKeyBeforeQueueing(eventTime,deviceId,action,/*byref*/flags,
- keyCode,scanCode,/*byref*/policyFlags);
- boolneedWake;
- {//acquirelock
- AutoMutex_l(mLock);
- int32_trepeatCount=0;
- KeyEntry*newEntry=mAllocator.obtainKeyEntry(eventTime,
- deviceId,source,policyFlags,action,flags,keyCode,scanCode,
- metaState,repeatCount,downTime);
- needWake=enqueueInboundEventLocked(newEntry);
- }//releaselock
- if(needWake){
- mLooper->wake();
- }
- }
- staticboolisValidKeyAction(int32_taction){
- switch(action){
- caseAKEY_EVENT_ACTION_DOWN:
- caseAKEY_EVENT_ACTION_UP:
- returntrue;
- default:
- returnfalse;
- }
- }
- staticboolvalidateKeyEvent(int32_taction){
- if(!isValidKeyAction(action)){
- LOGE("Keyeventhasinvalidactioncode0x%x",action);
- returnfalse;
- }
- returntrue;
- }
参数action检查通过后,还通过policyFlags参数来检查一下同时是否有ALT和SHIFT键被按下:
- if(policyFlags&POLICY_FLAG_ALT){
- metaState|=AMETA_ALT_ON|AMETA_ALT_LEFT_ON;
- }
- if(policyFlags&POLICY_FLAG_ALT_GR){
- metaState|=AMETA_ALT_ON|AMETA_ALT_RIGHT_ON;
- }
- if(policyFlags&POLICY_FLAG_SHIFT){
- metaState|=AMETA_SHIFT_ON|AMETA_SHIFT_LEFT_ON;
- }
- boolInputDispatcher::enqueueInboundEventLocked(EventEntry*entry){
- boolneedWake=mInboundQueue.isEmpty();
- mInboundQueue.enqueueAtTail(entry);
- switch(entry->type){
- caseEventEntry::TYPE_KEY:{
- KeyEntry*keyEntry=static_cast<KeyEntry*>(entry);
- if(isAppSwitchKeyEventLocked(keyEntry)){
- if(keyEntry->action==AKEY_EVENT_ACTION_DOWN){
- mAppSwitchSawKeyDown=true;
- }elseif(keyEntry->action==AKEY_EVENT_ACTION_UP){
- if(mAppSwitchSawKeyDown){
- <spanstyle="white-space:pre"></span>......
- mAppSwitchDueTime=keyEntry->eventTime+APP_SWITCH_TIMEOUT;
- mAppSwitchSawKeyDown=false;
- needWake=true;
- }
- }
- }
- break;
- }
- }
- returnneedWake;
- }
回到前面的notifyKey函数中,根据enqueueInboundEventLocked函数的返回值来决定是否要唤醒InputDispatccherThread线程:
- if(needWake){
- mLooper->wake();
- }
Step 9. Looper.wake
这个函数定义在frameworks/base/libs/utils/Looper.cpp文件中,在前面一篇文章Android应用程序消息处理机制(Looper、Handler)分析中,我们已经分析过这个函数了,这里不再详述,简单来说,它的作用就是用来唤醒睡眠在Looper对象内部的管道读端的线程,在我们的这个场景中,睡眠在Looper对象内部的管道读端的线程就是InputDispatccherThread线程了。
从上面InputManager启动过程的Step 15中,我们知道,此时InputDispatccherThread线程正在InputDispatcher类的dispatchOnceb函数中通过调用mLooper->loopOnce函数进入睡眠状态。当它被唤醒以后,它就会从InputDispatcher类的dispatchOnceb函数返回到InputDispatcherThread类的threadLoop函数,而InputDispatcherThread类的threadLoop函数是循环执行的,于是,它又会再次进入到InputDispatcher类的dispatchOnce函数来处理当前发生的键盘事件。
Step 10.InputDispatcher.dispatchOnce
这个函数定义在frameworks/base/libs/ui/InputDispatcher.cpp文件中:
- voidInputDispatcher::dispatchOnce(){
- nsecs_tkeyRepeatTimeout=mPolicy->getKeyRepeatTimeout();
- nsecs_tkeyRepeatDelay=mPolicy->getKeyRepeatDelay();
- nsecs_tnextWakeupTime=LONG_LONG_MAX;
- {//acquirelock
- AutoMutex_l(mLock);
- dispatchOnceInnerLocked(keyRepeatTimeout,keyRepeatDelay,&nextWakeupTime);
- ......
- }//releaselock
- ......
- }
Step 11.InputDispatcher.dispatchOnceInnerLocked
这个函数定义在frameworks/base/libs/ui/InputDispatcher.cpp文件中:
- voidInputDispatcher::dispatchOnceInnerLocked(nsecs_tkeyRepeatTimeout,
- nsecs_tkeyRepeatDelay,nsecs_t*nextWakeupTime){
- ......
- //Readytostartanewevent.
- //Ifwedon'talreadyhaveapendingevent,gograbone.
- if(!mPendingEvent){
- if(mInboundQueue.isEmpty()){
- ......
- }else{
- //Inboundqueuehasatleastoneentry.
- EventEntry*entry=mInboundQueue.headSentinel.next;
- ......
- mInboundQueue.dequeue(entry);
- mPendingEvent=entry;
- }
- ......
- }
- ......
- switch(mPendingEvent->type){
- ......
- caseEventEntry::TYPE_KEY:{
- KeyEntry*typedEntry=static_cast<KeyEntry*>(mPendingEvent);
- ......
- done=dispatchKeyLocked(currentTime,typedEntry,keyRepeatTimeout,
- &dropReason,nextWakeupTime);
- break;
- }
- ......
- }
- ......
- }
我们忽略了这个函数的次要逻辑,主要关注键盘事件的主要处理流程。首先,如果前面发生的键盘事件都已经处理完毕,那么这里的mPendingEvent就为NULL,又因为前面我们把刚刚发生的键盘事件加入了mInboundQueue队列,因此,这里mInboundQueue不为NULL,于是,这里就把mInboundQueue队列中的键盘事件取出来,放在mPendingEvent变量中:
- mInboundQueue.dequeue(entry);
- mPendingEvent=entry;
Step 12.InputDispatcher.dispatchKeyLocked
这个函数定义在frameworks/base/libs/ui/InputDispatcher.cpp文件中:
- boolInputDispatcher::dispatchKeyLocked(
- nsecs_tcurrentTime,KeyEntry*entry,nsecs_tkeyRepeatTimeout,
- DropReason*dropReason,nsecs_t*nextWakeupTime){
- ......
- //Identifytargets.
- if(!mCurrentInputTargetsValid){
- int32_tinjectionResult=findFocusedWindowTargetsLocked(currentTime,
- entry,nextWakeupTime);
- ......
- }
- //Dispatchthekey.
- dispatchEventToCurrentInputTargetsLocked(currentTime,entry,false);
- returntrue;
- }
我们先来看一InputDispatcher是如何找到当前激活的Activity窗口的,然后再分析它把键盘事件分发给当前激活Activity窗口的过程。
Step 13.InputDispatcher.findFocusedWindowTargetsLocked
这个函数定义在frameworks/base/libs/ui/InputDispatcher.cpp文件中:
- int32_tInputDispatcher::findFocusedWindowTargetsLocked(nsecs_tcurrentTime,
- constEventEntry*entry,nsecs_t*nextWakeupTime){
- mCurrentInputTargets.clear();
- int32_tinjectionResult;
- //Ifthereisnocurrentlyfocusedwindowandnofocusedapplication
- //thendroptheevent.
- if(!mFocusedWindow){
- if(mFocusedApplication){
- ......
- injectionResult=handleTargetsNotReadyLocked(currentTime,entry,
- mFocusedApplication,NULL,nextWakeupTime);
- gotoUnresponsive;
- }
- ......
- injectionResult=INPUT_EVENT_INJECTION_FAILED;
- gotoFailed;
- }
- //Checkpermissions.
- if(!checkInjectionPermission(mFocusedWindow,entry->injectionState)){
- injectionResult=INPUT_EVENT_INJECTION_PERMISSION_DENIED;
- gotoFailed;
- }
- //Ifthecurrentlyfocusedwindowispausedthenkeepwaiting.
- if(mFocusedWindow->paused){
- ......
- injectionResult=handleTargetsNotReadyLocked(currentTime,entry,
- mFocusedApplication,mFocusedWindow,nextWakeupTime);
- gotoUnresponsive;
- }
- //Ifthecurrentlyfocusedwindowisstillworkingonpreviouseventsthenkeepwaiting.
- if(!isWindowFinishedWithPreviousInputLocked(mFocusedWindow)){
- ......
- injectionResult=handleTargetsNotReadyLocked(currentTime,entry,
- mFocusedApplication,mFocusedWindow,nextWakeupTime);
- gotoUnresponsive;
- }
- //Success!Outputtargets.
- injectionResult=INPUT_EVENT_INJECTION_SUCCEEDED;
- addWindowTargetLocked(mFocusedWindow,InputTarget::FLAG_FOREGROUND,BitSet32(0));
- ......
- returninjectionResult;
- }
第二个if语句检查权限问题,原来,这个键盘事件除了是由硬件触发的外,也可以由其它进程注入进来的,如果这个键盘事件是由其它进程注入进来的,那么entry->injectState就不为NULL,它里面包含了事件注册者的进程ID和用户ID,于是,这里就会调用checkInjectionPermission来检查这个事件注入者的进程ID和用户ID,看看它是否具有这个权限。这里我们不考虑这种情况,因此,这里的entry->injectState为NULL,于是,这个if语句的检查也通过了。
第三个if语句检查当前激活的Activity窗口是否是处于paused状态,如果是的话,也不用进一步处理了。一般情况下,当前激活的Activity窗口都是处于resumed状态的,于是,这个if语句的检查也通过了。
第四个if语句检查当前激活的Activity窗口是否还正在处理前一个键盘事件,如果是的话,那就要等待它处理完前一个键盘事件后再来处理新的键盘事件了。这里我们也假设当前激活的Activity窗口不是正在处理前面的键盘事件,因此,这个if语句的检查也通过了。
最后,就调用addWindowTargetLocked函数把当前激活的Activity窗口添加到InputDispatcher类的mCurrentInputTargets成员变量中去。
Step 14.InputDispatcher.addWindowTargetLocked
这个函数定义在frameworks/base/libs/ui/InputDispatcher.cpp文件中:
- voidInputDispatcher::addWindowTargetLocked(constInputWindow*window,int32_ttargetFlags,
- BitSet32pointerIds){
- mCurrentInputTargets.push();
- InputTarget&target=mCurrentInputTargets.editTop();
- target.inputChannel=window->inputChannel;
- target.flags=targetFlags;
- target.xOffset=-window->frameLeft;
- target.yOffset=-window->frameTop;
- target.pointerIds=pointerIds;
- }
回到Step 12中的dispatchKeyLocked函数,它接下来就调用dispatchEventToCurrentInputTargetsLocked来进一步处理了。
Step 15.InputDispatcher.dispatchEventToCurrentInputTargetsLocked
这个函数定义在frameworks/base/libs/ui/InputDispatcher.cpp文件中:
- voidInputDispatcher::dispatchEventToCurrentInputTargetsLocked(nsecs_tcurrentTime,
- EventEntry*eventEntry,boolresumeWithAppendedMotionSample){
- ......
- for(size_ti=0;i<mCurrentInputTargets.size();i++){
- constInputTarget&inputTarget=mCurrentInputTargets.itemAt(i);
- ssize_tconnectionIndex=getConnectionIndexLocked(inputTarget.inputChannel);
- if(connectionIndex>=0){
- sp<Connection>connection=mConnectionsByReceiveFd.valueAt(connectionIndex);
- prepareDispatchCycleLocked(currentTime,connection,eventEntry,&inputTarget,
- resumeWithAppendedMotionSample);
- }else{
- ......
- }
- }
前面我们在分析应用程序注册键盘消息接收通道的过程时,在Step 18中(InputDispatcher.registerInputChannel),把Server端的InputChannel封装成了一个Connection,然后以这个InputChannel中的Receive Pipe Fd作为键值把这个Connection对象保存在mConnectionsByReceiveFd中。这里,既然我们已经通过mCurrentInputTargets得到了表示当前需要接收键盘事件的Activity窗口的InputTarget对象,而且这个InputTarget对象的inputChannel就表示当初在InputDispatcher中注册的Server端InputChannel,因此,这里就可以把这个Connection对象取出来,最后调用prepareDispatchCycleLocked函数来进一步处理。
Step 16.InputDispatcher.prepareDispatchCycleLocked
这个函数定义在frameworks/base/libs/ui/InputDispatcher.cpp文件中:
- voidInputDispatcher::prepareDispatchCycleLocked(nsecs_tcurrentTime,
- constsp<Connection>&connection,EventEntry*eventEntry,constInputTarget*inputTarget,
- boolresumeWithAppendedMotionSample){
- ......
- //Resumethedispatchcyclewithafreshlyappendedmotionsample.
- //Firstwecheckthatthelastdispatchentryintheoutboundqueueisforthesame
- //motioneventtowhichweappendedthemotionsample.Ifwefindsuchadispatch
- //entry,andifitiscurrentlyinprogressthenwetrytostreamthenewsample.
- boolwasEmpty=connection->outboundQueue.isEmpty();
- if(!wasEmpty&&resumeWithAppendedMotionSample){
- ......
- return;
- }
- //Thisisanewevent.
- //Enqueueanewdispatchentryontotheoutboundqueueforthisconnection.
- DispatchEntry*dispatchEntry=mAllocator.obtainDispatchEntry(eventEntry,//incrementsref
- inputTarget->flags,inputTarget->xOffset,inputTarget->yOffset);
- ......
- //Enqueuethedispatchentry.
- connection->outboundQueue.enqueueAtTail(dispatchEntry);
- //Iftheoutboundqueuewaspreviouslyempty,startthedispatchcyclegoing.
- if(wasEmpty){
- ......
- startDispatchCycleLocked(currentTime,connection);
- }
- }
在开始处理键盘事件之前,这个函数会检查一下传进来的参数connection中的outboundQueue事件队列是否为空,如果不为空,就要看看当前要处理的事件和outboundQueue队列中的最后一个事件是不是同一个motion事件,如果是的话,并且从上面传进来的resumeWithAppendedMotionSample参数为true,这时候就要以流水线的方式来处理这些motion事件了。在我们这个情景中,要处理的是键盘事件,因此在上面Step 12中传进来的resumeWithAppendedMotionSample参数为false,因此,我们略过这种情况。
接下来,就会把当前的键盘事件封装成一个DispatchEntry对象,然后添加到connection对象的outboundQueue队列中去,表示当前键盘事件是一个待处理的键盘事件。
当connection中的outboundQueue事件队列不为空,即wasEmpty为false时,说明当前这个Activity窗口正在处键盘事件了,因此,就不需要调用startDispatchCycleLocked来启动Activity窗口来处理这个事件了,因为一旦这个Activity窗口正在处键盘事件,它就会一直处理下去,直到它里的connection对象的outboundQueue为空为止。当connection中的outboundQueue事件队列为空时,就需要调用startDispatchCycleLocked来通知这个Activity窗口来执行键盘事件处理的流程了。
Step 17.InputDispatcher.startDispatchCycleLocked
这个函数定义在frameworks/base/libs/ui/InputDispatcher.cpp文件中:
- voidInputDispatcher::startDispatchCycleLocked(nsecs_tcurrentTime,
- constsp<Connection>&connection){
- ......
- DispatchEntry*dispatchEntry=connection->outboundQueue.headSentinel.next;
- //Markthedispatchentryasinprogress.
- dispatchEntry->inProgress=true;
- //Updatetheconnection'sinputstate.
- EventEntry*eventEntry=dispatchEntry->eventEntry;
- ......
- //Publishtheevent.
- status_tstatus;
- switch(eventEntry->type){
- caseEventEntry::TYPE_KEY:{
- KeyEntry*keyEntry=static_cast<KeyEntry*>(eventEntry);
- //Applytargetflags.
- int32_taction=keyEntry->action;
- int32_tflags=keyEntry->flags;
- //Publishthekeyevent.
- status=connection->inputPublisher.publishKeyEvent(keyEntry->deviceId,keyEntry->source,
- action,flags,keyEntry->keyCode,keyEntry->scanCode,
- keyEntry->metaState,keyEntry->repeatCount,keyEntry->downTime,
- keyEntry->eventTime);
- ......
- break;
- }
- ......
- }
- //Sendthedispatchsignal.
- status=connection->inputPublisher.sendDispatchSignal();
- ......
- }
Step 18. InputPublisher.publishKeyEvent
这个函数定义在frameworks/base/libs/ui/InputTransport.cpp文件中:
- status_tInputPublisher::publishKeyEvent(
- int32_tdeviceId,
- int32_tsource,
- int32_taction,
- int32_tflags,
- int32_tkeyCode,
- int32_tscanCode,
- int32_tmetaState,
- int32_trepeatCount,
- nsecs_tdownTime,
- nsecs_teventTime){
- ......
- status_tresult=publishInputEvent(AINPUT_EVENT_TYPE_KEY,deviceId,source);
- if(result<0){
- returnresult;
- }
- mSharedMessage->key.action=action;
- mSharedMessage->key.flags=flags;
- mSharedMessage->key.keyCode=keyCode;
- mSharedMessage->key.scanCode=scanCode;
- mSharedMessage->key.metaState=metaState;
- mSharedMessage->key.repeatCount=repeatCount;
- mSharedMessage->key.downTime=downTime;
- mSharedMessage->key.eventTime=eventTime;
- returnOK;
- }
这个匿名共享内存是什么时候创建的呢?前面我们在分析应用程序注册键盘消息接收通道的过程时,在Step 18中(InputDispatcher.registerInputChannel),在把Server端的InputChannel封装成一个 Connection对象时,会调用它的initialize成员函数来执行一些初始化工作,就是在这个时候创建这个匿名共享内存的了:
- sp<Connection>connection=newConnection(inputChannel);
- status_tstatus=connection->initialize();
- status_tInputPublisher::initialize(){
- ......
- intashmemFd=mChannel->getAshmemFd();
- intresult=ashmem_get_size_region(ashmemFd);
- ......
- mAshmemSize=(size_t)result;
- mSharedMessage=static_cast<InputMessage*>(mmap(NULL,mAshmemSize,
- PROT_READ|PROT_WRITE,MAP_SHARED,ashmemFd,0));
- ......
- mPinned=true;
- mSharedMessage->consumed=false;
- returnreset();
- }
这个匿名共享内存mSharedMessage的作用是什么呢?原来,在InputChannel中,前向管道和反向管道的作用只是用来在Server端和Client端之间相互通知有事件发生了,但是具体是什么样的事件,还需要去读取这个匿名共享内存的内容才知道。前面我们在分析应用程序注册键盘消息接收通道的过程时,在Step 14中(InputChannel.openInputChannelPair)创建Server端和Client端的InputChannel对时,创建一个匿名共享内存,这个匿名共享内存有两个文件描述符同时指向它,其中一个放在Server端的InputChannel中,另外一个放在Client端的InputChannel中。这样,当InputDispatcher通过Server端的InputChannel的前向管道来通知Client端有键盘事件发生时,Client端只要通过它的InputChannel中的匿名共享内存文件描述符去读取匿名共享内存中的内容,就可以知道发生了什么事情了。有关匿名共享内存的相关知识,请参考Android系统匿名共享内存Ashmem(Anonymous Shared Memory)简要介绍和学习计划一文。
回到Step 17中,接下来就是调用InputPublisher的成员函数sendDispatchSignal来通知Activity窗口处理键盘事件了。
Step 19.InputPublishe.sendDispatchSignal
这个函数定义在frameworks/base/libs/ui/InputTransport.cpp文件中:
- status_tInputPublisher::sendDispatchSignal(){
- ......
- mWasDispatched=true;
- returnmChannel->sendSignal(INPUT_SIGNAL_DISPATCH);
- }
Step 20. InputChannel.sendSignal
这个函数定义在frameworks/base/libs/ui/InputTransport.cpp文件中:
- status_tInputChannel::sendSignal(charsignal){
- ssize_tnWrite;
- do{
- nWrite=::write(mSendPipeFd,&signal,1);
- }while(nWrite==-1&&errno==EINTR);
- if(nWrite==1){
- ......
- returnOK;
- }
- return-errno;
- }
在前面分析应用程序注册键盘消息接收通道过程的Step 21中,我们也说过,当应用程序的主线程因为这个InputChannel中的前向管道的写端唤醒时,NativeInputQueue的成员函数handleReceiveCallback就会被回调,因此,接下来,应用程序的主线程就会被唤醒,然后执行NativeInputQueue的成员函数handleReceiveCallback。
Step 21.NativeInputQueue.handleReceiveCallback
这个函数定义在frameworks/base/core/jni/android_view_InputQueue.cpp文件中:
- intNativeInputQueue::handleReceiveCallback(intreceiveFd,intevents,void*data){
- NativeInputQueue*q=static_cast<NativeInputQueue*>(data);
- JNIEnv*env=AndroidRuntime::getJNIEnv();
- sp<Connection>connection;
- InputEvent*inputEvent;
- jobjectinputHandlerObjLocal;
- jlongfinishedToken;
- {//acquirelock
- AutoMutex_l(q->mLock);
- ssize_tconnectionIndex=q->mConnectionsByReceiveFd.indexOfKey(receiveFd);
- ......
- connection=q->mConnectionsByReceiveFd.valueAt(connectionIndex);
- ......
- status_tstatus=connection->inputConsumer.receiveDispatchSignal();
- if(status){
- ......
- return0;//removethecallback
- }
- ......
- status=connection->inputConsumer.consume(&connection->inputEventFactory,&inputEvent);
- ......
- finishedToken=generateFinishedToken(receiveFd,connection->id,connection->messageSeqNum);
- inputHandlerObjLocal=env->NewLocalRef(connection->inputHandlerObjGlobal);
- }//releaselock
- ......
- int32_tinputEventType=inputEvent->getType();
- jobjectinputEventObj;
- jmethodIDdispatchMethodId;
- switch(inputEventType){
- caseAINPUT_EVENT_TYPE_KEY:
- ......
- inputEventObj=android_view_KeyEvent_fromNative(env,
- static_cast<KeyEvent*>(inputEvent));
- dispatchMethodId=gInputQueueClassInfo.dispatchKeyEvent;
- break;
- }
- ......
- }
- ......
- env->CallStaticVoidMethod(gInputQueueClassInfo.clazz,
- dispatchMethodId,inputHandlerObjLocal,inputEventObj,
- jlong(finishedToken));
- ......
- return1;
- }
在InputChannel内部中,分别有一个InputPublisher对象和一个InputConsumer对象,对于Server端的InputChannel来说,它使用的是InputPublisher对象,通过它进行键盘消息的分发,而对于Client端的InputChannel来说,它使用的是InputConsumer对象,通过它进行键盘消息的读取。
获得了这个InputConsumer对象后首先是调用它的receiveDispatchSignal来确认是否是接收到了键盘消息的通知,如果是的话,再调用它的consume函数来把键盘事件读取出来,最后,调用Java层的回调对象InputQueue的DispatchKeyEvent来处理这个键盘事件。下面,我们就依次来分析这些过程。
Step 22.InputConsumer.receiveDispatchSignal
这个函数定义在frameworks/base/libs/ui/InputTransport.cpp文件中:
- status_tInputConsumer::receiveDispatchSignal(){
- ......
- charsignal;
- status_tresult=mChannel->receiveSignal(&signal);
- if(result){
- returnresult;
- }
- if(signal!=INPUT_SIGNAL_DISPATCH){
- ......
- returnUNKNOWN_ERROR;
- }
- returnOK;
- }
InputChannel类的receiveSignal函数也是定义在frameworks/base/libs/ui/InputTransport.cpp文件中:
- status_tInputChannel::receiveSignal(char*outSignal){
- ssize_tnRead;
- do{
- nRead=::read(mReceivePipeFd,outSignal,1);
- }while(nRead==-1&&errno==EINTR);
- if(nRead==1){
- ......
- returnOK;
- }
- ......
- return-errno;
- }
这个函数定义在frameworks/base/libs/ui/InputTransport.cpp文件中:
- status_tInputConsumer::consume(InputEventFactoryInterface*factory,InputEvent**outEvent){
- ......
- *outEvent=NULL;
- intashmemFd=mChannel->getAshmemFd();
- intresult=ashmem_pin_region(ashmemFd,0,0);
- ......
- if(mSharedMessage->consumed){
- ......
- returnINVALID_OPERATION;
- }
- //Acquirebut*neverrelease*thesemaphore.Contentiononthesemaphoreisusedtosignal
- //tothepublisherthatthemessagehasbeenconsumed(orisintheprocessofbeing
- //consumed).Eventuallythepublisherwillreinitializethesemaphoreforthenextmessage.
- result=sem_wait(&mSharedMessage->semaphore);
- ......
- mSharedMessage->consumed=true;
- switch(mSharedMessage->type){
- caseAINPUT_EVENT_TYPE_KEY:{
- KeyEvent*keyEvent=factory->createKeyEvent();
- if(!keyEvent)returnNO_MEMORY;
- populateKeyEvent(keyEvent);
- *outEvent=keyEvent;
- break;
- }
- ......
- }
- returnOK;
- }
回到Step 21中的handleReceiveCallback函数中,从InputConsumer中获得了键盘事件的内容(保存在本地变量inputEvent中)后,就开始要通知Java层的应用程序了。在前面分析应用程序注册键盘消息接收通道的过程时,在Step 21中(NativeInputQueue.registerInputChannel),会把传进来的对象inputHandlerObj保存在Connection对象中:
- connection->inputHandlerObjGlobal=env->NewGlobalRef(inputHandlerObj);
- inputHandlerObjLocal=env->NewLocalRef(connection->inputHandlerObjGlobal);
- dispatchMethodId=gInputQueueClassInfo.dispatchKeyEvent;
- inputEventObj=android_view_KeyEvent_fromNative(env,
- static_cast<KeyEvent*>(inputEvent));
- env->CallStaticVoidMethod(gInputQueueClassInfo.clazz,
- dispatchMethodId,inputHandlerObjLocal,inputEventObj,
- jlong(finishedToken));
这个函数定义在frameworks/base/core/java/android/view/InputQueue.java文件中:
- publicfinalclassInputQueue{
- ......
- privatestaticvoiddispatchKeyEvent(InputHandlerinputHandler,
- KeyEventevent,longfinishedToken){
- RunnablefinishedCallback=FinishedCallback.obtain(finishedToken);
- inputHandler.handleKey(event,finishedCallback);
- }
- ......
- }
这里的inputHandler对象是在前面分析应用程序注册键盘消息接收通道的过程时,在Step 1(ViewRoot.setView)中传进来的:
- InputQueue.registerInputChannel(mInputChannel,mInputHandler,
- Looper.myQueue());
Step 25. InputHandler.handleKey
这个函数定义在frameworks/base/core/java/android/view/ViewRoot.java文件中:
- publicfinalclassViewRootextendsHandlerimplementsViewParent,
- View.AttachInfo.Callbacks{
- ......
- privatefinalInputHandlermInputHandler=newInputHandler(){
- publicvoidhandleKey(KeyEventevent,RunnablefinishedCallback){
- startInputEvent(finishedCallback);
- dispatchKey(event,true);
- }
- ......
- };
- ......
- }
- publicfinalclassViewRootextendsHandlerimplementsViewParent,
- View.AttachInfo.Callbacks{
- ......
- privatevoidstartInputEvent(RunnablefinishedCallback){
- ......
- mFinishedCallback=finishedCallback;
- }
- ......
- }
Step 26.ViewRoot.dispatchKey
这个函数定义在frameworks/base/core/java/android/view/ViewRoot.java文件中:
- publicfinalclassViewRootextendsHandlerimplementsViewParent,
- View.AttachInfo.Callbacks{
- ......
- privatevoiddispatchKey(KeyEventevent,booleansendDone){
- ......
- Messagemsg=obtainMessage(DISPATCH_KEY);
- msg.obj=event;
- msg.arg1=sendDone?1:0;
- ......
- sendMessageAtTime(msg,event.getEventTime());
- }
- ......
- }
Step 27.ViewRoot.deliverKeyEvent
这个函数定义在frameworks/base/core/java/android/view/ViewRoot.java文件中:
- publicfinalclassViewRootextendsHandlerimplementsViewParent,
- View.AttachInfo.Callbacks{
- ......
- privatevoiddeliverKeyEvent(KeyEventevent,booleansendDone){
- //IfmViewisnull,wejustconsumethekeyeventbecauseitdoesn't
- //makesensetodoanythingelsewithit.
- booleanhandled=mView!=null
- ?mView.dispatchKeyEventPreIme(event):true;
- ......
- //Ifitispossibleforthiswindowtointeractwiththeinput
- //methodwindow,thenwewanttofirstdispatchourkeyevents
- //totheinputmethod.
- if(mLastWasImTarget){
- InputMethodManagerimm=InputMethodManager.peekInstance();
- if(imm!=null&&mView!=null){
- ......
- imm.dispatchKeyEvent(mView.getContext(),seq,event,
- mInputMethodCallback);
- return;
- }
- }
- ......
- }
- ......
- }
Step 28. InputMethodManager.dispatchKeyEvent
这个函数定义在frameworks/base/core/java/android/view/inputmethod/InputMethodManager.java文件中。这是一个输入法相关的类,我们这里就不关注了,只要知道当输入法处理完成之后,它就会调用ViewRoot类的mInputMehtodCallback对象的finishedEvent成员函数。
Step 29. InputMethodCallack.finishedEvent
这个函数定义在frameworks/base/core/java/android/view/ViewRoot.java文件中:
- publicfinalclassViewRootextendsHandlerimplementsViewParent,
- View.AttachInfo.Callbacks{
- ......
- staticclassInputMethodCallbackextendsIInputMethodCallback.Stub{
- privateWeakReference<ViewRoot>mViewRoot;
- publicInputMethodCallback(ViewRootviewRoot){
- mViewRoot=newWeakReference<ViewRoot>(viewRoot);
- }
- publicvoidfinishedEvent(intseq,booleanhandled){
- finalViewRootviewRoot=mViewRoot.get();
- if(viewRoot!=null){
- viewRoot.dispatchFinishedEvent(seq,handled);
- }
- }
- ......
- }
- ......
- }
Step 30.ViewRoot.dispatchFinishedEvent
这个函数定义在frameworks/base/core/java/android/view/ViewRoot.java文件中:
- publicfinalclassViewRootextendsHandlerimplementsViewParent,
- View.AttachInfo.Callbacks{
- ......
- publicvoiddispatchFinishedEvent(intseq,booleanhandled){
- Messagemsg=obtainMessage(FINISHED_EVENT);
- msg.arg1=seq;
- msg.arg2=handled?1:0;
- sendMessage(msg);
- }
- ......
- }
Step 31.ViewRoot.handleFinishedEvent
这个函数定义在frameworks/base/core/java/android/view/ViewRoot.java文件中:
- publicfinalclassViewRootextendsHandlerimplementsViewParent,
- View.AttachInfo.Callbacks{
- ......
- voidhandleFinishedEvent(intseq,booleanhandled){
- finalKeyEventevent=(KeyEvent)retrievePendingEvent(seq);
- ......
- if(event!=null){
- finalbooleansendDone=seq>=0;
- if(!handled){
- deliverKeyEventToViewHierarchy(event,sendDone);
- return;
- }elseif(sendDone){
- ......
- }else{
- ......
- }
- }
- }
- ......
- }
Step 32.ViewRoot.deliverKeyEventToViewHierarchy
这个函数定义在frameworks/base/core/java/android/view/ViewRoot.java文件中:
- publicfinalclassViewRootextendsHandlerimplementsViewParent,
- View.AttachInfo.Callbacks{
- ......
- privatevoiddeliverKeyEventToViewHierarchy(KeyEventevent,booleansendDone){
- try{
- if(mView!=null&&mAdded){
- ......
- booleankeyHandled=mView.dispatchKeyEvent(event);
- }
- ......
- }finally{
- if(sendDone){
- finishInputEvent();
- }
- }
- }
- ......
- }
ViewRoot类的成员变量mView的类型为DecorView,它是由ActivityThread类第一次Resume当前的Activity窗口时创建的,具体可以参考ActivityThread类的handleResumeActivity成员函数,这里就不关注了。
Step 33. DecorView.dispatchKeyEvent
这个函数定义在frameworks/base/policy/src/com/android/internal/policy/impl/PhoneWindow.java文件中,它是PhoneWindow类的一个内部类:
- publicclassPhoneWindowextendsWindowimplementsMenuBuilder.Callback{
- ......
- privatefinalclassDecorViewextendsFrameLayoutimplementsRootViewSurfaceTaker{
- ......
- @Override
- publicbooleandispatchKeyEvent(KeyEventevent){
- ......
- finalCallbackcb=getCallback();
- finalbooleanhandled=cb!=null&&mFeatureId<0?cb.dispatchKeyEvent(event)
- :super.dispatchKeyEvent(event);
- ......
- }
- ......
- }
- ......
- }
Step 34. Activity.dispatchKeyEvent
这个函数定义在frameworks/base/core/java/android/app/Activity.java文件中:
- publicclassActivityextendsContextThemeWrapper
- implementsLayoutInflater.Factory,
- Window.Callback,KeyEvent.Callback,
- OnCreateContextMenuListener,ComponentCallbacks{
- ......
- publicbooleandispatchKeyEvent(KeyEventevent){
- ......
- Viewdecor=mDecor;
- if(decor==null)decor=win.getDecorView();
- returnevent.dispatch(this,decor!=null
- ?decor.getKeyDispatcherState():null,this);
- }
- ......
- }
Step 35. KeyEvent.dispatch
这个函数定义在frameworks/base/core/java/android/view/KeyEvent.java文件中:
- publicclassKeyEventextendsInputEventimplementsParcelable{
- ......
- publicfinalbooleandispatch(Callbackreceiver,DispatcherStatestate,
- Objecttarget){
- switch(mAction){
- caseACTION_DOWN:{
- ......
- booleanres=receiver.onKeyDown(mKeyCode,this);
- ......
- returnres;
- }
- caseACTION_UP:
- ......
- returnreceiver.onKeyUp(mKeyCode,this);
- caseACTION_MULTIPLE:
- finalintcount=mRepeatCount;
- finalintcode=mKeyCode;
- if(receiver.onKeyMultiple(code,count,this)){
- returntrue;
- }
- ......
- returnfalse;
- }
- returnfalse;
- }
- ......
- }
Activity窗口处理完这个键盘事件后,层层返回,最后回到Step 32中,调用finishInputEvent事件来处理一些手尾工,下面我们将会看到这些手尾工是什么。
Step 36. ViewRoot.finishInputEvent
这个函数定义在frameworks/base/core/java/android/view/ViewRoot.java文件中:
- publicfinalclassViewRootextendsHandlerimplementsViewParent,
- View.AttachInfo.Callbacks{
- ......
- privatevoidfinishInputEvent(){
- ......
- if(mFinishedCallback!=null){
- mFinishedCallback.run();
- mFinishedCallback=null;
- }else{
- ......
- }
- }
- ......
- }
ViewRoot类里面的成员变量mFinishedCallback是在前面Step 25中由InputQueue设置的,它是一个Runnable对象,实际类型是定义在InputQueue的内部类FinishedCallback,因此,这里调用它的run方法时,接下来就会调用InputQueue的内部类FinishedCallback的run成员函数:
- publicfinalclassInputQueue{
- ......
- privatestaticclassFinishedCallbackimplementsRunnable{
- ......
- publicvoidrun(){
- synchronized(sLock){
- ......
- nativeFinished(mFinishedToken);
- ......
- }
- }
- ......
- }
- ......
- }
Step 37. InputQueue.nativeFinished
这个函数定义在frameworks/base/core/jni/android_view_InputQueue.cpp文件中:
- staticvoidandroid_view_InputQueue_nativeFinished(JNIEnv*env,jclassclazz,
- jlongfinishedToken){
- status_tstatus=gNativeInputQueue.finished(
- env,finishedToken,false/*ignoreSpuriousFinish*/);
- ......
- }
Step 38. NativeInputQueue.finished
这个函数定义在frameworks/base/core/jni/android_view_InputQueue.cpp文件中:
- status_tNativeInputQueue::finished(JNIEnv*env,jlongfinishedToken,boolignoreSpuriousFinish){
- int32_treceiveFd;
- uint16_tconnectionId;
- uint16_tmessageSeqNum;
- parseFinishedToken(finishedToken,&receiveFd,&connectionId,&messageSeqNum);
- {//acquirelock
- AutoMutex_l(mLock);
- ssize_tconnectionIndex=mConnectionsByReceiveFd.indexOfKey(receiveFd);
- ......
- sp<Connection>connection=mConnectionsByReceiveFd.valueAt(connectionIndex);
- ......
- connection->messageInProgress=false;
- status_tstatus=connection->inputConsumer.sendFinishedSignal();
- ......
- }//releaselock
- returnOK;
- }
- finishedToken=generateFinishedToken(receiveFd,connection->id,connection->messageSeqNum);
- jlongNativeInputQueue::generateFinishedToken(int32_treceiveFd,uint16_tconnectionId,
- uint16_tmessageSeqNum){
- return(jlong(receiveFd)<<32)|(jlong(connectionId)<<16)|jlong(messageSeqNum);
- }
因此,在上面的finished函数里面,首先就是要对参数值finishedToken进行解码,把receiveFd、connectionId和messageSeqNum三个值分别取回来:
- parseFinishedToken(finishedToken,&receiveFd,&connectionId,&messageSeqNum);
- voidNativeInputQueue::parseFinishedToken(jlongfinishedToken,
- int32_t*outReceiveFd,uint16_t*outConnectionId,uint16_t*outMessageIndex){
- *outReceiveFd=int32_t(finishedToken>>32);
- *outConnectionId=uint16_t(finishedToken>>16);
- *outMessageIndex=uint16_t(finishedToken);
- }
- ssize_tconnectionIndex=mConnectionsByReceiveFd.indexOfKey(receiveFd);
- ......
- sp<Connection>connection=mConnectionsByReceiveFd.valueAt(connectionIndex);
- status_tstatus=connection->inputConsumer.sendFinishedSignal();
Step 39. InputConsumer.sendFinishedSignal
这个函数定义在frameworks/base/libs/ui/InputTransport.cpp文件中:
- status_tInputConsumer::sendFinishedSignal(){
- ......
- returnmChannel->sendSignal(INPUT_SIGNAL_FINISHED);
- }
前面我们在分析应用程序注册键盘消息接收通道的过程时,在Step 18(InputDispatcher.registerInputChannel)中,说到InputDispatcher把一个反向管道的读端文件描述符添加到WindowManagerService所运行的线程中的Looper对象中去,然后就会在这个反向管道的读端上睡眠等待有这个管道有新的内容可读。现在,InputConsumer往这个反向管道写入新的内容了,于是,InputDispatcher就被唤醒过来了,唤醒过来后,它所调用的函数是InputDispatcher.handleReceiveCallback函数,这与前面的Step 21的逻辑是一样的。
Step 40. InputDispatcher.handleReceiveCallack
这个函数定义在frameworks/base/libs/ui/InputDispatcher.cpp文件中:
- intInputDispatcher::handleReceiveCallback(intreceiveFd,intevents,void*data){
- InputDispatcher*d=static_cast<InputDispatcher*>(data);
- {//acquirelock
- AutoMutex_l(d->mLock);
- ssize_tconnectionIndex=d->mConnectionsByReceiveFd.indexOfKey(receiveFd);
- ......
- nsecs_tcurrentTime=now();
- sp<Connection>connection=d->mConnectionsByReceiveFd.valueAt(connectionIndex);
- ......
- status_tstatus=connection->inputPublisher.receiveFinishedSignal();
- if(status){
- ......
- return0;//removethecallback
- }
- d->finishDispatchCycleLocked(currentTime,connection);
- ......
- return1;
- }//releaselock
- }
- ssize_tconnectionIndex=d->mConnectionsByReceiveFd.indexOfKey(receiveFd);
- ......
- sp<Connection>connection=d->mConnectionsByReceiveFd.valueAt(connectionIndex);
Step 41. InputPublisher.receiverFinishedSignal
这个函数定义在frameworks/base/libs/ui/InputTransport.cpp文件中:
- status_tInputPublisher::receiveFinishedSignal(){
- ....
- charsignal;
- status_tresult=mChannel->receiveSignal(&signal);
- if(result){
- returnresult;
- }
- if(signal!=INPUT_SIGNAL_FINISHED){
- .......
- returnUNKNOWN_ERROR;
- }
- returnOK;
- }
回到前面的Step 40中,确认了是真的收到了键盘事件处理完成的信号后,就调用InputDispatcher的finishDispatchCycleLocked函数来执行一些善后工作了。
Step 42. InputDispatcher.finishDispatchCycleLocked
这个函数定义在frameworks/base/libs/ui/InputDispatcher.cpp文件中:
- voidInputDispatcher::finishDispatchCycleLocked(nsecs_tcurrentTime,
- constsp<Connection>&connection){
- ......
- //Notifyothersystemcomponents.
- onDispatchCycleFinishedLocked(currentTime,connection);
- //Resetthepublishersincetheeventhasbeenconsumed.
- //Wedothisnowsothatthepublishercanreleasesomeofitsinternalresources
- //whilewaitingforthenextdispatchcycletobegin.
- status_tstatus=connection->inputPublisher.reset();
- ......
- startNextDispatchCycleLocked(currentTime,connection);
- }
一是通知其它系统,InputDispatcher完成了一次键盘事件的处理:
- //Notifyothersystemcomponents.
- onDispatchCycleFinishedLocked(currentTime,connection);
- //Resetthepublishersincetheeventhasbeenconsumed.
- //Wedothisnowsothatthepublishercanreleasesomeofitsinternalresources
- //whilewaitingforthenextdispatchcycletobegin.
- status_tstatus=connection->inputPublisher.reset();
- startNextDispatchCycleLocked(currentTime,connection);
至此,InputManager分发键盘消息给应用程序的过程就分析完成了,这是一个比较复杂的过程,不过,只要我们抓住主要的线索,就不难理解了,现在我们就小结一下这个过程的四个主要线索:
A. 键盘事件发生,InputManager中的InputReader被唤醒,此前InputReader睡眠在/dev/input/event0这个设备文件上;
B.InputReader被唤醒后,它接着唤醒InputManager中的InputDispatcher,此前InputDispatcher睡眠在InputManager所运行的线程中的Looper对象里面的管道的读端上;
C. InputDispatcher被唤醒后,它接着唤醒应用程序的主线程来处理这个键盘事件,此前应用程序的主线程睡眠在Client端InputChannel中的前向管道的读端上;
D. 应用程序处理处理键盘事件之后,它接着唤醒InputDispatcher来执行善后工作,此前InputDispatcher睡眠在Server端InputChannel的反向管道的读端上,注意这里与第二个线索处的区别。
4.应用程序注销键盘消息接收通道的过程分析
当Activity窗口创建时,它会向InputManager注册键盘消息接收通道,而当Activity窗口销毁时,它就会向InputManager注销前面注册的键盘消息接收通道了,本节内容就来看看应用程序注销键盘消息接收通道的过程。
当我们按下键盘上的Back键时,当前激活的Activity窗口就会被失去焦点,但是这时候它还没有被销毁,它的状态被设置为Stopped;当新的Activity窗口即将要显示时,它会通知WindowManagerService,这时候WindowManagerService就会处理当前处理Stopped状态的Activity窗口了,要执行的操作就是销毁它们了,在销毁的时候,就会注销它们之前所注册的键盘消息接收通道。
新的Activity窗口通知WindowManagerService它即将要显示的过程比较复杂,但是它与我们本节要介绍的内容不是很相关,因此,这里就略过大部过程了,我们从ActvitiyRecord的windowsVisible函数开始分析。注意,这里的ActivityRecord是新的Activity窗口在ActivityManangerService的代表,而那些处于Stopped状态的Activity窗口
会放在ActivityStack类的一个等待可见的mWaitingVisibleActivities列表里面,事实于,对于那些Stopped状态的Activity窗口来说,它们是等待销毁,而不是等待可见。
像前面一样,我们先来看一张应用程序注销键盘消息接收通道的过程的序列图,然后根据这个序列图来详细分析互一个步骤:
Step 1. ActivityRecord.windowsVisible
这个函数定义在frameworks/base/services/java/com/android/server/am/ActivityRecord.java文件中:
- classActivityRecordextendsIApplicationToken.Stub{
- ......
- booleannowVisible;//isthisactivity'swindowvisible?
- booleanidle;//hastheactivitygoneidle?
- ......
- publicvoidwindowsVisible(){
- synchronized(service){
- ......
- if(!nowVisible){
- nowVisible=true;
- if(!idle){
- .......
- }else{
- //Ifthisactivitywasalreadyidle,thenwenowneedto
- //makesureweperformthefullstopofanyactivities
- //thatarewaitingtodoso.Thisisbecausewewon't
- //dothatwhiletheyarestillwaitingforthisoneto
- //becomevisible.
- finalintN=stack.mWaitingVisibleActivities.size();
- if(N>0){
- for(inti=0;i<N;i++){
- ActivityRecordr=(ActivityRecord)
- stack.mWaitingVisibleActivities.get(i);
- r.waitingVisible=false;
- ......
- }
- stack.mWaitingVisibleActivities.clear();
- Messagemsg=Message.obtain();
- msg.what=ActivityStack.IDLE_NOW_MSG;
- stack.mHandler.sendMessage(msg);
- }
- }
- ......
- }
- }
- }
- ......
- }
- finalintN=stack.mWaitingVisibleActivities.size();
- if(N>0){
- for(inti=0;i<N;i++){
- ActivityRecordr=(ActivityRecord)
- stack.mWaitingVisibleActivities.get(i);
- r.waitingVisible=false;
- ......
- }
- stack.mWaitingVisibleActivities.clear();
- Messagemsg=Message.obtain();
- msg.what=ActivityStack.IDLE_NOW_MSG;
- stack.mHandler.sendMessage(msg);
- }
Step 2. ActivityStack.activityIdleInternal
这个函数定义在frameworks/base/services/java/com/android/server/am/ActivityStack.java文件中:
- publicclassActivityStack{
- ......
- finalvoidactivityIdleInternal(IBindertoken,booleanfromTimeout,
- Configurationconfig){
- ......
- ArrayList<ActivityRecord>stops=null;
- ......
- intNS=0;
- ......
- synchronized(mService){
- ......
- //Atomicallyretrievealloftheotherthingstodo.
- stops=processStoppingActivitiesLocked(true);
- NS=stops!=null?stops.size():0;
- ......
- }
- inti;
- ......
- //Stopanyactivitiesthatarescheduledtodosobuthavebeen
- //waitingforthenextonetostart.
- for(i=0;i<NS;i++){
- ActivityRecordr=(ActivityRecord)stops.get(i);
- synchronized(mService){
- if(r.finishing){
- finishCurrentActivityLocked(r,FINISH_IMMEDIATELY);
- }else{
- ......
- }
- }
- }
- ......
- }
- ......
- }
Step 3.ActivityStack.finishCurrentActivityLocked
这个函数定义在frameworks/base/services/java/com/android/server/am/ActivityStack.java文件中:
- publicclassActivityStack{
- ......
- privatefinalActivityRecordfinishCurrentActivityLocked(ActivityRecordr,
- intmode){
- ......
- returnfinishCurrentActivityLocked(r,index,mode);
- }
- privatefinalActivityRecordfinishCurrentActivityLocked(ActivityRecordr,
- intindex,intmode){
- ......
- //makesuretherecordiscleanedoutofotherplaces.
- mStoppingActivities.remove(r);
- mWaitingVisibleActivities.remove(r);
- ......
- finalActivityStateprevState=r.state;
- r.state=ActivityState.FINISHING;
- if(mode==FINISH_IMMEDIATELY
- ||prevState==ActivityState.STOPPED
- ||prevState==ActivityState.INITIALIZING){
- //Ifthisactivityisalreadystopped,wecanjustfinish
- //itrightnow.
- returndestroyActivityLocked(r,true)?null:r;
- }else{
- ......
- }
- returnr;
- }
- ......
- }
Step 4.ActivityStack.destroyActivityLocked
这个函数定义在frameworks/base/services/java/com/android/server/am/ActivityStack.java文件中:
- publicclassActivityStack{
- ......
- finalbooleandestroyActivityLocked(ActivityRecordr,
- booleanremoveFromApp){
- ......
- booleanremovedFromHistory=false;
- ......
- finalbooleanhadApp=r.app!=null;
- if(hadApp){
- ......
- try{
- ......
- r.app.thread.scheduleDestroyActivity(r,r.finishing,
- r.configChangeFlags);
- }catch(Exceptione){
- ......
- }
- ......
- }else{
- ......
- }
- ......
- returnremovedFromHistory;
- }
- ......
- }
- r.app.thread.scheduleDestroyActivity(r,r.finishing,
- r.configChangeFlags);
Step 5.ApplicationThread.scheduleDestroyActivity
这个函数定义在frameworks/base/core/java/android/app/ActivityThread.java文件中:
- publicfinalclassActivityThread{
- ......
- privatefinalclassApplicationThreadextendsApplicationThreadNative{
- ......
- publicfinalvoidscheduleDestroyActivity(IBindertoken,booleanfinishing,
- intconfigChanges){
- queueOrSendMessage(H.DESTROY_ACTIVITY,token,finishing?1:0,
- configChanges);
- }
- ......
- }
- ......
- }
Step 6.ActivityThread.handleDestroyActivity
这个函数定义在frameworks/base/core/java/android/app/ActivityThread.java文件中:
- publicfinalclassActivityThread{
- ......
- privatefinalvoidhandleDestroyActivity(IBindertoken,booleanfinishing,
- intconfigChanges,booleangetNonConfigInstance){
- ......
- ActivityClientRecordr=performDestroyActivity(token,finishing,
- configChanges,getNonConfigInstance);
- if(r!=null){
- WindowManagerwm=r.activity.getWindowManager();
- Viewv=r.activity.mDecor;
- if(v!=null){
- ......
- if(r.activity.mWindowAdded){
- wm.removeViewImmediate(v);
- }
- ......
- }
- ......
- }
- ......
- }
- ......
- }
Step 7.LocalWindowManager.removeViewImmediate
这个函数定义在frameworks/base/core/java/android/view/Window.java文件中:
- publicabstractclassWindow{
- ......
- privateclassLocalWindowManagerimplementsWindowManager{
- ......
- publicfinalvoidremoveViewImmediate(Viewview){
- mWindowManager.removeViewImmediate(view);
- }
- ......
- privatefinalWindowManagermWindowManager;
- }
- ......
- }
Step 8.WndowManagerImpl.removeViewImmediate
这个函数定义在frameworks/base/core/java/android/view/WindowManagerImpl.java文件中:
- publicclassWindowManagerImplimplementsWindowManager{
- ......
- publicvoidremoveViewImmediate(Viewview){
- synchronized(this){
- intindex=findViewLocked(view,true);
- ViewRootroot=mRoots[index];
- ......
- root.die(true);
- ......
- }
- }
- ......
- }
Step 9. ViewRoot.die
这个函数定义在frameworks/base/core/java/android/view/ViewRoot.java文件中:
- publicfinalclassViewRootextendsHandlerimplementsViewParent,
- View.AttachInfo.Callbacks{
- ......
- publicvoiddie(booleanimmediate){
- if(immediate){
- doDie();
- }else{
- ......
- }
- }
- ......
- }
Step 10.ViewRoot.doDie
这个函数定义在frameworks/base/core/java/android/view/ViewRoot.java文件中:
- publicfinalclassViewRootextendsHandlerimplementsViewParent,
- View.AttachInfo.Callbacks{
- ......
- voiddoDie(){
- ......
- synchronized(this){
- ......
- if(mAdded){
- mAdded=false;
- dispatchDetachedFromWindow();
- }
- }
- }
- ......
- }
Step 11.ViewRoot.ispatchDetachedFromWindow
这个函数定义在frameworks/base/core/java/android/view/ViewRoot.java文件中:
- publicfinalclassViewRootextendsHandlerimplementsViewParent,
- View.AttachInfo.Callbacks{
- ......
- voiddispatchDetachedFromWindow(){
- ......
- if(mInputChannel!=null){
- if(mInputQueueCallback!=null){
- ......
- }else{
- InputQueue.unregisterInputChannel(mInputChannel);
- }
- }
- try{
- sWindowSession.remove(mWindow);
- }catch(RemoteExceptione){
- }
- ......
- }
- ......
- }
我们先来看注销注册在应用程序这一侧的Client端InputChannel,然后再回过头来分析注销注册在InputManager这一侧的Server端InputChannel。
Step 12.InputQueue.unregisterInputChannel
这个函数定义在frameworks/base/core/java/android/view/InputQueue.java文件中:
- publicfinalclassInputQueue{
- ......
- publicstaticvoidunregisterInputChannel(InputChannelinputChannel){
- ......
- synchronized(sLock){
- ......
- nativeUnregisterInputChannel(inputChannel);
- }
- }
- ......
- }
Step 13.InputQueue.nativeUnregisterInputChannel
这个函数定义在frameworks/base/core/jni/android_view_InputQueue.cpp文件中:
- staticvoidandroid_view_InputQueue_nativeUnregisterInputChannel(JNIEnv*env,jclassclazz,
- jobjectinputChannelObj){
- status_tstatus=gNativeInputQueue.unregisterInputChannel(env,inputChannelObj);
- ......
- }
Step 14.NativeInputQueue.unregisterInputChannel
这个函数定义在frameworks/base/core/jni/android_view_InputQueue.cpp文件中:
- status_tNativeInputQueue::unregisterInputChannel(JNIEnv*env,jobjectinputChannelObj){
- sp<InputChannel>inputChannel=android_view_InputChannel_getInputChannel(env,
- inputChannelObj);
- ......
- {//acquirelock
- AutoMutex_l(mLock);
- ssize_tconnectionIndex=getConnectionIndex(inputChannel);
- ......
- sp<Connection>connection=mConnectionsByReceiveFd.valueAt(connectionIndex);
- mConnectionsByReceiveFd.removeItemsAt(connectionIndex);
- connection->status=Connection::STATUS_ZOMBIE;
- connection->looper->removeFd(inputChannel->getReceivePipeFd());
- env->DeleteGlobalRef(connection->inputHandlerObjGlobal);
- connection->inputHandlerObjGlobal=NULL;
- ......
- }//releaselock
- ......
- returnOK;
- }
- ssize_tconnectionIndex=getConnectionIndex(inputChannel);
- ......
- sp<Connection>connection=mConnectionsByReceiveFd.valueAt(connectionIndex);
- mConnectionsByReceiveFd.removeItemsAt(connectionIndex);
- connection->looper->removeFd(inputChannel->getReceivePipeFd());
最后将Connection对象中的回调对象inputHandlerOjbGlobal对象删除:
- env->DeleteGlobalRef(connection->inputHandlerObjGlobal);
- connection->inputHandlerObjGlobal=NULL;
注册在应用程序这一侧的Client端InputChannel被注销以后,回到前面的Step 11中,我们继续分析注销注册在InputManager这一侧的Server端InputChannel。
Step 15. WindowManagerService.Session.remove
这个函数定义在frameworks/base/services/java/com/android/server/WindowManagerService.java文件中:
- publicclassWindowManagerServiceextendsIWindowManager.Stub
- implementsWatchdog.Monitor{
- ......
- privatefinalclassSessionextendsIWindowSession.Stub
- implementsIBinder.DeathRecipient{
- ......
- publicvoidremove(IWindowwindow){
- removeWindow(this,window);
- }
- ......
- }
- ......
- }
Step 16.WindowManagerService.removeWindow
这个函数定义在frameworks/base/services/java/com/android/server/WindowManagerService.java文件中:
- publicclassWindowManagerServiceextendsIWindowManager.Stub
- implementsWatchdog.Monitor{
- ......
- publicvoidremoveWindow(Sessionsession,IWindowclient){
- synchronized(mWindowMap){
- WindowStatewin=windowForClientLocked(session,client,false);
- if(win==null){
- return;
- }
- removeWindowLocked(session,win);
- }
- }
- ......
- }
回忆一下前面我们在分析应用程序注册键盘消息管道的过程时,在Step 11(WindowManagerService.addWindow)中,WindowManagerService为这个即将要激活的Activity窗口创建了一个WindowState对象win,创建的时候,使用了从ViewRoot中传过来的两个参数,分别是一个Session对象session和一个IWindow对象client。
在这个函数中,ViewRoot传过来的两个参数session和client和上面说的两个参数是一致的,因此,这个函数首先通过参数session和client得到一个WindowState对象win,然后调用removeWindowLocked来把它从WindowManagerService删除。
Step 17.WindowManagerService.removeWindowLocked
这个函数定义在frameworks/base/services/java/com/android/server/WindowManagerService.java文件中:
- publicclassWindowManagerServiceextendsIWindowManager.Stub
- implementsWatchdog.Monitor{
- ......
- publicvoidremoveWindowLocked(Sessionsession,WindowStatewin){
- ......
- win.disposeInputChannel();
- ......
- }
- ......
- }
Step 18. WindowState.disposeInputChannel
这个函数定义在frameworks/base/services/java/com/android/server/WindowManagerService.java文件中:
- publicclassWindowManagerServiceextendsIWindowManager.Stub
- implementsWatchdog.Monitor{
- ......
- privatefinalclassWindowStateimplementsWindowManagerPolicy.WindowState{
- ......
- voiddisposeInputChannel(){
- if(mInputChannel!=null){
- mInputManager.unregisterInputChannel(mInputChannel);
- mInputChannel.dispose();
- mInputChannel=null;
- }
- }
- ......
- }
- ......
- }
Step 19. InputManager.unregisterInputChannel
这个函数定义在frameworks/base/services/java/com/android/server/InputManager.java文件中:
- publicclassInputManager{
- ......
- publicvoidunregisterInputChannel(InputChannelinputChannel){
- ......
- nativeUnregisterInputChannel(inputChannel);
- }
- ......
- }
Step 20.InputManager.nativeUnregisterInputChannel
这个函数定义在frameworks/base/services/jni/com_android_server_InputManager.cpp文件中:
- staticvoidandroid_server_InputManager_nativeUnregisterInputChannel(JNIEnv*env,jclassclazz,
- jobjectinputChannelObj){
- ......
- sp<InputChannel>inputChannel=android_view_InputChannel_getInputChannel(env,
- inputChannelObj);
- ......
- status_tstatus=gNativeInputManager->unregisterInputChannel(env,inputChannel);
- ......
- }
Step 21.NativeInputManager.unregisterInputChannel
这个函数定义在frameworks/base/services/jni/com_android_server_InputManager.cpp文件中:
- status_tNativeInputManager::unregisterInputChannel(JNIEnv*env,
- constsp<InputChannel>&inputChannel){
- ......
- returnmInputManager->getDispatcher()->unregisterInputChannel(inputChannel);
- }
Step 22.InputDispatcher.unregisterInputChannel
这个函数定义在frameworks/base/libs/ui/InputDispatcher.cpp文件中:
- status_tInputDispatcher::unregisterInputChannel(constsp<InputChannel>&inputChannel){
- ......
- {//acquirelock
- AutoMutex_l(mLock);
- ssize_tconnectionIndex=getConnectionIndexLocked(inputChannel);
- ......
- sp<Connection>connection=mConnectionsByReceiveFd.valueAt(connectionIndex);
- mConnectionsByReceiveFd.removeItemsAt(connectionIndex);
- ......
- mLooper->removeFd(inputChannel->getReceivePipeFd());
- .....
- }//releaselock
- ......
- returnOK;
- }
- ssize_tconnectionIndex=getConnectionIndexLocked(inputChannel);
- ......
- sp<Connection>connection=mConnectionsByReceiveFd.valueAt(connectionIndex);
- mConnectionsByReceiveFd.removeItemsAt(connectionIndex);
这样,应用程序注销键盘消息接收通道的过程就分析完成了,整个应用程序键盘消息处理机制也分析完成了,这是一个比较复杂的过程,要完全理解它还需要花费一些努力和时间,不过,理解了这个过程之后,对Android应用程序框架层的理解就更进一步了。


发表评论

相关推荐
Android自定义输入法软键盘,博客地址: https://blog.csdn.net/DeMonliuhui/article/details/84589936
android 自定义键盘,数字键盘,密码键盘,全部支持 可参考博客:http://blog.csdn.net/weinan_w/article/details/51754465
blog: https://blog.csdn.net/xjzdr/article/details/115524192
为每个程序设置初始输入法。每次打开程序,或者从其它程序切换回来,都能够还原为该...详细使用说明请阅览《macOS 中英文输入法切换终极解决方案》,链接:http://blog.csdn.net/hndfguxing/article/details/79178020
相关博客 https://blog.csdn.net/qinglingLS/article/details/107363185 一个小例子。
在Webot机器人仿真平台中用键盘控制小车的世界模型,与Webot机器人仿真平台(七) 键盘控制小车 配套使用https://blog.csdn.net/crp997576280/article/details/105661899
纯英文界面做的没意思,加上中文输入法是我一直想做的,界面如何修改处理可以自己修改,接口说明全面,支持不同窗口大小的调整,移植说明:https://blog.csdn.net/weixin_42892101/article/details/108057414
资源分类:Python库 所属语言:Python 资源全名:em_keyboard-3.5.0.tar.gz 资源来源:官方 安装方法:https://lanzao.blog.csdn.net/article/details/101784059
1、键盘检测测数据集,从COCO2017数据集中提取得到,并分别转成了txt和xml两种格式的标签,可用于YOLO键盘检测; 2、目标类别名:keyboard;...4、https://blog.csdn.net/weixin_51154380/article/details/124480876
ADBKeyBoard.apk adb中文输入法 完美支持中文 adb输入中文 用法 adb shell am broadcast -a ADB_INPUT_TEXT --es msg "中文输入法" ...http://blog.csdn.net/u011068616/article/details/47945927
用python编写的快捷键工具,可以快速启动我们常用的软件,常用文件,常用网址,更棒的是,减轻了对鼠标的依赖,极大的方便了我们编写代码, ...https://blog.csdn.net/weixin_42129248/article/details/89816053
参考文章见:Hook Windows NT:http://blog.csdn.net/winsenjiansbomber/article/details/16891189 下表展示了WINUSER.H定义的一些钩子的类型: 钩子名称 作用层次 监视消息的类型和时机 WH_CALLWNDPROC 线程、系统 ...