- 浏览: 21488655 次
- 性别:

- 来自: 杭州
-

最新评论
-
ZY199266:
配置文件还需要额外的配置ma
Android 客户端通过内置API(HttpClient) 访问 服务器(用Spring MVC 架构) 返回的json数据全过程 -
ZY199266:
我的一访问为什么是 /mavenwebdemo/WEB-I ...
Android 客户端通过内置API(HttpClient) 访问 服务器(用Spring MVC 架构) 返回的json数据全过程 -
lvgaga:
我又一个问题就是 如果像你的这种形式写。配置文件还需要额外的 ...
Android 客户端通过内置API(HttpClient) 访问 服务器(用Spring MVC 架构) 返回的json数据全过程 -
lvgaga:
我的一访问为什么是 /mavenwebdemo/WEB-I ...
Android 客户端通过内置API(HttpClient) 访问 服务器(用Spring MVC 架构) 返回的json数据全过程 -
y1210251848:
你的那个错误应该是项目所使用的目标框架不支持吧
log4net配置(web中使用log4net,把web.config放在单独的文件中)
[Binder.5] Android系统进程间通信Binder机制在应用程序框架层的Java接口源代码分析
在前面几篇文章中,我们详细介绍了Android系统进程间通信机制Binder的原理,并且深入分析了系统提供的Binder运行库和驱动程序的源代码。细心的读者会发现,这几篇文章分析的Binder接口都是基于C/C++语言来实现的,但是我们在编写应用程序都是基于Java语言的,那么,我们如何使用Java语言来使用系统的Binder机制来进行进程间通信呢?这就是本文要介绍的Android系统应用程序框架层的用Java语言来实现的Binder接口了。
熟悉Android系统的读者,应该能想到应用程序框架中的基于Java语言的Binder接口是通过JNI来调用基于C/C++语言的Binder运行库来为Java应用程序提供进程间通信服务的了。JNI在Android系统中用得相当普遍,SDK中的Java接口API很多只是简单地通过JNI来调用底层的C/C++运行库从而为应用程序服务的。
这里,我们仍然是通过具体的例子来说明Binder机制在应用程序框架层中的Java接口,主要就是Service Manager、Server和Client这三个角色的实现了。通常,在应用程序中,我们都是把Server实现为Service的形式,并且通过IServiceManager.addService接口来把这个Service添加到Service Manager,Client也是通过IServiceManager.getService接口来获得Service接口,接着就可以使用这个Service提供的功能了,这个与运行时库的Binder接口是一致的。
前面我们学习Android硬件抽象层时,曾经在应用程序框架层中提供了一个硬件访问服务HelloService,这个Service运行在一个独立的进程中充当Server的角色,使用这个Service的Client运行在另一个进程中,它们之间就是通过Binder机制来通信的了。这里,我们就使用HelloService这个例子来分析Android系统进程间通信Binder机制在应用程序框架层的Java接口源代码。所以希望读者在阅读下面的内容之前,先了解一下前面在Ubuntu上为Android系统的Application Frameworks层增加硬件访问服务这篇文章。
这篇文章通过五个情景来学习Android系统进程间通信Binder机制在应用程序框架层的Java接口:1. 获取Service Manager的Java远程接口的过程;2. HelloService接口的定义;3. HelloService的启动过程;4. Client获取HelloService的Java远程接口的过程;5.Client通过HelloService的Java远程接口来使用HelloService提供的服务的过程。
一. 获取Service Manager的Java远程接口
我们要获取的Service Manager的Java远程接口是一个ServiceManagerProxy对象的IServiceManager接口。我们现在就来看看ServiceManagerProxy类是长什么样子的:
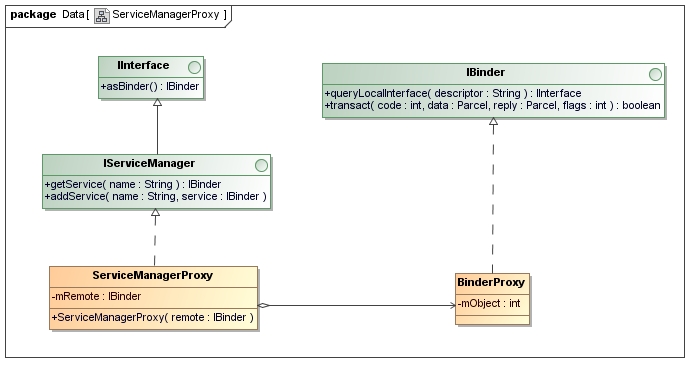
这里可以看出,ServiceManagerProxy类实现了IServiceManager接口,IServiceManager提供了getService和addService两个成员函数来管理系统中的Service。从ServiceManagerProxy类的构造函数可以看出,它需要一个BinderProxy对象的IBinder接口来作为参数。因此,要获取Service Manager的Java远程接口ServiceManagerProxy,首先要有一个BinderProxy对象。下面将会看到这个BinderProxy对象是如何获得的。
再来看一下是通过什么路径来获取Service Manager的Java远程接口ServiceManagerProxy的。这个主角就是ServiceManager了,我们也先看一下ServiceManager是长什么样子的:

ServiceManager类有一个静态成员函数getIServiceManager,它的作用就是用来获取Service Manager的Java远程接口了,而这个函数又是通过ServiceManagerNative来获取Service Manager的Java远程接口的。
接下来,我们就看一下ServiceManager.getIServiceManager这个函数的实现,这个函数定义在frameworks/base/core/java/android/os/ServiceManager.java文件中:
- publicfinalclassServiceManager{
- ......
- privatestaticIServiceManagersServiceManager;
- ......
- privatestaticIServiceManagergetIServiceManager(){
- if(sServiceManager!=null){
- returnsServiceManager;
- }
- //Findtheservicemanager
- sServiceManager=ServiceManagerNative.asInterface(BinderInternal.getContextObject());
- returnsServiceManager;
- }
- ......
- }
我们来看一下BinderInternal.getContextObject的实现,这个函数定义在frameworks/base/core/java/com/android/internal/os/BinderInternal.java文件中:
- publicclassBinderInternal{
- ......
- /**
- *Returntheglobal"contextobject"ofthesystem.Thisisusually
- *animplementationofIServiceManager,whichyoucanusetofind
- *otherservices.
- */
- publicstaticfinalnativeIBindergetContextObject();
- ......
- }
- staticjobjectandroid_os_BinderInternal_getContextObject(JNIEnv*env,jobjectclazz)
- {
- sp<IBinder>b=ProcessState::self()->getContextObject(NULL);
- returnjavaObjectForIBinder(env,b);
- }
- sp<IBinder>b=ProcessState::self()->getContextObject(NULL);
- sp<IBinder>b=newBpBinder(0);
- jobjectjavaObjectForIBinder(JNIEnv*env,constsp<IBinder>&val)
- {
- if(val==NULL)returnNULL;
- if(val->checkSubclass(&gBinderOffsets)){
- //Oneofourown!
- jobjectobject=static_cast<JavaBBinder*>(val.get())->object();
- //printf("objectForBinder%p:it'sourown%p!\n",val.get(),object);
- returnobject;
- }
- //Fortherestofthefunctionwewillholdthislock,toserialize
- //looking/creationofJavaproxiesfornativeBinderproxies.
- AutoMutex_l(mProxyLock);
- //Someoneelse's...doweknowaboutit?
- jobjectobject=(jobject)val->findObject(&gBinderProxyOffsets);
- if(object!=NULL){
- jobjectres=env->CallObjectMethod(object,gWeakReferenceOffsets.mGet);
- if(res!=NULL){
- LOGV("objectForBinder%p:foundexisting%p!\n",val.get(),res);
- returnres;
- }
- LOGV("Proxyobject%pofIBinder%pnolongerinworkingset!!!",object,val.get());
- android_atomic_dec(&gNumProxyRefs);
- val->detachObject(&gBinderProxyOffsets);
- env->DeleteGlobalRef(object);
- }
- object=env->NewObject(gBinderProxyOffsets.mClass,gBinderProxyOffsets.mConstructor);
- if(object!=NULL){
- LOGV("objectForBinder%p:creatednew%p!\n",val.get(),object);
- //Theproxyholdsareferencetothenativeobject.
- env->SetIntField(object,gBinderProxyOffsets.mObject,(int)val.get());
- val->incStrong(object);
- //Thenativeobjectneedstoholdaweakreferencebacktothe
- //proxy,sowecanretrievethesameproxyifitisstillactive.
- jobjectrefObject=env->NewGlobalRef(
- env->GetObjectField(object,gBinderProxyOffsets.mSelf));
- val->attachObject(&gBinderProxyOffsets,refObject,
- jnienv_to_javavm(env),proxy_cleanup);
- //Notethatanewobjectreferencehasbeencreated.
- android_atomic_inc(&gNumProxyRefs);
- incRefsCreated(env);
- }
- returnobject;
- }
先看gBinderOffsets的定义:
- staticstructbindernative_offsets_t
- {
- //Classstate.
- jclassmClass;
- jmethodIDmExecTransact;
- //Objectstate.
- jfieldIDmObject;
- }gBinderOffsets;
- constchar*constkBinderPathName="android/os/Binder";
- staticintint_register_android_os_Binder(JNIEnv*env)
- {
- jclassclazz;
- clazz=env->FindClass(kBinderPathName);
- LOG_FATAL_IF(clazz==NULL,"Unabletofindclassandroid.os.Binder");
- gBinderOffsets.mClass=(jclass)env->NewGlobalRef(clazz);
- gBinderOffsets.mExecTransact
- =env->GetMethodID(clazz,"execTransact","(IIII)Z");
- assert(gBinderOffsets.mExecTransact);
- gBinderOffsets.mObject
- =env->GetFieldID(clazz,"mObject","I");
- assert(gBinderOffsets.mObject);
- returnAndroidRuntime::registerNativeMethods(
- env,kBinderPathName,
- gBinderMethods,NELEM(gBinderMethods));
- }
再来看gBinderProxyOffsets的定义:
- staticstructbinderproxy_offsets_t
- {
- //Classstate.
- jclassmClass;
- jmethodIDmConstructor;
- jmethodIDmSendDeathNotice;
- //Objectstate.
- jfieldIDmObject;
- jfieldIDmSelf;
- }gBinderProxyOffsets;
简单来说,gBinderProxyOffsets是用来变量是用来记录上面第一个图中的BinderProxy类的相关信息的,它是在注册BinderProxy类的JNI方法的int_register_android_os_BinderProxy函数初始化的:
- constchar*constkBinderProxyPathName="android/os/BinderProxy";
- staticintint_register_android_os_BinderProxy(JNIEnv*env)
- {
- jclassclazz;
- clazz=env->FindClass("java/lang/ref/WeakReference");
- LOG_FATAL_IF(clazz==NULL,"Unabletofindclassjava.lang.ref.WeakReference");
- gWeakReferenceOffsets.mClass=(jclass)env->NewGlobalRef(clazz);
- gWeakReferenceOffsets.mGet
- =env->GetMethodID(clazz,"get","()Ljava/lang/Object;");
- assert(gWeakReferenceOffsets.mGet);
- clazz=env->FindClass("java/lang/Error");
- LOG_FATAL_IF(clazz==NULL,"Unabletofindclassjava.lang.Error");
- gErrorOffsets.mClass=(jclass)env->NewGlobalRef(clazz);
- clazz=env->FindClass(kBinderProxyPathName);
- LOG_FATAL_IF(clazz==NULL,"Unabletofindclassandroid.os.BinderProxy");
- gBinderProxyOffsets.mClass=(jclass)env->NewGlobalRef(clazz);
- gBinderProxyOffsets.mConstructor
- =env->GetMethodID(clazz,"<init>","()V");
- assert(gBinderProxyOffsets.mConstructor);
- gBinderProxyOffsets.mSendDeathNotice
- =env->GetStaticMethodID(clazz,"sendDeathNotice","(Landroid/os/IBinder$DeathRecipient;)V");
- assert(gBinderProxyOffsets.mSendDeathNotice);
- gBinderProxyOffsets.mObject
- =env->GetFieldID(clazz,"mObject","I");
- assert(gBinderProxyOffsets.mObject);
- gBinderProxyOffsets.mSelf
- =env->GetFieldID(clazz,"mSelf","Ljava/lang/ref/WeakReference;");
- assert(gBinderProxyOffsets.mSelf);
- returnAndroidRuntime::registerNativeMethods(
- env,kBinderProxyPathName,
- gBinderProxyMethods,NELEM(gBinderProxyMethods));
- }
- if(val->checkSubclass(&gBinderOffsets)){
- //Oneofourown!
- jobjectobject=static_cast<JavaBBinder*>(val.get())->object();
- //printf("objectForBinder%p:it'sourown%p!\n",val.get(),object);
- returnobject;
- }
于是函数继续往下执行:
- jobjectobject=(jobject)val->findObject(&gBinderProxyOffsets);
于是函数又继续往下执行:
- object=env->NewObject(gBinderProxyOffsets.mClass,gBinderProxyOffsets.mConstructor);
- env->SetIntField(object,gBinderProxyOffsets.mObject,(int)val.get());
接下去,还要把它放到BpBinder里面去,下次就要使用时,就可以在上一步调用BpBinder::findObj把它找回来了:
- val->attachObject(&gBinderProxyOffsets,refObject,
- jnienv_to_javavm(env),proxy_cleanup);
回到ServiceManager.getIServiceManager中,从下面语句返回:
- sServiceManager=ServiceManagerNative.asInterface(BinderInternal.getContextObject());
相当于是:
- sServiceManager=ServiceManagerNative.asInterface(newBinderProxy());
接下去就是调用ServiceManagerNative.asInterface函数了,这个函数定义在frameworks/base/core/java/android/os/ServiceManagerNative.java文件中:
- publicabstractclassServiceManagerNative......
- {
- ......
- staticpublicIServiceManagerasInterface(IBinderobj)
- {
- if(obj==null){
- returnnull;
- }
- IServiceManagerin=
- (IServiceManager)obj.queryLocalInterface(descriptor);
- if(in!=null){
- returnin;
- }
- returnnewServiceManagerProxy(obj);
- }
- ......
- }
返回到ServiceManager.getIServiceManager中,从下面语句返回:
- sServiceManager=ServiceManagerNative.asInterface(newBinderProxy());
就相当于是:
- sServiceManager=newServiceManagerProxy(newBinderProxy());
总结一下,就是在Java层,我们拥有了一个Service Manager远程接口ServiceManagerProxy,而这个ServiceManagerProxy对象在JNI层有一个句柄值为0的BpBinder对象与之通过gBinderProxyOffsets关联起来。
这样获取Service Manager的Java远程接口的过程就完成了。
二.HelloService接口的定义
前面我们在学习Android系统的硬件抽象层(HAL)时,在在Ubuntu上为Android系统的Application Frameworks层增加硬件访问服务这篇文章中,我们编写了一个硬件服务HelloService,它的服务接口定义在frameworks/base/core/java/android/os/IHelloService.aidl文件中:
- packageandroid.os;
- interfaceIHelloService
- {
- voidsetVal(intval);
- intgetVal();
- }
这个服务接口很简单,只有两个函数,分别用来读写硬件寄存器。
注意,这是一个aidl文件,编译后会生成一个IHelloService.java。我们来看一下这个文件的内容隐藏着什么奥秘,可以这么神奇地支持进程间通信。
- /*
- *Thisfileisauto-generated.DONOTMODIFY.
- *Originalfile:frameworks/base/core/java/android/os/IHelloService.aidl
- */
- packageandroid.os;
- publicinterfaceIHelloServiceextendsandroid.os.IInterface
- {
- /**Local-sideIPCimplementationstubclass.*/
- publicstaticabstractclassStubextendsandroid.os.Binderimplementsandroid.os.IHelloService
- {
- privatestaticfinaljava.lang.StringDESCRIPTOR="android.os.IHelloService";
- /**Constructthestubatattachittotheinterface.*/
- publicStub()
- {
- this.attachInterface(this,DESCRIPTOR);
- }
- /**
- *CastanIBinderobjectintoanandroid.os.IHelloServiceinterface,
- *generatingaproxyifneeded.
- */
- publicstaticandroid.os.IHelloServiceasInterface(android.os.IBinderobj)
- {
- if((obj==null)){
- returnnull;
- }
- android.os.IInterfaceiin=(android.os.IInterface)obj.queryLocalInterface(DESCRIPTOR);
- if(((iin!=null)&&(iininstanceofandroid.os.IHelloService))){
- return((android.os.IHelloService)iin);
- }
- returnnewandroid.os.IHelloService.Stub.Proxy(obj);
- }
- publicandroid.os.IBinderasBinder()
- {
- returnthis;
- }
- @Override
- publicbooleanonTransact(intcode,android.os.Parceldata,android.os.Parcelreply,intflags)throwsandroid.os.RemoteException
- {
- switch(code)
- {
- caseINTERFACE_TRANSACTION:
- {
- reply.writeString(DESCRIPTOR);
- returntrue;
- }
- caseTRANSACTION_setVal:
- {
- data.enforceInterface(DESCRIPTOR);
- int_arg0;
- _arg0=data.readInt();
- this.setVal(_arg0);
- reply.writeNoException();
- returntrue;
- }
- caseTRANSACTION_getVal:
- {
- data.enforceInterface(DESCRIPTOR);
- int_result=this.getVal();
- reply.writeNoException();
- reply.writeInt(_result);
- returntrue;
- }
- }
- returnsuper.onTransact(code,data,reply,flags);
- }
- privatestaticclassProxyimplementsandroid.os.IHelloService
- {
- privateandroid.os.IBindermRemote;
- Proxy(android.os.IBinderremote)
- {
- mRemote=remote;
- }
- publicandroid.os.IBinderasBinder()
- {
- returnmRemote;
- }
- publicjava.lang.StringgetInterfaceDescriptor()
- {
- returnDESCRIPTOR;
- }
- publicvoidsetVal(intval)throwsandroid.os.RemoteException
- {
- android.os.Parcel_data=android.os.Parcel.obtain();
- android.os.Parcel_reply=android.os.Parcel.obtain();
- try{
- _data.writeInterfaceToken(DESCRIPTOR);
- _data.writeInt(val);
- mRemote.transact(Stub.TRANSACTION_setVal,_data,_reply,0);
- _reply.readException();
- }
- finally{
- _reply.recycle();
- _data.recycle();
- }
- }
- publicintgetVal()throwsandroid.os.RemoteException
- {
- android.os.Parcel_data=android.os.Parcel.obtain();
- android.os.Parcel_reply=android.os.Parcel.obtain();
- int_result;
- try{
- _data.writeInterfaceToken(DESCRIPTOR);
- mRemote.transact(Stub.TRANSACTION_getVal,_data,_reply,0);
- _reply.readException();
- _result=_reply.readInt();
- }
- finally{
- _reply.recycle();
- _data.recycle();
- }
- return_result;
- }
- }
- staticfinalintTRANSACTION_setVal=(android.os.IBinder.FIRST_CALL_TRANSACTION+0);
- staticfinalintTRANSACTION_getVal=(android.os.IBinder.FIRST_CALL_TRANSACTION+1);
- }
- publicvoidsetVal(intval)throwsandroid.os.RemoteException;
- publicintgetVal()throwsandroid.os.RemoteException;
- }
这里我们可以看到IHelloService.aidl这个文件编译后的真面目,原来就是根据IHelloService接口的定义生成相应的Stub和Proxy类,这个就是我们熟悉的Binder机制的内容了,即实现这个HelloService的Server必须继续于这里的IHelloService.Stub类,而这个HelloService的远程接口就是这里的IHelloService.Stub.Proxy对象获得的IHelloService接口。接下来的内容,我们就可以看到IHelloService.Stub和IHelloService.Stub.Proxy是怎么创建或者使用的。
三.HelloService的启动过程
在讨论HelloService的启动过程之前,我们先来看一下实现HelloService接口的Server是怎么定义的。
回忆在Ubuntu上为Android系统的Application Frameworks层增加硬件访问服务一文,我们在frameworks/base/services/java/com/android/server目录下新增了一个HelloService.java文件:
- packagecom.android.server;
- importandroid.content.Context;
- importandroid.os.IHelloService;
- importandroid.util.Slog;
- publicclassHelloServiceextendsIHelloService.Stub{
- privatestaticfinalStringTAG="HelloService";
- HelloService(){
- init_native();
- }
- publicvoidsetVal(intval){
- setVal_native(val);
- }
- publicintgetVal(){
- returngetVal_native();
- }
- privatestaticnativebooleaninit_native();
- privatestaticnativevoidsetVal_native(intval);
- privatestaticnativeintgetVal_native();
- }
这里,我们可以看到,HelloService继续了IHelloService.Stub类,它通过本地方法调用实现了getVal和setVal两个函数。我们不关心这两个函数的具体实现,有兴趣的读者可以参考在Ubuntu上为Android系统的Application Frameworks层增加硬件访问服务一文。
有了HelloService这个Server类后,下一步就是考虑怎么样把它启动起来了。在frameworks/base/services/java/com/android/server/SystemServer.java文件中,定义了SystemServer类。SystemServer对象是在系统启动的时候创建的,它被创建的时候会启动一个线程来创建HelloService,并且把它添加到Service Manager中去。
我们来看一下这部份的代码:
- classServerThreadextendsThread{
- ......
- @Override
- publicvoidrun(){
- ......
- Looper.prepare();
- ......
- try{
- Slog.i(TAG,"HelloService");
- ServiceManager.addService("hello",newHelloService());
- }catch(Throwablee){
- Slog.e(TAG,"FailurestartingHelloService",e);
- }
- ......
- Looper.loop();
- ......
- }
- }
- ......
- publicclassSystemServer
- {
- ......
- /**
- *ThismethodiscalledfromZygotetoinitializethesystem.Thiswillcausethenative
- *services(SurfaceFlinger,AudioFlinger,etc..)tobestarted.Afterthatitwillcallback
- *upintoinit2()tostarttheAndroidservices.
- */
- nativepublicstaticvoidinit1(String[]args);
- ......
- publicstaticfinalvoidinit2(){
- Slog.i(TAG,"EnteredtheAndroidsystemserver!");
- Threadthr=newServerThread();
- thr.setName("android.server.ServerThread");
- thr.start();
- }
- ......
- }
这里,我们可以看到,在ServerThread.run函数中,执行了下面代码把HelloService添加到Service Manager中去。这里我们关注把HelloService添加到Service Manager中去的代码:
- try{
- Slog.i(TAG,"HelloService");
- ServiceManager.addService("hello",newHelloService());
- }catch(Throwablee){
- Slog.e(TAG,"FailurestartingHelloService",e);
- }
通过调用ServiceManager.addService把一个HelloService实例添加到Service Manager中去。
我们先来看一下HelloService的创建过程:
- newHelloService();
这个语句会调用HelloService类的构造函数,而HelloService类继承于IHelloService.Stub类,IHelloService.Stub类又继承了Binder类,因此,最后会调用Binder类的构造函数:
- publicclassBinderimplementsIBinder{
- ......
- privateintmObject;
- ......
- publicBinder(){
- init();
- ......
- }
- privatenativefinalvoidinit();
- ......
- }
这里调用了一个JNI方法init来初始化这个Binder对象,这个JNI方法定义在frameworks/base/core/jni/android_util_Binder.cpp文件中:
- staticvoidandroid_os_Binder_init(JNIEnv*env,jobjectclazz)
- {
- JavaBBinderHolder*jbh=newJavaBBinderHolder(env,clazz);
- if(jbh==NULL){
- jniThrowException(env,"java/lang/OutOfMemoryError",NULL);
- return;
- }
- LOGV("JavaBinder%p:acquiringfirstrefonholder%p",clazz,jbh);
- jbh->incStrong(clazz);
- env->SetIntField(clazz,gBinderOffsets.mObject,(int)jbh);
- }
回到ServerThread.run函数中,我们再来看一下ServiceManager.addService函数的实现:
- publicfinalclassServiceManager{
- ......
- privatestaticIServiceManagersServiceManager;
- ......
- publicstaticvoidaddService(Stringname,IBinderservice){
- try{
- getIServiceManager().addService(name,service);
- }catch(RemoteExceptione){
- Log.e(TAG,"errorinaddService",e);
- }
- }
- ......
- }
这里的getIServiceManager函数我们在前面已经分析过了,它返回的是一个ServiceManagerProxy对象的IServiceManager接口。因此,我们进入到ServiceManagerProxy.addService中去看看:
- classServiceManagerProxyimplementsIServiceManager{
- publicServiceManagerProxy(IBinderremote){
- mRemote=remote;
- }
- ......
- publicvoidaddService(Stringname,IBinderservice)
- throwsRemoteException{
- Parceldata=Parcel.obtain();
- Parcelreply=Parcel.obtain();
- data.writeInterfaceToken(IServiceManager.descriptor);
- data.writeString(name);
- data.writeStrongBinder(service);
- mRemote.transact(ADD_SERVICE_TRANSACTION,data,reply,0);
- reply.recycle();
- data.recycle();
- }
- ......
- privateIBindermRemote;
- }
这里的Parcel类是用Java来实现的,它跟我们前面几篇文章介绍Binder机制时提到的用C++实现的Parcel类的作用是一样的,即用来在两个进程之间传递数据。
这里我们关注是如何把参数service写到data这个Parcel对象中去的:
- data.writeStrongBinder(service);
我们来看看Parcel.writeStrongBinder函数的实现:
- publicfinalclassParcel{
- ......
- /**
- *WriteanobjectintotheparcelatthecurrentdataPosition(),
- *growingdataCapacity()ifneeded.
- */
- publicfinalnativevoidwriteStrongBinder(IBinderval);
- ......
- }
这里的writeStrongBinder函数又是一个JNI方法,它定义在frameworks/base/core/jni/android_util_Binder.cpp文件中:
- staticvoidandroid_os_Parcel_writeStrongBinder(JNIEnv*env,jobjectclazz,jobjectobject)
- {
- Parcel*parcel=parcelForJavaObject(env,clazz);
- if(parcel!=NULL){
- conststatus_terr=parcel->writeStrongBinder(ibinderForJavaObject(env,object));
- if(err!=NO_ERROR){
- jniThrowException(env,"java/lang/OutOfMemoryError",NULL);
- }
- }
- }
这里的object参数是一个Java语言实现的Binder对象,在调用C++语言实现的Parcel::writeStrongBinder把这个对象写入到parcel对象时,首先通过ibinderForJavaObject函数把这个Java语言实现的Binder对象转换为C++语言实现的JavaBBinderHolder对象:
- sp<IBinder>ibinderForJavaObject(JNIEnv*env,jobjectobj)
- {
- if(obj==NULL)returnNULL;
- if(env->IsInstanceOf(obj,gBinderOffsets.mClass)){
- JavaBBinderHolder*jbh=(JavaBBinderHolder*)
- env->GetIntField(obj,gBinderOffsets.mObject);
- returnjbh!=NULL?jbh->get(env):NULL;
- }
- if(env->IsInstanceOf(obj,gBinderProxyOffsets.mClass)){
- return(IBinder*)
- env->GetIntField(obj,gBinderProxyOffsets.mObject);
- }
- LOGW("ibinderForJavaObject:%pisnotaBinderobject",obj);
- returnNULL;
- }
我们知道,这里的obj参数是一个Binder类的实例,因此,这里会进入到第一个if语句中去。
在前面创建HelloService对象,曾经在调用到HelloService的父类Binder中,曾经在JNI层创建了一个JavaBBinderHolder对象,然后把这个对象的地址保存在Binder类的mObject成员变量中,因此,这里把obj对象的mObject成员变量强制转为JavaBBinderHolder对象。
到了这里,这个函数的功课还未完成,还剩下最后关键的一步:
- returnjbh!=NULL?jbh->get(env):NULL;
这里就是jbh->get这个语句了。
在JavaBBinderHolder类中,有一个成员变量mBinder,它的类型为JavaBBinder,而JavaBBinder类继承于BBinder类。在前面学习Binder机制的C++语言实现时,我们在Android系统进程间通信(IPC)机制Binder中的Server启动过程源代码分析这篇文章中,曾经介绍过,IPCThreadState类负责与Binder驱动程序进行交互,它把从Binder驱动程序读出来的请求作简单的处理后,最后把这个请求扔给BBinder的onTransact函数来进一步处理。
这里,我们就是要把JavaBBinderHolder里面的JavaBBinder类型Binder实体添加到Service Manager中去,以便使得这个HelloService有Client来请求服务时,由Binder驱动程序来唤醒这个Server线程,进而调用这个JavaBBinder类型Binder实体的onTransact函数来进一步处理,这个函数我们在后面会继续介绍。
先来看一下JavaBBinderHolder::get函数的实现:
- classJavaBBinderHolder:publicRefBase
- {
- ......
- JavaBBinderHolder(JNIEnv*env,jobjectobject)
- :mObject(object)
- {
- ......
- }
- ......
- sp<JavaBBinder>get(JNIEnv*env)
- {
- AutoMutex_l(mLock);
- sp<JavaBBinder>b=mBinder.promote();
- if(b==NULL){
- b=newJavaBBinder(env,mObject);
- mBinder=b;
- ......
- }
- returnb;
- }
- ......
- jobjectmObject;
- wp<JavaBBinder>mBinder;
- };
这里是第一次调用get函数,因此,会创建一个JavaBBinder对象,并且保存在mBinder成员变量中。注意,这里的mObject就是上面创建的HelloService对象了,这是一个Java对象。这个HelloService对象最终也会保存在JavaBBinder对象的成员变量mObject中。
回到android_os_Parcel_writeStrongBinder函数中,下面这个语句:
- conststatus_terr=parcel->writeStrongBinder(ibinderForJavaObject(env,object));
- conststatus_terr=parcel->writeStrongBinder((JavaBBinderHodler*)(obj.mObject));
接着,再回到ServiceManagerProxy.addService这个函数中,最后它通过其成员变量mRemote来执行进程间通信操作。前面我们在介绍如何获取Service Manager远程接口时提到,这里的mRemote成员变量实际上是一个BinderProxy对象,因此,我们再来看看BinderProxy.transact函数的实现:
- finalclassBinderProxyimplementsIBinder{
- ......
- publicnativebooleantransact(intcode,Parceldata,Parcelreply,
- intflags)throwsRemoteException;
- ......
- }
这里的transact成员函数又是一个JNI方法,它定义在frameworks/base/core/jni/android_util_Binder.cpp文件中:
- staticjbooleanandroid_os_BinderProxy_transact(JNIEnv*env,jobjectobj,
- jintcode,jobjectdataObj,
- jobjectreplyObj,jintflags)
- {
- ......
- Parcel*data=parcelForJavaObject(env,dataObj);
- if(data==NULL){
- returnJNI_FALSE;
- }
- Parcel*reply=parcelForJavaObject(env,replyObj);
- if(reply==NULL&&replyObj!=NULL){
- returnJNI_FALSE;
- }
- IBinder*target=(IBinder*)
- env->GetIntField(obj,gBinderProxyOffsets.mObject);
- if(target==NULL){
- jniThrowException(env,"java/lang/IllegalStateException","Binderhasbeenfinalized!");
- returnJNI_FALSE;
- }
- ......
- status_terr=target->transact(code,*data,reply,flags);
- ......
- if(err==NO_ERROR){
- returnJNI_TRUE;
- }elseif(err==UNKNOWN_TRANSACTION){
- returnJNI_FALSE;
- }
- signalExceptionForError(env,obj,err);
- returnJNI_FALSE;
- }
这里传进来的参数dataObj和replyObj是一个Java接口实现的Parcel类,由于这里是JNI层,需要把它转换为C++实现的Parcel类,它们就是通过我们前面说的parcelForJavaObject函数进行转换的。
前面我们在分析如何获取Service Manager远程接口时,曾经说到,在JNI层中,创建了一个BpBinder对象,它的句柄值为0,它的地址保存在gBinderProxyOffsets.mObject中,因此,这里通过下面语句得到这个BpBinder对象的IBinder接口:
- IBinder*target=(IBinder*)
- env->GetIntField(obj,gBinderProxyOffsets.mObject);
有了这个IBinder接口后,就和我们前面几篇文章介绍Binder机制的C/C++实现一致了。
最后,通过BpBinder::transact函数进入到Binder驱动程序,然后Binder驱动程序唤醒Service Manager响应这个ADD_SERVICE_TRANSACTION请求:
- status_terr=target->transact(code,*data,reply,flags);
具体可以参考Android系统进程间通信(IPC)机制Binder中的Server启动过程源代码分析一文。需要注意的是,这里的data包含了一个JavaBBinderHolder类型的Binder实体对象,它就代表了我们上面创建的HelloService。Service Manager收到这个ADD_SERVICE_TRANSACTION请求时,就会把这个Binder实体纳入到自己内部进行管理。
这样,实现HelloService的Server的启动过程就完成了。
四.Client获取HelloService的Java远程接口的过程
前面我们在学习Android系统硬件抽象层(HAL)时,在在Ubuntu上为Android系统内置Java应用程序测试Application Frameworks层的硬件服务这篇文章中,我们创建了一个应用程序,这个应用程序作为一个Client角色,借助Service Manager这个Java远程接口来获得HelloService的远程接口,进而调用HelloService提供的服务。
我们看看它是如何借助Service Manager这个Java远程接口来获得HelloService的远程接口的。在Hello这个Activity的onCreate函数,通过IServiceManager.getService函数来获得HelloService的远程接口:
- publicclassHelloextendsActivityimplementsOnClickListener{
- ......
- privateIHelloServicehelloService=null;
- ......
- @Override
- publicvoidonCreate(BundlesavedInstanceState){
- helloService=IHelloService.Stub.asInterface(
- ServiceManager.getService("hello"));
- }
- ......
- }
我们先来看ServiceManager.getService的实现。前面我们说过,这里实际上是调用了ServiceManagerProxy.getService函数:
- classServiceManagerProxyimplementsIServiceManager{
- publicServiceManagerProxy(IBinderremote){
- mRemote=remote;
- }
- ......
- publicIBindergetService(Stringname)throwsRemoteException{
- Parceldata=Parcel.obtain();
- Parcelreply=Parcel.obtain();
- data.writeInterfaceToken(IServiceManager.descriptor);
- data.writeString(name);
- mRemote.transact(GET_SERVICE_TRANSACTION,data,reply,0);
- IBinderbinder=reply.readStrongBinder();
- reply.recycle();
- data.recycle();
- returnbinder;
- }
- ......
- privateIBindermRemote;
- }
最终通过mRemote.transact来执行实际操作。我们在前面已经介绍过了,这里的mRemote实际上是一个BinderProxy对象,它的transact成员函数是一个JNI方法,实现在frameworks/base/core/jni/android_util_Binder.cpp文件中的android_os_BinderProxy_transact函数中。
这个函数前面我们已经看到了,这里就不再列出来了。不过,当这个函数从:
- status_terr=target->transact(code,*data,reply,flags);
这里的reply变量里面就包括了一个HelloService的引用了。注意,这里的reply变量就是我们在ServiceManagerProxy.getService函数里面传进来的参数reply,它是一个Parcel对象。
回到ServiceManagerProxy.getService函数中,从下面语句返回:
- mRemote.transact(GET_SERVICE_TRANSACTION,data,reply,0);
接着,就通过下面语句将这个HelloService的引用读出来:
- IBinderbinder=reply.readStrongBinder();
我们看看Parcel.readStrongBinder的实现:
- publicfinalclassParcel{
- ......
- /**
- *ReadanobjectfromtheparcelatthecurrentdataPosition().
- */
- publicfinalnativeIBinderreadStrongBinder();
- ......
- }
它也是一个JNI方法,实现在frameworks/base/core/jni/android_util_Binder.cpp文件中:
- staticjobjectandroid_os_Parcel_readStrongBinder(JNIEnv*env,jobjectclazz)
- {
- Parcel*parcel=parcelForJavaObject(env,clazz);
- if(parcel!=NULL){
- returnjavaObjectForIBinder(env,parcel->readStrongBinder());
- }
- returnNULL;
- }
这里首先把Java语言实现的Parcel对象class转换成C++语言实现的Parcel对象parcel,接着,通过parcel->readStrongBinder函数来获得一个Binder引用。
我们在前面学习Binder机制时,在Android系统进程间通信(IPC)机制Binder中的Client获得Server远程接口过程源代码分析这篇文章中,曾经分析过这个函数,它最终返回来的是一个BpBinder对象,因此,下面的语句:
- returnjavaObjectForIBinder(env,parcel->readStrongBinder());
就相当于是:
- returnjavaObjectForIBinder(env,newBpBinder(handle));
这里的handle就是HelloService这个Binder实体在Client进程中的句柄了,它是由Binder驱动程序设置的,上层不用关心它的值具体是多少。至于javaObjectForIBinder这个函数,我们前面介绍如何获取Service Manager的Java远程接口时已经有详细介绍,这里就不累述了,它的作用就是创建一个BinderProxy对象,并且把刚才获得的BpBinder对象的地址保存在这个BinderProxy对象的mObject成员变量中。
最后返回到Hello.onCreate函数中,从下面语句返回:
- helloService=IHelloService.Stub.asInterface(
- ServiceManager.getService("hello"));
就相当于是:
- helloService=IHelloService.Stub.asInterface(newBinderProxy()));
回忆一下前面介绍IHelloService接口的定义时,IHelloService.Stub.asInterface是这样定义的:
- publicinterfaceIHelloServiceextendsandroid.os.IInterface
- {
- /**Local-sideIPCimplementationstubclass.*/
- publicstaticabstractclassStubextendsandroid.os.Binderimplementsandroid.os.IHelloService
- {
- ......
- publicstaticandroid.os.IHelloServiceasInterface(android.os.IBinderobj)
- {
- if((obj==null)){
- returnnull;
- }
- android.os.IInterfaceiin=(android.os.IInterface)obj.queryLocalInterface(DESCRIPTOR);
- if(((iin!=null)&&(iininstanceofandroid.os.IHelloService))){
- return((android.os.IHelloService)iin);
- }
- returnnewandroid.os.IHelloService.Stub.Proxy(obj);
- }
- ......
- }
- }
这里的obj是一个BinderProxy对象,它的queryLocalInterface返回null,于是调用下面语句获得HelloService的远程接口:
- returnnewandroid.os.IHelloService.Stub.Proxy(obj);
相当于是:
- returnnewandroid.os.IHelloService.Stub.Proxy(newBinderProxy());
这样,我们就获得了HelloService的远程接口了,它实质上是一个实现了IHelloService接口的IHelloService.Stub.Proxy对象。
五.Client通过HelloService的Java远程接口来使用HelloService提供的服务的过程
上面介绍的Hello这个Activity获得了HelloService的远程接口后,就可以使用它的服务了。
我们以使用IHelloService.getVal函数为例详细说明。在Hello::onClick函数中调用了IHelloService.getVal函数:
- publicclassHelloextendsActivityimplementsOnClickListener{
- ......
- @Override
- publicvoidonClick(Viewv){
- if(v.equals(readButton)){
- intval=helloService.getVal();
- ......
- }
- elseif(v.equals(writeButton)){
- ......
- }
- elseif(v.equals(clearButton)){
- ......
- }
- }
- ......
- }
通知前面的分析,我们知道,这里的helloService接口实际上是一个IHelloService.Stub.Proxy对象,因此,我们进入到IHelloService.Stub.Proxy类的getVal函数中:
- publicinterfaceIHelloServiceextendsandroid.os.IInterface
- {
- /**Local-sideIPCimplementationstubclass.*/
- publicstaticabstractclassStubextendsandroid.os.Binderimplementsandroid.os.IHelloService
- {
- ......
- privatestaticclassProxyimplementsandroid.os.IHelloService
- {
- privateandroid.os.IBindermRemote;
- ......
- publicintgetVal()throwsandroid.os.RemoteException
- {
- android.os.Parcel_data=android.os.Parcel.obtain();
- android.os.Parcel_reply=android.os.Parcel.obtain();
- int_result;
- try{
- _data.writeInterfaceToken(DESCRIPTOR);
- mRemote.transact(Stub.TRANSACTION_getVal,_data,_reply,0);
- _reply.readException();
- _result=_reply.readInt();
- }
- finally{
- _reply.recycle();
- _data.recycle();
- }
- return_result;
- }
- }
- ......
- staticfinalintTRANSACTION_getVal=(android.os.IBinder.FIRST_CALL_TRANSACTION+1);
- }
- ......
- }
这里我们可以看出,实际上是通过mRemote.transact来请求HelloService执行TRANSACTION_getVal操作。这里的mRemote是一个BinderProxy对象,这是我们在前面获取HelloService的Java远程接口的过程中创建的。
BinderProxy.transact函数是一个JNI方法,我们在前面已经介绍过了,这里不再累述。最过调用到Binder驱动程序,Binder驱动程序唤醒HelloService这个Server。前面我们在介绍HelloService的启动过程时,曾经提到,HelloService这个Server线程被唤醒之后,就会调用JavaBBinder类的onTransact函数:
- classJavaBBinder:publicBBinder
- {
- JavaBBinder(JNIEnv*env,jobjectobject)
- :mVM(jnienv_to_javavm(env)),mObject(env->NewGlobalRef(object))
- {
- ......
- }
- ......
- virtualstatus_tonTransact(
- uint32_tcode,constParcel&data,Parcel*reply,uint32_tflags=0)
- {
- JNIEnv*env=javavm_to_jnienv(mVM);
- ......
- jbooleanres=env->CallBooleanMethod(mObject,gBinderOffsets.mExecTransact,
- code,(int32_t)&data,(int32_t)reply,flags);
- ......
- returnres!=JNI_FALSE?NO_ERROR:UNKNOWN_TRANSACTION;
- }
- ......
- JavaVM*constmVM;
- jobjectconstmObject;
- };
前面我们在介绍HelloService的启动过程时,曾经介绍过,JavaBBinder类里面的成员变量mObject就是HelloService类的一个实例对象了。因此,这里通过语句:
- jbooleanres=env->CallBooleanMethod(mObject,gBinderOffsets.mExecTransact,
- code,(int32_t)&data,(int32_t)reply,flags);
就调用了HelloService.execTransact函数,而HelloService.execTransact函数继承了Binder类的execTransact函数:
- publicclassBinderimplementsIBinder{
- ......
- //Entrypointfromandroid_util_Binder.cpp'sonTransact
- privatebooleanexecTransact(intcode,intdataObj,intreplyObj,intflags){
- Parceldata=Parcel.obtain(dataObj);
- Parcelreply=Parcel.obtain(replyObj);
- //theoretically,weshouldcalltransact,whichwillcallonTransact,
- //butallthatdoesisrewindit,andwejustgotthesefromanIPC,
- //sowe'lljustcallitdirectly.
- booleanres;
- try{
- res=onTransact(code,data,reply,flags);
- }catch(RemoteExceptione){
- reply.writeException(e);
- res=true;
- }catch(RuntimeExceptione){
- reply.writeException(e);
- res=true;
- }catch(OutOfMemoryErrore){
- RuntimeExceptionre=newRuntimeException("Outofmemory",e);
- reply.writeException(re);
- res=true;
- }
- reply.recycle();
- data.recycle();
- returnres;
- }
- }
这里又调用了onTransact函数来作进一步处理。由于HelloService类继承了IHelloService.Stub类,而IHelloService.Stub类实现了onTransact函数,HelloService类没有实现,因此,最终调用了IHelloService.Stub.onTransact函数:
- publicinterfaceIHelloServiceextendsandroid.os.IInterface
- {
- /**Local-sideIPCimplementationstubclass.*/
- publicstaticabstractclassStubextendsandroid.os.Binderimplementsandroid.os.IHelloService
- {
- ......
- @Override
- publicbooleanonTransact(intcode,android.os.Parceldata,android.os.Parcelreply,intflags)throwsandroid.os.RemoteException
- {
- switch(code)
- {
- ......
- caseTRANSACTION_getVal:
- {
- data.enforceInterface(DESCRIPTOR);
- int_result=this.getVal();
- reply.writeNoException();
- reply.writeInt(_result);
- returntrue;
- }
- }
- returnsuper.onTransact(code,data,reply,flags);
- }
- ......
- }
- }
函数最终又调用了HelloService.getVal函数:
- publicclassHelloServiceextendsIHelloService.Stub{
- ......
- publicintgetVal(){
- returngetVal_native();
- }
- ......
- privatestaticnativeintgetVal_native();
- }
最终,经过层层返回,就回到IHelloService.Stub.Proxy.getVal函数中来了,从下面语句返回:
- mRemote.transact(Stub.TRANSACTION_getVal,_data,_reply,0);
并将结果读出来:
- _result=_reply.readInt();
最后将这个结果返回到Hello.onClick函数中。
这样,Client通过HelloService的Java远程接口来使用HelloService提供的服务的过程就介绍完了。
至此,Android系统进程间通信Binder机制在应用程序框架层的Java接口源代码分析也完成了,整个Binder机制的学习就结束了。
重新学习Android系统进程间通信Binder机制,请回到Android进程间通信(IPC)机制Binder简要介绍和学习计划一文。
在前面几篇文章中,我们详细介绍了Android系统进程间通信机制Binder的原理,并且深入分析了系统提供的Binder运行库和驱动程序的源代码。细心的读者会发现,这几篇文章分析的Binder接口都是基于C/C++语言来实现的,但是我们在编写应用程序都是基于Java语言的,那么,我们如何使用Java语言来使用系统的Binder机制来进行进程间通信呢?这就是本文要介绍的Android系统应用程序框架层的用Java语言来实现的Binder接口了。
熟悉Android系统的读者,应该能想到应用程序框架中的基于Java语言的Binder接口是通过JNI来调用基于C/C++语言的Binder运行库来为Java应用程序提供进程间通信服务的了。JNI在Android系统中用得相当普遍,SDK中的Java接口API很多只是简单地通过JNI来调用底层的C/C++运行库从而为应用程序服务的。
这里,我们仍然是通过具体的例子来说明Binder机制在应用程序框架层中的Java接口,主要就是Service Manager、Server和Client这三个角色的实现了。通常,在应用程序中,我们都是把Server实现为Service的形式,并且通过IServiceManager.addService接口来把这个Service添加到Service Manager,Client也是通过IServiceManager.getService接口来获得Service接口,接着就可以使用这个Service提供的功能了,这个与运行时库的Binder接口是一致的。
前面我们学习Android硬件抽象层时,曾经在应用程序框架层中提供了一个硬件访问服务HelloService,这个Service运行在一个独立的进程中充当Server的角色,使用这个Service的Client运行在另一个进程中,它们之间就是通过Binder机制来通信的了。这里,我们就使用HelloService这个例子来分析Android系统进程间通信Binder机制在应用程序框架层的Java接口源代码。所以希望读者在阅读下面的内容之前,先了解一下前面在Ubuntu上为Android系统的Application Frameworks层增加硬件访问服务这篇文章。
这篇文章通过五个情景来学习Android系统进程间通信Binder机制在应用程序框架层的Java接口:1. 获取Service Manager的Java远程接口的过程;2. HelloService接口的定义;3. HelloService的启动过程;4. Client获取HelloService的Java远程接口的过程;5.Client通过HelloService的Java远程接口来使用HelloService提供的服务的过程。
一. 获取Service Manager的Java远程接口
我们要获取的Service Manager的Java远程接口是一个ServiceManagerProxy对象的IServiceManager接口。我们现在就来看看ServiceManagerProxy类是长什么样子的:
这里可以看出,ServiceManagerProxy类实现了IServiceManager接口,IServiceManager提供了getService和addService两个成员函数来管理系统中的Service。从ServiceManagerProxy类的构造函数可以看出,它需要一个BinderProxy对象的IBinder接口来作为参数。因此,要获取Service Manager的Java远程接口ServiceManagerProxy,首先要有一个BinderProxy对象。下面将会看到这个BinderProxy对象是如何获得的。
再来看一下是通过什么路径来获取Service Manager的Java远程接口ServiceManagerProxy的。这个主角就是ServiceManager了,我们也先看一下ServiceManager是长什么样子的:
ServiceManager类有一个静态成员函数getIServiceManager,它的作用就是用来获取Service Manager的Java远程接口了,而这个函数又是通过ServiceManagerNative来获取Service Manager的Java远程接口的。
接下来,我们就看一下ServiceManager.getIServiceManager这个函数的实现,这个函数定义在frameworks/base/core/java/android/os/ServiceManager.java文件中:
- publicfinalclassServiceManager{
- ......
- privatestaticIServiceManagersServiceManager;
- ......
- privatestaticIServiceManagergetIServiceManager(){
- if(sServiceManager!=null){
- returnsServiceManager;
- }
- //Findtheservicemanager
- sServiceManager=ServiceManagerNative.asInterface(BinderInternal.getContextObject());
- returnsServiceManager;
- }
- ......
- }
我们来看一下BinderInternal.getContextObject的实现,这个函数定义在frameworks/base/core/java/com/android/internal/os/BinderInternal.java文件中:
- publicclassBinderInternal{
- ......
- /**
- *Returntheglobal"contextobject"ofthesystem.Thisisusually
- *animplementationofIServiceManager,whichyoucanusetofind
- *otherservices.
- */
- publicstaticfinalnativeIBindergetContextObject();
- ......
- }
- staticjobjectandroid_os_BinderInternal_getContextObject(JNIEnv*env,jobjectclazz)
- {
- sp<IBinder>b=ProcessState::self()->getContextObject(NULL);
- returnjavaObjectForIBinder(env,b);
- }
- sp<IBinder>b=ProcessState::self()->getContextObject(NULL);
- sp<IBinder>b=newBpBinder(0);
- jobjectjavaObjectForIBinder(JNIEnv*env,constsp<IBinder>&val)
- {
- if(val==NULL)returnNULL;
- if(val->checkSubclass(&gBinderOffsets)){
- //Oneofourown!
- jobjectobject=static_cast<JavaBBinder*>(val.get())->object();
- //printf("objectForBinder%p:it'sourown%p!\n",val.get(),object);
- returnobject;
- }
- //Fortherestofthefunctionwewillholdthislock,toserialize
- //looking/creationofJavaproxiesfornativeBinderproxies.
- AutoMutex_l(mProxyLock);
- //Someoneelse's...doweknowaboutit?
- jobjectobject=(jobject)val->findObject(&gBinderProxyOffsets);
- if(object!=NULL){
- jobjectres=env->CallObjectMethod(object,gWeakReferenceOffsets.mGet);
- if(res!=NULL){
- LOGV("objectForBinder%p:foundexisting%p!\n",val.get(),res);
- returnres;
- }
- LOGV("Proxyobject%pofIBinder%pnolongerinworkingset!!!",object,val.get());
- android_atomic_dec(&gNumProxyRefs);
- val->detachObject(&gBinderProxyOffsets);
- env->DeleteGlobalRef(object);
- }
- object=env->NewObject(gBinderProxyOffsets.mClass,gBinderProxyOffsets.mConstructor);
- if(object!=NULL){
- LOGV("objectForBinder%p:creatednew%p!\n",val.get(),object);
- //Theproxyholdsareferencetothenativeobject.
- env->SetIntField(object,gBinderProxyOffsets.mObject,(int)val.get());
- val->incStrong(object);
- //Thenativeobjectneedstoholdaweakreferencebacktothe
- //proxy,sowecanretrievethesameproxyifitisstillactive.
- jobjectrefObject=env->NewGlobalRef(
- env->GetObjectField(object,gBinderProxyOffsets.mSelf));
- val->attachObject(&gBinderProxyOffsets,refObject,
- jnienv_to_javavm(env),proxy_cleanup);
- //Notethatanewobjectreferencehasbeencreated.
- android_atomic_inc(&gNumProxyRefs);
- incRefsCreated(env);
- }
- returnobject;
- }
先看gBinderOffsets的定义:
- staticstructbindernative_offsets_t
- {
- //Classstate.
- jclassmClass;
- jmethodIDmExecTransact;
- //Objectstate.
- jfieldIDmObject;
- }gBinderOffsets;
- constchar*constkBinderPathName="android/os/Binder";
- staticintint_register_android_os_Binder(JNIEnv*env)
- {
- jclassclazz;
- clazz=env->FindClass(kBinderPathName);
- LOG_FATAL_IF(clazz==NULL,"Unabletofindclassandroid.os.Binder");
- gBinderOffsets.mClass=(jclass)env->NewGlobalRef(clazz);
- gBinderOffsets.mExecTransact
- =env->GetMethodID(clazz,"execTransact","(IIII)Z");
- assert(gBinderOffsets.mExecTransact);
- gBinderOffsets.mObject
- =env->GetFieldID(clazz,"mObject","I");
- assert(gBinderOffsets.mObject);
- returnAndroidRuntime::registerNativeMethods(
- env,kBinderPathName,
- gBinderMethods,NELEM(gBinderMethods));
- }
再来看gBinderProxyOffsets的定义:
- staticstructbinderproxy_offsets_t
- {
- //Classstate.
- jclassmClass;
- jmethodIDmConstructor;
- jmethodIDmSendDeathNotice;
- //Objectstate.
- jfieldIDmObject;
- jfieldIDmSelf;
- }gBinderProxyOffsets;
简单来说,gBinderProxyOffsets是用来变量是用来记录上面第一个图中的BinderProxy类的相关信息的,它是在注册BinderProxy类的JNI方法的int_register_android_os_BinderProxy函数初始化的:
- constchar*constkBinderProxyPathName="android/os/BinderProxy";
- staticintint_register_android_os_BinderProxy(JNIEnv*env)
- {
- jclassclazz;
- clazz=env->FindClass("java/lang/ref/WeakReference");
- LOG_FATAL_IF(clazz==NULL,"Unabletofindclassjava.lang.ref.WeakReference");
- gWeakReferenceOffsets.mClass=(jclass)env->NewGlobalRef(clazz);
- gWeakReferenceOffsets.mGet
- =env->GetMethodID(clazz,"get","()Ljava/lang/Object;");
- assert(gWeakReferenceOffsets.mGet);
- clazz=env->FindClass("java/lang/Error");
- LOG_FATAL_IF(clazz==NULL,"Unabletofindclassjava.lang.Error");
- gErrorOffsets.mClass=(jclass)env->NewGlobalRef(clazz);
- clazz=env->FindClass(kBinderProxyPathName);
- LOG_FATAL_IF(clazz==NULL,"Unabletofindclassandroid.os.BinderProxy");
- gBinderProxyOffsets.mClass=(jclass)env->NewGlobalRef(clazz);
- gBinderProxyOffsets.mConstructor
- =env->GetMethodID(clazz,"<init>","()V");
- assert(gBinderProxyOffsets.mConstructor);
- gBinderProxyOffsets.mSendDeathNotice
- =env->GetStaticMethodID(clazz,"sendDeathNotice","(Landroid/os/IBinder$DeathRecipient;)V");
- assert(gBinderProxyOffsets.mSendDeathNotice);
- gBinderProxyOffsets.mObject
- =env->GetFieldID(clazz,"mObject","I");
- assert(gBinderProxyOffsets.mObject);
- gBinderProxyOffsets.mSelf
- =env->GetFieldID(clazz,"mSelf","Ljava/lang/ref/WeakReference;");
- assert(gBinderProxyOffsets.mSelf);
- returnAndroidRuntime::registerNativeMethods(
- env,kBinderProxyPathName,
- gBinderProxyMethods,NELEM(gBinderProxyMethods));
- }
- if(val->checkSubclass(&gBinderOffsets)){
- //Oneofourown!
- jobjectobject=static_cast<JavaBBinder*>(val.get())->object();
- //printf("objectForBinder%p:it'sourown%p!\n",val.get(),object);
- returnobject;
- }
于是函数继续往下执行:
- jobjectobject=(jobject)val->findObject(&gBinderProxyOffsets);
于是函数又继续往下执行:
- object=env->NewObject(gBinderProxyOffsets.mClass,gBinderProxyOffsets.mConstructor);
- env->SetIntField(object,gBinderProxyOffsets.mObject,(int)val.get());
接下去,还要把它放到BpBinder里面去,下次就要使用时,就可以在上一步调用BpBinder::findObj把它找回来了:
- val->attachObject(&gBinderProxyOffsets,refObject,
- jnienv_to_javavm(env),proxy_cleanup);
回到ServiceManager.getIServiceManager中,从下面语句返回:
- sServiceManager=ServiceManagerNative.asInterface(BinderInternal.getContextObject());
相当于是:
- sServiceManager=ServiceManagerNative.asInterface(newBinderProxy());
接下去就是调用ServiceManagerNative.asInterface函数了,这个函数定义在frameworks/base/core/java/android/os/ServiceManagerNative.java文件中:
- publicabstractclassServiceManagerNative......
- {
- ......
- staticpublicIServiceManagerasInterface(IBinderobj)
- {
- if(obj==null){
- returnnull;
- }
- IServiceManagerin=
- (IServiceManager)obj.queryLocalInterface(descriptor);
- if(in!=null){
- returnin;
- }
- returnnewServiceManagerProxy(obj);
- }
- ......
- }
返回到ServiceManager.getIServiceManager中,从下面语句返回:
- sServiceManager=ServiceManagerNative.asInterface(newBinderProxy());
就相当于是:
- sServiceManager=newServiceManagerProxy(newBinderProxy());
总结一下,就是在Java层,我们拥有了一个Service Manager远程接口ServiceManagerProxy,而这个ServiceManagerProxy对象在JNI层有一个句柄值为0的BpBinder对象与之通过gBinderProxyOffsets关联起来。
这样获取Service Manager的Java远程接口的过程就完成了。
二.HelloService接口的定义
前面我们在学习Android系统的硬件抽象层(HAL)时,在在Ubuntu上为Android系统的Application Frameworks层增加硬件访问服务这篇文章中,我们编写了一个硬件服务HelloService,它的服务接口定义在frameworks/base/core/java/android/os/IHelloService.aidl文件中:
- packageandroid.os;
- interfaceIHelloService
- {
- voidsetVal(intval);
- intgetVal();
- }
这个服务接口很简单,只有两个函数,分别用来读写硬件寄存器。
注意,这是一个aidl文件,编译后会生成一个IHelloService.java。我们来看一下这个文件的内容隐藏着什么奥秘,可以这么神奇地支持进程间通信。
- /*
- *Thisfileisauto-generated.DONOTMODIFY.
- *Originalfile:frameworks/base/core/java/android/os/IHelloService.aidl
- */
- packageandroid.os;
- publicinterfaceIHelloServiceextendsandroid.os.IInterface
- {
- /**Local-sideIPCimplementationstubclass.*/
- publicstaticabstractclassStubextendsandroid.os.Binderimplementsandroid.os.IHelloService
- {
- privatestaticfinaljava.lang.StringDESCRIPTOR="android.os.IHelloService";
- /**Constructthestubatattachittotheinterface.*/
- publicStub()
- {
- this.attachInterface(this,DESCRIPTOR);
- }
- /**
- *CastanIBinderobjectintoanandroid.os.IHelloServiceinterface,
- *generatingaproxyifneeded.
- */
- publicstaticandroid.os.IHelloServiceasInterface(android.os.IBinderobj)
- {
- if((obj==null)){
- returnnull;
- }
- android.os.IInterfaceiin=(android.os.IInterface)obj.queryLocalInterface(DESCRIPTOR);
- if(((iin!=null)&&(iininstanceofandroid.os.IHelloService))){
- return((android.os.IHelloService)iin);
- }
- returnnewandroid.os.IHelloService.Stub.Proxy(obj);
- }
- publicandroid.os.IBinderasBinder()
- {
- returnthis;
- }
- @Override
- publicbooleanonTransact(intcode,android.os.Parceldata,android.os.Parcelreply,intflags)throwsandroid.os.RemoteException
- {
- switch(code)
- {
- caseINTERFACE_TRANSACTION:
- {
- reply.writeString(DESCRIPTOR);
- returntrue;
- }
- caseTRANSACTION_setVal:
- {
- data.enforceInterface(DESCRIPTOR);
- int_arg0;
- _arg0=data.readInt();
- this.setVal(_arg0);
- reply.writeNoException();
- returntrue;
- }
- caseTRANSACTION_getVal:
- {
- data.enforceInterface(DESCRIPTOR);
- int_result=this.getVal();
- reply.writeNoException();
- reply.writeInt(_result);
- returntrue;
- }
- }
- returnsuper.onTransact(code,data,reply,flags);
- }
- privatestaticclassProxyimplementsandroid.os.IHelloService
- {
- privateandroid.os.IBindermRemote;
- Proxy(android.os.IBinderremote)
- {
- mRemote=remote;
- }
- publicandroid.os.IBinderasBinder()
- {
- returnmRemote;
- }
- publicjava.lang.StringgetInterfaceDescriptor()
- {
- returnDESCRIPTOR;
- }
- publicvoidsetVal(intval)throwsandroid.os.RemoteException
- {
- android.os.Parcel_data=android.os.Parcel.obtain();
- android.os.Parcel_reply=android.os.Parcel.obtain();
- try{
- _data.writeInterfaceToken(DESCRIPTOR);
- _data.writeInt(val);
- mRemote.transact(Stub.TRANSACTION_setVal,_data,_reply,0);
- _reply.readException();
- }
- finally{
- _reply.recycle();
- _data.recycle();
- }
- }
- publicintgetVal()throwsandroid.os.RemoteException
- {
- android.os.Parcel_data=android.os.Parcel.obtain();
- android.os.Parcel_reply=android.os.Parcel.obtain();
- int_result;
- try{
- _data.writeInterfaceToken(DESCRIPTOR);
- mRemote.transact(Stub.TRANSACTION_getVal,_data,_reply,0);
- _reply.readException();
- _result=_reply.readInt();
- }
- finally{
- _reply.recycle();
- _data.recycle();
- }
- return_result;
- }
- }
- staticfinalintTRANSACTION_setVal=(android.os.IBinder.FIRST_CALL_TRANSACTION+0);
- staticfinalintTRANSACTION_getVal=(android.os.IBinder.FIRST_CALL_TRANSACTION+1);
- }
- publicvoidsetVal(intval)throwsandroid.os.RemoteException;
- publicintgetVal()throwsandroid.os.RemoteException;
- }
这里我们可以看到IHelloService.aidl这个文件编译后的真面目,原来就是根据IHelloService接口的定义生成相应的Stub和Proxy类,这个就是我们熟悉的Binder机制的内容了,即实现这个HelloService的Server必须继续于这里的IHelloService.Stub类,而这个HelloService的远程接口就是这里的IHelloService.Stub.Proxy对象获得的IHelloService接口。接下来的内容,我们就可以看到IHelloService.Stub和IHelloService.Stub.Proxy是怎么创建或者使用的。
三.HelloService的启动过程
在讨论HelloService的启动过程之前,我们先来看一下实现HelloService接口的Server是怎么定义的。
回忆在Ubuntu上为Android系统的Application Frameworks层增加硬件访问服务一文,我们在frameworks/base/services/java/com/android/server目录下新增了一个HelloService.java文件:
- packagecom.android.server;
- importandroid.content.Context;
- importandroid.os.IHelloService;
- importandroid.util.Slog;
- publicclassHelloServiceextendsIHelloService.Stub{
- privatestaticfinalStringTAG="HelloService";
- HelloService(){
- init_native();
- }
- publicvoidsetVal(intval){
- setVal_native(val);
- }
- publicintgetVal(){
- returngetVal_native();
- }
- privatestaticnativebooleaninit_native();
- privatestaticnativevoidsetVal_native(intval);
- privatestaticnativeintgetVal_native();
- }
这里,我们可以看到,HelloService继续了IHelloService.Stub类,它通过本地方法调用实现了getVal和setVal两个函数。我们不关心这两个函数的具体实现,有兴趣的读者可以参考在Ubuntu上为Android系统的Application Frameworks层增加硬件访问服务一文。
有了HelloService这个Server类后,下一步就是考虑怎么样把它启动起来了。在frameworks/base/services/java/com/android/server/SystemServer.java文件中,定义了SystemServer类。SystemServer对象是在系统启动的时候创建的,它被创建的时候会启动一个线程来创建HelloService,并且把它添加到Service Manager中去。
我们来看一下这部份的代码:
- classServerThreadextendsThread{
- ......
- @Override
- publicvoidrun(){
- ......
- Looper.prepare();
- ......
- try{
- Slog.i(TAG,"HelloService");
- ServiceManager.addService("hello",newHelloService());
- }catch(Throwablee){
- Slog.e(TAG,"FailurestartingHelloService",e);
- }
- ......
- Looper.loop();
- ......
- }
- }
- ......
- publicclassSystemServer
- {
- ......
- /**
- *ThismethodiscalledfromZygotetoinitializethesystem.Thiswillcausethenative
- *services(SurfaceFlinger,AudioFlinger,etc..)tobestarted.Afterthatitwillcallback
- *upintoinit2()tostarttheAndroidservices.
- */
- nativepublicstaticvoidinit1(String[]args);
- ......
- publicstaticfinalvoidinit2(){
- Slog.i(TAG,"EnteredtheAndroidsystemserver!");
- Threadthr=newServerThread();
- thr.setName("android.server.ServerThread");
- thr.start();
- }
- ......
- }
这里,我们可以看到,在ServerThread.run函数中,执行了下面代码把HelloService添加到Service Manager中去。这里我们关注把HelloService添加到Service Manager中去的代码:
- try{
- Slog.i(TAG,"HelloService");
- ServiceManager.addService("hello",newHelloService());
- }catch(Throwablee){
- Slog.e(TAG,"FailurestartingHelloService",e);
- }
通过调用ServiceManager.addService把一个HelloService实例添加到Service Manager中去。
我们先来看一下HelloService的创建过程:
- newHelloService();
这个语句会调用HelloService类的构造函数,而HelloService类继承于IHelloService.Stub类,IHelloService.Stub类又继承了Binder类,因此,最后会调用Binder类的构造函数:
- publicclassBinderimplementsIBinder{
- ......
- privateintmObject;
- ......
- publicBinder(){
- init();
- ......
- }
- privatenativefinalvoidinit();
- ......
- }
这里调用了一个JNI方法init来初始化这个Binder对象,这个JNI方法定义在frameworks/base/core/jni/android_util_Binder.cpp文件中:
- staticvoidandroid_os_Binder_init(JNIEnv*env,jobjectclazz)
- {
- JavaBBinderHolder*jbh=newJavaBBinderHolder(env,clazz);
- if(jbh==NULL){
- jniThrowException(env,"java/lang/OutOfMemoryError",NULL);
- return;
- }
- LOGV("JavaBinder%p:acquiringfirstrefonholder%p",clazz,jbh);
- jbh->incStrong(clazz);
- env->SetIntField(clazz,gBinderOffsets.mObject,(int)jbh);
- }
回到ServerThread.run函数中,我们再来看一下ServiceManager.addService函数的实现:
- publicfinalclassServiceManager{
- ......
- privatestaticIServiceManagersServiceManager;
- ......
- publicstaticvoidaddService(Stringname,IBinderservice){
- try{
- getIServiceManager().addService(name,service);
- }catch(RemoteExceptione){
- Log.e(TAG,"errorinaddService",e);
- }
- }
- ......
- }
这里的getIServiceManager函数我们在前面已经分析过了,它返回的是一个ServiceManagerProxy对象的IServiceManager接口。因此,我们进入到ServiceManagerProxy.addService中去看看:
- classServiceManagerProxyimplementsIServiceManager{
- publicServiceManagerProxy(IBinderremote){
- mRemote=remote;
- }
- ......
- publicvoidaddService(Stringname,IBinderservice)
- throwsRemoteException{
- Parceldata=Parcel.obtain();
- Parcelreply=Parcel.obtain();
- data.writeInterfaceToken(IServiceManager.descriptor);
- data.writeString(name);
- data.writeStrongBinder(service);
- mRemote.transact(ADD_SERVICE_TRANSACTION,data,reply,0);
- reply.recycle();
- data.recycle();
- }
- ......
- privateIBindermRemote;
- }
这里的Parcel类是用Java来实现的,它跟我们前面几篇文章介绍Binder机制时提到的用C++实现的Parcel类的作用是一样的,即用来在两个进程之间传递数据。
这里我们关注是如何把参数service写到data这个Parcel对象中去的:
- data.writeStrongBinder(service);
我们来看看Parcel.writeStrongBinder函数的实现:
- publicfinalclassParcel{
- ......
- /**
- *WriteanobjectintotheparcelatthecurrentdataPosition(),
- *growingdataCapacity()ifneeded.
- */
- publicfinalnativevoidwriteStrongBinder(IBinderval);
- ......
- }
这里的writeStrongBinder函数又是一个JNI方法,它定义在frameworks/base/core/jni/android_util_Binder.cpp文件中:
- staticvoidandroid_os_Parcel_writeStrongBinder(JNIEnv*env,jobjectclazz,jobjectobject)
- {
- Parcel*parcel=parcelForJavaObject(env,clazz);
- if(parcel!=NULL){
- conststatus_terr=parcel->writeStrongBinder(ibinderForJavaObject(env,object));
- if(err!=NO_ERROR){
- jniThrowException(env,"java/lang/OutOfMemoryError",NULL);
- }
- }
- }
这里的object参数是一个Java语言实现的Binder对象,在调用C++语言实现的Parcel::writeStrongBinder把这个对象写入到parcel对象时,首先通过ibinderForJavaObject函数把这个Java语言实现的Binder对象转换为C++语言实现的JavaBBinderHolder对象:
- sp<IBinder>ibinderForJavaObject(JNIEnv*env,jobjectobj)
- {
- if(obj==NULL)returnNULL;
- if(env->IsInstanceOf(obj,gBinderOffsets.mClass)){
- JavaBBinderHolder*jbh=(JavaBBinderHolder*)
- env->GetIntField(obj,gBinderOffsets.mObject);
- returnjbh!=NULL?jbh->get(env):NULL;
- }
- if(env->IsInstanceOf(obj,gBinderProxyOffsets.mClass)){
- return(IBinder*)
- env->GetIntField(obj,gBinderProxyOffsets.mObject);
- }
- LOGW("ibinderForJavaObject:%pisnotaBinderobject",obj);
- returnNULL;
- }
我们知道,这里的obj参数是一个Binder类的实例,因此,这里会进入到第一个if语句中去。
在前面创建HelloService对象,曾经在调用到HelloService的父类Binder中,曾经在JNI层创建了一个JavaBBinderHolder对象,然后把这个对象的地址保存在Binder类的mObject成员变量中,因此,这里把obj对象的mObject成员变量强制转为JavaBBinderHolder对象。
到了这里,这个函数的功课还未完成,还剩下最后关键的一步:
- returnjbh!=NULL?jbh->get(env):NULL;
这里就是jbh->get这个语句了。
在JavaBBinderHolder类中,有一个成员变量mBinder,它的类型为JavaBBinder,而JavaBBinder类继承于BBinder类。在前面学习Binder机制的C++语言实现时,我们在Android系统进程间通信(IPC)机制Binder中的Server启动过程源代码分析这篇文章中,曾经介绍过,IPCThreadState类负责与Binder驱动程序进行交互,它把从Binder驱动程序读出来的请求作简单的处理后,最后把这个请求扔给BBinder的onTransact函数来进一步处理。
这里,我们就是要把JavaBBinderHolder里面的JavaBBinder类型Binder实体添加到Service Manager中去,以便使得这个HelloService有Client来请求服务时,由Binder驱动程序来唤醒这个Server线程,进而调用这个JavaBBinder类型Binder实体的onTransact函数来进一步处理,这个函数我们在后面会继续介绍。
先来看一下JavaBBinderHolder::get函数的实现:
- classJavaBBinderHolder:publicRefBase
- {
- ......
- JavaBBinderHolder(JNIEnv*env,jobjectobject)
- :mObject(object)
- {
- ......
- }
- ......
- sp<JavaBBinder>get(JNIEnv*env)
- {
- AutoMutex_l(mLock);
- sp<JavaBBinder>b=mBinder.promote();
- if(b==NULL){
- b=newJavaBBinder(env,mObject);
- mBinder=b;
- ......
- }
- returnb;
- }
- ......
- jobjectmObject;
- wp<JavaBBinder>mBinder;
- };
这里是第一次调用get函数,因此,会创建一个JavaBBinder对象,并且保存在mBinder成员变量中。注意,这里的mObject就是上面创建的HelloService对象了,这是一个Java对象。这个HelloService对象最终也会保存在JavaBBinder对象的成员变量mObject中。
回到android_os_Parcel_writeStrongBinder函数中,下面这个语句:
- conststatus_terr=parcel->writeStrongBinder(ibinderForJavaObject(env,object));
- conststatus_terr=parcel->writeStrongBinder((JavaBBinderHodler*)(obj.mObject));
接着,再回到ServiceManagerProxy.addService这个函数中,最后它通过其成员变量mRemote来执行进程间通信操作。前面我们在介绍如何获取Service Manager远程接口时提到,这里的mRemote成员变量实际上是一个BinderProxy对象,因此,我们再来看看BinderProxy.transact函数的实现:
- finalclassBinderProxyimplementsIBinder{
- ......
- publicnativebooleantransact(intcode,Parceldata,Parcelreply,
- intflags)throwsRemoteException;
- ......
- }
这里的transact成员函数又是一个JNI方法,它定义在frameworks/base/core/jni/android_util_Binder.cpp文件中:
- staticjbooleanandroid_os_BinderProxy_transact(JNIEnv*env,jobjectobj,
- jintcode,jobjectdataObj,
- jobjectreplyObj,jintflags)
- {
- ......
- Parcel*data=parcelForJavaObject(env,dataObj);
- if(data==NULL){
- returnJNI_FALSE;
- }
- Parcel*reply=parcelForJavaObject(env,replyObj);
- if(reply==NULL&&replyObj!=NULL){
- returnJNI_FALSE;
- }
- IBinder*target=(IBinder*)
- env->GetIntField(obj,gBinderProxyOffsets.mObject);
- if(target==NULL){
- jniThrowException(env,"java/lang/IllegalStateException","Binderhasbeenfinalized!");
- returnJNI_FALSE;
- }
- ......
- status_terr=target->transact(code,*data,reply,flags);
- ......
- if(err==NO_ERROR){
- returnJNI_TRUE;
- }elseif(err==UNKNOWN_TRANSACTION){
- returnJNI_FALSE;
- }
- signalExceptionForError(env,obj,err);
- returnJNI_FALSE;
- }
这里传进来的参数dataObj和replyObj是一个Java接口实现的Parcel类,由于这里是JNI层,需要把它转换为C++实现的Parcel类,它们就是通过我们前面说的parcelForJavaObject函数进行转换的。
前面我们在分析如何获取Service Manager远程接口时,曾经说到,在JNI层中,创建了一个BpBinder对象,它的句柄值为0,它的地址保存在gBinderProxyOffsets.mObject中,因此,这里通过下面语句得到这个BpBinder对象的IBinder接口:
- IBinder*target=(IBinder*)
- env->GetIntField(obj,gBinderProxyOffsets.mObject);
有了这个IBinder接口后,就和我们前面几篇文章介绍Binder机制的C/C++实现一致了。
最后,通过BpBinder::transact函数进入到Binder驱动程序,然后Binder驱动程序唤醒Service Manager响应这个ADD_SERVICE_TRANSACTION请求:
- status_terr=target->transact(code,*data,reply,flags);
具体可以参考Android系统进程间通信(IPC)机制Binder中的Server启动过程源代码分析一文。需要注意的是,这里的data包含了一个JavaBBinderHolder类型的Binder实体对象,它就代表了我们上面创建的HelloService。Service Manager收到这个ADD_SERVICE_TRANSACTION请求时,就会把这个Binder实体纳入到自己内部进行管理。
这样,实现HelloService的Server的启动过程就完成了。
四.Client获取HelloService的Java远程接口的过程
前面我们在学习Android系统硬件抽象层(HAL)时,在在Ubuntu上为Android系统内置Java应用程序测试Application Frameworks层的硬件服务这篇文章中,我们创建了一个应用程序,这个应用程序作为一个Client角色,借助Service Manager这个Java远程接口来获得HelloService的远程接口,进而调用HelloService提供的服务。
我们看看它是如何借助Service Manager这个Java远程接口来获得HelloService的远程接口的。在Hello这个Activity的onCreate函数,通过IServiceManager.getService函数来获得HelloService的远程接口:
- publicclassHelloextendsActivityimplementsOnClickListener{
- ......
- privateIHelloServicehelloService=null;
- ......
- @Override
- publicvoidonCreate(BundlesavedInstanceState){
- helloService=IHelloService.Stub.asInterface(
- ServiceManager.getService("hello"));
- }
- ......
- }
我们先来看ServiceManager.getService的实现。前面我们说过,这里实际上是调用了ServiceManagerProxy.getService函数:
- classServiceManagerProxyimplementsIServiceManager{
- publicServiceManagerProxy(IBinderremote){
- mRemote=remote;
- }
- ......
- publicIBindergetService(Stringname)throwsRemoteException{
- Parceldata=Parcel.obtain();
- Parcelreply=Parcel.obtain();
- data.writeInterfaceToken(IServiceManager.descriptor);
- data.writeString(name);
- mRemote.transact(GET_SERVICE_TRANSACTION,data,reply,0);
- IBinderbinder=reply.readStrongBinder();
- reply.recycle();
- data.recycle();
- returnbinder;
- }
- ......
- privateIBindermRemote;
- }
最终通过mRemote.transact来执行实际操作。我们在前面已经介绍过了,这里的mRemote实际上是一个BinderProxy对象,它的transact成员函数是一个JNI方法,实现在frameworks/base/core/jni/android_util_Binder.cpp文件中的android_os_BinderProxy_transact函数中。
这个函数前面我们已经看到了,这里就不再列出来了。不过,当这个函数从:
- status_terr=target->transact(code,*data,reply,flags);
这里的reply变量里面就包括了一个HelloService的引用了。注意,这里的reply变量就是我们在ServiceManagerProxy.getService函数里面传进来的参数reply,它是一个Parcel对象。
回到ServiceManagerProxy.getService函数中,从下面语句返回:
- mRemote.transact(GET_SERVICE_TRANSACTION,data,reply,0);
接着,就通过下面语句将这个HelloService的引用读出来:
- IBinderbinder=reply.readStrongBinder();
我们看看Parcel.readStrongBinder的实现:
- publicfinalclassParcel{
- ......
- /**
- *ReadanobjectfromtheparcelatthecurrentdataPosition().
- */
- publicfinalnativeIBinderreadStrongBinder();
- ......
- }
它也是一个JNI方法,实现在frameworks/base/core/jni/android_util_Binder.cpp文件中:
- staticjobjectandroid_os_Parcel_readStrongBinder(JNIEnv*env,jobjectclazz)
- {
- Parcel*parcel=parcelForJavaObject(env,clazz);
- if(parcel!=NULL){
- returnjavaObjectForIBinder(env,parcel->readStrongBinder());
- }
- returnNULL;
- }
这里首先把Java语言实现的Parcel对象class转换成C++语言实现的Parcel对象parcel,接着,通过parcel->readStrongBinder函数来获得一个Binder引用。
我们在前面学习Binder机制时,在Android系统进程间通信(IPC)机制Binder中的Client获得Server远程接口过程源代码分析这篇文章中,曾经分析过这个函数,它最终返回来的是一个BpBinder对象,因此,下面的语句:
- returnjavaObjectForIBinder(env,parcel->readStrongBinder());
就相当于是:
- returnjavaObjectForIBinder(env,newBpBinder(handle));
这里的handle就是HelloService这个Binder实体在Client进程中的句柄了,它是由Binder驱动程序设置的,上层不用关心它的值具体是多少。至于javaObjectForIBinder这个函数,我们前面介绍如何获取Service Manager的Java远程接口时已经有详细介绍,这里就不累述了,它的作用就是创建一个BinderProxy对象,并且把刚才获得的BpBinder对象的地址保存在这个BinderProxy对象的mObject成员变量中。
最后返回到Hello.onCreate函数中,从下面语句返回:
- helloService=IHelloService.Stub.asInterface(
- ServiceManager.getService("hello"));
就相当于是:
- helloService=IHelloService.Stub.asInterface(newBinderProxy()));
回忆一下前面介绍IHelloService接口的定义时,IHelloService.Stub.asInterface是这样定义的:
- publicinterfaceIHelloServiceextendsandroid.os.IInterface
- {
- /**Local-sideIPCimplementationstubclass.*/
- publicstaticabstractclassStubextendsandroid.os.Binderimplementsandroid.os.IHelloService
- {
- ......
- publicstaticandroid.os.IHelloServiceasInterface(android.os.IBinderobj)
- {
- if((obj==null)){
- returnnull;
- }
- android.os.IInterfaceiin=(android.os.IInterface)obj.queryLocalInterface(DESCRIPTOR);
- if(((iin!=null)&&(iininstanceofandroid.os.IHelloService))){
- return((android.os.IHelloService)iin);
- }
- returnnewandroid.os.IHelloService.Stub.Proxy(obj);
- }
- ......
- }
- }
这里的obj是一个BinderProxy对象,它的queryLocalInterface返回null,于是调用下面语句获得HelloService的远程接口:
- returnnewandroid.os.IHelloService.Stub.Proxy(obj);
相当于是:
- returnnewandroid.os.IHelloService.Stub.Proxy(newBinderProxy());
这样,我们就获得了HelloService的远程接口了,它实质上是一个实现了IHelloService接口的IHelloService.Stub.Proxy对象。
五.Client通过HelloService的Java远程接口来使用HelloService提供的服务的过程
上面介绍的Hello这个Activity获得了HelloService的远程接口后,就可以使用它的服务了。
我们以使用IHelloService.getVal函数为例详细说明。在Hello::onClick函数中调用了IHelloService.getVal函数:
- publicclassHelloextendsActivityimplementsOnClickListener{
- ......
- @Override
- publicvoidonClick(Viewv){
- if(v.equals(readButton)){
- intval=helloService.getVal();
- ......
- }
- elseif(v.equals(writeButton)){
- ......
- }
- elseif(v.equals(clearButton)){
- ......
- }
- }
- ......
- }
通知前面的分析,我们知道,这里的helloService接口实际上是一个IHelloService.Stub.Proxy对象,因此,我们进入到IHelloService.Stub.Proxy类的getVal函数中:
- publicinterfaceIHelloServiceextendsandroid.os.IInterface
- {
- /**Local-sideIPCimplementationstubclass.*/
- publicstaticabstractclassStubextendsandroid.os.Binderimplementsandroid.os.IHelloService
- {
- ......
- privatestaticclassProxyimplementsandroid.os.IHelloService
- {
- privateandroid.os.IBindermRemote;
- ......
- publicintgetVal()throwsandroid.os.RemoteException
- {
- android.os.Parcel_data=android.os.Parcel.obtain();
- android.os.Parcel_reply=android.os.Parcel.obtain();
- int_result;
- try{
- _data.writeInterfaceToken(DESCRIPTOR);
- mRemote.transact(Stub.TRANSACTION_getVal,_data,_reply,0);
- _reply.readException();
- _result=_reply.readInt();
- }
- finally{
- _reply.recycle();
- _data.recycle();
- }
- return_result;
- }
- }
- ......
- staticfinalintTRANSACTION_getVal=(android.os.IBinder.FIRST_CALL_TRANSACTION+1);
- }
- ......
- }
这里我们可以看出,实际上是通过mRemote.transact来请求HelloService执行TRANSACTION_getVal操作。这里的mRemote是一个BinderProxy对象,这是我们在前面获取HelloService的Java远程接口的过程中创建的。
BinderProxy.transact函数是一个JNI方法,我们在前面已经介绍过了,这里不再累述。最过调用到Binder驱动程序,Binder驱动程序唤醒HelloService这个Server。前面我们在介绍HelloService的启动过程时,曾经提到,HelloService这个Server线程被唤醒之后,就会调用JavaBBinder类的onTransact函数:
- classJavaBBinder:publicBBinder
- {
- JavaBBinder(JNIEnv*env,jobjectobject)
- :mVM(jnienv_to_javavm(env)),mObject(env->NewGlobalRef(object))
- {
- ......
- }
- ......
- virtualstatus_tonTransact(
- uint32_tcode,constParcel&data,Parcel*reply,uint32_tflags=0)
- {
- JNIEnv*env=javavm_to_jnienv(mVM);
- ......
- jbooleanres=env->CallBooleanMethod(mObject,gBinderOffsets.mExecTransact,
- code,(int32_t)&data,(int32_t)reply,flags);
- ......
- returnres!=JNI_FALSE?NO_ERROR:UNKNOWN_TRANSACTION;
- }
- ......
- JavaVM*constmVM;
- jobjectconstmObject;
- };
前面我们在介绍HelloService的启动过程时,曾经介绍过,JavaBBinder类里面的成员变量mObject就是HelloService类的一个实例对象了。因此,这里通过语句:
- jbooleanres=env->CallBooleanMethod(mObject,gBinderOffsets.mExecTransact,
- code,(int32_t)&data,(int32_t)reply,flags);
就调用了HelloService.execTransact函数,而HelloService.execTransact函数继承了Binder类的execTransact函数:
- publicclassBinderimplementsIBinder{
- ......
- //Entrypointfromandroid_util_Binder.cpp'sonTransact
- privatebooleanexecTransact(intcode,intdataObj,intreplyObj,intflags){
- Parceldata=Parcel.obtain(dataObj);
- Parcelreply=Parcel.obtain(replyObj);
- //theoretically,weshouldcalltransact,whichwillcallonTransact,
- //butallthatdoesisrewindit,andwejustgotthesefromanIPC,
- //sowe'lljustcallitdirectly.
- booleanres;
- try{
- res=onTransact(code,data,reply,flags);
- }catch(RemoteExceptione){
- reply.writeException(e);
- res=true;
- }catch(RuntimeExceptione){
- reply.writeException(e);
- res=true;
- }catch(OutOfMemoryErrore){
- RuntimeExceptionre=newRuntimeException("Outofmemory",e);
- reply.writeException(re);
- res=true;
- }
- reply.recycle();
- data.recycle();
- returnres;
- }
- }
这里又调用了onTransact函数来作进一步处理。由于HelloService类继承了IHelloService.Stub类,而IHelloService.Stub类实现了onTransact函数,HelloService类没有实现,因此,最终调用了IHelloService.Stub.onTransact函数:
- publicinterfaceIHelloServiceextendsandroid.os.IInterface
- {
- /**Local-sideIPCimplementationstubclass.*/
- publicstaticabstractclassStubextendsandroid.os.Binderimplementsandroid.os.IHelloService
- {
- ......
- @Override
- publicbooleanonTransact(intcode,android.os.Parceldata,android.os.Parcelreply,intflags)throwsandroid.os.RemoteException
- {
- switch(code)
- {
- ......
- caseTRANSACTION_getVal:
- {
- data.enforceInterface(DESCRIPTOR);
- int_result=this.getVal();
- reply.writeNoException();
- reply.writeInt(_result);
- returntrue;
- }
- }
- returnsuper.onTransact(code,data,reply,flags);
- }
- ......
- }
- }
函数最终又调用了HelloService.getVal函数:
- publicclassHelloServiceextendsIHelloService.Stub{
- ......
- publicintgetVal(){
- returngetVal_native();
- }
- ......
- privatestaticnativeintgetVal_native();
- }
最终,经过层层返回,就回到IHelloService.Stub.Proxy.getVal函数中来了,从下面语句返回:
- mRemote.transact(Stub.TRANSACTION_getVal,_data,_reply,0);
并将结果读出来:
- _result=_reply.readInt();
最后将这个结果返回到Hello.onClick函数中。
这样,Client通过HelloService的Java远程接口来使用HelloService提供的服务的过程就介绍完了。
至此,Android系统进程间通信Binder机制在应用程序框架层的Java接口源代码分析也完成了,整个Binder机制的学习就结束了。
重新学习Android系统进程间通信Binder机制,请回到Android进程间通信(IPC)机制Binder简要介绍和学习计划一文。


发表评论

相关推荐
Android系统进程间通信Binder机制在应用程序框架层的Java接口源代码分析[归纳].pdf
Android系统进程间通信Binder机制在应用程序框架层的Java接口源代码分析
第5章 Binder进程间通信系统............................... 144 5.1 Binder驱动程序..................................................... 145 5.1.1 基础数据结构............................................
本文主要介绍 Android系统进程间通信Binder机制Java 接口源码分析,这里详细介绍了如何实现Binder 机制和Java接口直接的通信,有兴趣的小伙伴可以参考下
5.10 Binder进程间通信机制的Java接口 5.10.1 Service Manager的Java代理对象的获取过程 5.10.2 Java服务接口的定义和解析 5.10.3 Java服务的启动过程 5.10.4 Java服务代理对象的获取过程 5.10.5 Java...
一.简要介绍和学习计划 二.Service Manager 成为Binder 守护进程之路 三.Server 和Client 获得Service Manager 接口之路 四.Server 启动过程源代码分析 ...应用程序框架层的Java 接口源代码分析
在内容上,本书结合使用情景,全面、深入、细致地分析Android系统的源代码,涉及到Linux内核层、硬件抽象层(HAL)、运行时库层(Runtime)、应用程序框架层(Application Framework)以及应用程序层(Application)。...
5.10 Binder进程间通信机制的Java接口 5.10.1 Service Manager的Java代理对象的获取过程 5.10.2 Java服务接口的定义和解析 5.10.3 Java服务的启动过程 5.10.4 Java服务代理对象的获取过程 5.10.5 Java服务的...
在内容上,本书结合使用情景,全面、深入、细致地分析Android系统的源代码,涉及到Linux内核层、硬件抽象层(HAL)、运行时库层(Runtime)、应用程序框架层(Application Framework)以及应用程序层(Application)。...
23 如何调试跟踪Android源代码 61 24 Eclipse环境搭建 68 24.1 Eclipse 3.3 (Europa) 68 24.2 Eclipse 3.4 (Ganymede) 68 24.3 ADT 安装疑难解答 69 25 Android的底层库libutils介绍 70 25.1 libutils概述 70 25.2 ...
Binder篇(第5~6章)着重分析了Binder在Native框架层和Java框架层的机制和实现,能让读者深入理解进程间的通信模型; 消息通信篇(第7章)重点分析了Android的消息驱动和异步处理机制,能让读者深入理解线程间的...
binder篇(第5~6章)着重分析了binder在native框架层和java框架层的机制和实现,能让读者深入理解进程间的通信模型;消息通信篇(第7章)重点分析了android的消息驱动和异步处理机制,能让读者深入理解线程间的通信...
结合实际应用开发需求,以情景分析的方式有针对性地对Android的源代码进行了十分详尽的剖析,深刻揭示Android系统的工作原理 机锋网、51CTO、开源中国社区等专业技术网站一致鼎力推荐 内容简介 《深入理解...