- 浏览: 21488107 次
- 性别:

- 来自: 杭州
-

最新评论
-
ZY199266:
配置文件还需要额外的配置ma
Android 客户端通过内置API(HttpClient) 访问 服务器(用Spring MVC 架构) 返回的json数据全过程 -
ZY199266:
我的一访问为什么是 /mavenwebdemo/WEB-I ...
Android 客户端通过内置API(HttpClient) 访问 服务器(用Spring MVC 架构) 返回的json数据全过程 -
lvgaga:
我又一个问题就是 如果像你的这种形式写。配置文件还需要额外的 ...
Android 客户端通过内置API(HttpClient) 访问 服务器(用Spring MVC 架构) 返回的json数据全过程 -
lvgaga:
我的一访问为什么是 /mavenwebdemo/WEB-I ...
Android 客户端通过内置API(HttpClient) 访问 服务器(用Spring MVC 架构) 返回的json数据全过程 -
y1210251848:
你的那个错误应该是项目所使用的目标框架不支持吧
log4net配置(web中使用log4net,把web.config放在单独的文件中)
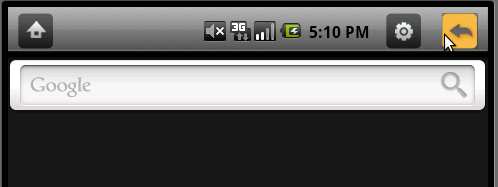
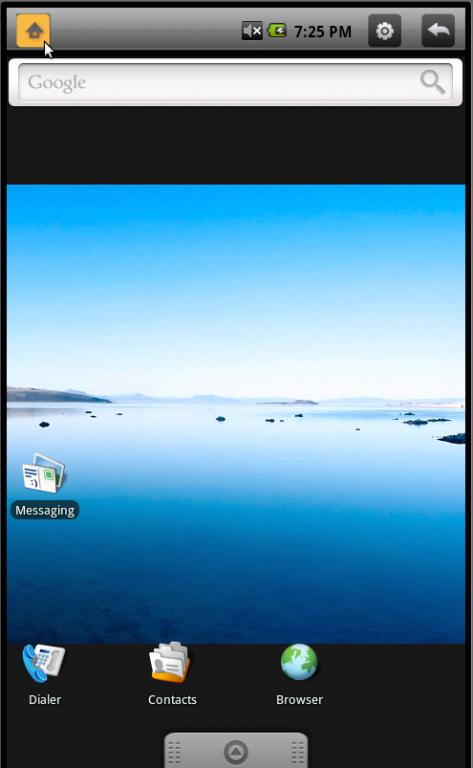
在android的状态栏(statusbar)中增加menu,home和back快捷键的方法
http://blog.csdn.net/caszhao/article/details/5986743
在状态栏上添加Menu,Back,Home三个按钮的方法,在下文有良好的阐述。详见:
《在android的状态栏(statusbar)中增加menu,home和back快捷键的方法》http://blog.csdn.net/freshui/archive/2010/07/15/5738115.aspx
在使用过程中,存在两个问题:
- HOME键在我的机器上无效
- 连击按钮时,由于有时Intent未响应,导致弹起操作未响应直接诶被WindowsManager抛掉。这样就出现了虽然手已离开屏幕,但按钮出现高亮的状态。
1、对于第一个问题,我的方法是把home键单独进行处理,向launcher发送一个启动activity的Intent,这样可以直接回到桌面上。在原方法的基础上,对Home单独进行处理。
2{
3Log.d(TAG,"HOMEbuttonIntent!");
4Intentintent=newIntent(Intent.ACTION_MAIN);
5intent.setFlags(Intent.FLAG_ACTIVITY_NEW_TASK);
6intent.addCategory(Intent.CATEGORY_HOME);
7mService.sendIntent2(intent);
8}
9else
10{
11Log.d(TAG,"othertwobuttonsIntent!");
12Intentintent=newIntent(Intent.ACTION_ICONKEY_CHANGED);
13intent.addFlags(Intent.FLAG_RECEIVER_REGISTERED_ONLY);
14intent.putExtra("keycode",mResvKeyCode);
15mService.sendIntent(intent);
16}
在StatusBarService.java中添加sendIntent2方法
2{
3mContext.startActivity(intent);
4}
2、第二个问题的修正思想是使用Animation逐帧动画来使得按钮从完成 正常态按下后-变化至高亮态-恢复正常态 这一周期。
a. 先在res/layout(与status_bar.xml同目录)中添加三个animation动画xml配置文件。
分别是
animation_home.xml:
2<animation-listxmlns:android="http://schemas.android.com/apk/res/android"
3android:oneshot="true">
4<item
5android:duration="80"
6android:drawable="@drawable/stat_home">
7</item>
8<item
9android:duration="80"
10android:drawable="@drawable/stat_home_pressed">
11</item>
12<item
13android:duration="80"
14android:drawable="@drawable/stat_home">
15</item>
16</animation-list>
animation_back.xml:
2<animation-listxmlns:android="http://schemas.android.com/apk/res/android"
3android:oneshot="true">
4<item
5android:duration="80"
6android:drawable="@drawable/stat_back">
7</item>
8<item
9android:duration="80"
10android:drawable="@drawable/stat_back_pressed">
11</item>
12<item
13android:duration="80"
14android:drawable="@drawable/stat_back">
15</item>
16</animation-list>
17
18
19
animation_menu.xml:
2<animation-listxmlns:android="http://schemas.android.com/apk/res/android"
3android:oneshot="true">
4<item
5android:duration="80"
6android:drawable="@drawable/stat_menu">
7</item>
8<item
9android:duration="80"
10android:drawable="@drawable/stat_menu_pressed">
11</item>
12<item
13android:duration="80"
14android:drawable="@drawable/stat_menu">
15</item>
16</animation-list>
17
18
这三个xml文件分别对应着 home back menu的动画过程
b . 在res/layout/status_bar.xml中修改Imageview的background指向上述三个xml配置文件:
2<!--android:background="@drawable/status_bar_closed_default_background"-->
3<com.android.server.status.StatusBarViewxmlns:android="http://schemas.android.com/apk/res/android"
4android:background="@drawable/statusbar_background"
5android:orientation="vertical"
6android:focusable="true"
7android:descendantFocusability="afterDescendants"
8>
9
10<LinearLayoutandroid:id="@+id/icons"
11android:layout_width="fill_parent"
12android:layout_height="fill_parent"
13android:orientation="horizontal">
14<!--Ethan.zhao:StartAddhomebuttononstatus_bar-->
15<ImageView
16android:id="@+id/status_home"
17android:layout_width="wrap_content"
18android:layout_height="wrap_content"
19android:layout_gravity="top"
20android:background="@layout/animation_home"
21/>
22<!--Ethan.zhao:StartAddhomebuttononstatus_bar-->
23
24<com.android.server.status.IconMergerandroid:id="@+id/notificationIcons"
25android:layout_width="0dip"
26android:layout_weight="1"
27android:layout_height="fill_parent"
28android:layout_alignParentLeft="true"
29android:paddingLeft="6dip"
30android:gravity="center_vertical"
31android:orientation="horizontal"/>
32
33<LinearLayoutandroid:id="@+id/statusIcons"
34android:layout_width="wrap_content"
35android:layout_height="fill_parent"
36android:layout_alignParentRight="true"
37android:paddingRight="6dip"
38android:gravity="center_vertical"
39android:orientation="horizontal"/>
40<!--Ethan.zhao:StartAddmenu/backbuttononstatus_bar-->
41<ImageView
42android:id="@+id/status_menu"
43android:layout_width="wrap_content"
44android:layout_height="wrap_content"
45android:layout_gravity="top"
46android:background="@layout/animation_menu"
47/>
48
49<ImageView
50android:id="@+id/status_back"
51android:layout_width="wrap_content"
52android:layout_height="wrap_content"
53android:layout_gravity="top"
54android:background="@layout/animation_back"
55/>
56<!--Ethan.zhao:EndAddthreebuttononstatus_bar-->
57</LinearLayout>
58<LinearLayoutandroid:id="@+id/ticker"
59android:layout_width="fill_parent"
60android:layout_height="fill_parent"
61android:paddingLeft="6dip"
62android:animationCache="false"
63android:orientation="horizontal">
64<ImageSwitcherandroid:id="@+id/tickerIcon"
65android:layout_width="wrap_content"
66android:layout_height="fill_parent"
67android:layout_marginRight="8dip"
68>
69<com.android.server.status.AnimatedImageView
70android:layout_width="25dip"
71android:layout_height="25dip"
72/>
73<com.android.server.status.AnimatedImageView
74android:layout_width="25dip"
75android:layout_height="25dip"
76/>
77</ImageSwitcher>
78<com.android.server.status.TickerViewandroid:id="@+id/tickerText"
79android:layout_width="0dip"
80android:layout_weight="1"
81android:layout_height="wrap_content"
82android:paddingTop="2dip"
83android:paddingRight="10dip">
84<TextView
85android:layout_width="fill_parent"
86android:layout_height="wrap_content"
87android:singleLine="true"
88android:textColor="#ff000000"/>
89<TextView
90android:layout_width="fill_parent"
91android:layout_height="wrap_content"
92android:singleLine="true"
93android:textColor="#ff000000"/>
94</com.android.server.status.TickerView>
95</LinearLayout>
96
97<com.android.server.status.DateViewandroid:id="@+id/date"
98android:layout_width="wrap_content"
99android:layout_height="fill_parent"
100android:singleLine="true"
101android:textSize="16sp"
102android:textStyle="bold"
103android:gravity="center_vertical|left"
104android:paddingLeft="6px"
105android:paddingRight="6px"
106android:textColor="?android:attr/textColorPrimaryInverse"
107android:background="@drawable/statusbar_background"
108/>
109</com.android.server.status.StatusBarView>
c . 修改StatusBarView.java文件,加入Animation相关代码:
添加三个AnimationDrawable:
2AnimationDrawablemBackAnimation;
3AnimationDrawablemMenuAnimation;
在onFinishInflate()方法中
2mBackAnimation=(AnimationDrawable)mBackIcon.getBackground();
3mMenuAnimation=(AnimationDrawable)mMenuIcon.getBackground();
updateResvKeyIcon这个方法,改造成如下这样:
2{
3if(key==RESV_KEY_BACK)
4{
5mBackAnimation.run();
6}
7elseif(key==RESV_KEY_HOME)
8{
9mHomeAnimation.run();
10}
11elseif(key==RESV_KEY_MENU)
12{
13mMenuAnimation.run();
14}
15return0;
16}
d. 注释掉所有的updateResvKeyIcon方法,仅保留以下一个,并加上判断语句。
2{
3switch(getResvKeyArea(event)){
4caseRESV_KEY_HOME:
5caseRESV_KEY_BACK:
6caseRESV_KEY_MENU:
7{
8mResvKeyState=event.getAction();
9mResvKeyCode=getResvKeyArea(event);
10if(mResvKeyState==MotionEvent.ACTION_DOWN)updateResvKeyIcon(mResvKeyCode);//这句改成这样
http://download.csdn.net/source/2807668
http://blog.csdn.net/freshui/article/details/5738115
需要说明的是:刚入手android没几天,对系统还不算很熟悉,这篇文章是基于前一篇转帖做的。只是觉得他的方法有些麻烦,而且改出来的效果也不是我想要的。
由于完全改了status bar,建议先做几张png图片,加到
Frameworks/base/core/res/res/drawable
下。最好做一张背景图,替换statusbar_background.png
另外我又加了几张icon,分别是home menu和back的正常和按下状态。
这些图片为:
stat_home.png
stat_home_pressed.png
stat_back.png
stat_back_pressed.png
stat_menu.png
stat_menu_pressed.png
修改步骤为:
一.修改xml界面
1.增加图标
当然,更改整个status bar避免不要要对源码大刀修一下。我的该法是:
修改status bar的layerout文件:
Frameworks/base/core/res/res/layout/status_bar.xml
在原来的linearlayout中新增三个image view
- <LinearLayoutandroid:id="@+id/icons"
- android:layout_width="fill_parent"
- android:layout_height="fill_parent"
- android:orientation="horizontal">
- <ImageViewandroid:id="@+id/status_home"
- android:layout_width="wrap_content"
- android:layout_height="wrap_content"
- android:layout_gravity="top"
- android:paddingTop="6dip"
- android:paddingRight="10dip"
- android:paddingLeft="10dip"
- android:src="@drawable/stat_home"/>
- <com.android.server.status.IconMergerandroid:id="@+id/notificationIcons"
- android:layout_width="0dip"
- android:layout_weight="1"
- android:layout_height="fill_parent"
- android:layout_alignParentLeft="true"
- android:paddingLeft="6dip"
- android:gravity="center_vertical"
- android:orientation="horizontal"/>
- <LinearLayoutandroid:id="@+id/statusIcons"
- android:layout_width="wrap_content"
- android:layout_height="fill_parent"
- android:layout_alignParentRight="true"
- android:paddingRight="6dip"
- android:gravity="center_vertical"
- android:orientation="horizontal"/>
- <ImageViewandroid:id="@+id/status_menu"
- android:layout_width="wrap_content"
- android:layout_height="wrap_content"
- android:layout_gravity="top"
- android:paddingTop="6dip"
- android:paddingLeft="10dip"
- android:paddingRight="10dip"
- android:src="@drawable/stat_menu"/>
- <ImageViewandroid:id="@+id/status_back"
- android:layout_width="wrap_content"
- android:layout_height="wrap_content"
- android:layout_gravity="top"
- android:paddingTop="6dip"
- android:paddingRight="10dip"
- android:paddingLeft="10dip"
- android:src="@drawable/stat_back"/>
- /LinearLayout>
这样做的好处就是简单。同时保证最右端是home按钮,最左端是back按钮,不受它本来的约束。这样status bar上即可看到这些按钮了。
图标的位置,可通过修改paddingRight,paddingLeft和paddingTop的值达到最佳视觉效果。
2.修改status bar的高度。
既然要在status bar上增加那么几个按钮,当然是想要使用触摸操作的,android自带的status bar高度太小,不适用。对于7寸屏的话,50pixel的高度应该是差不多了。
修改高度很简单,如我转的shinning mm的博文。
修改frameworks/base/core/res/res/values/dimens.xml的status_bar_height属性
<!-- Height of the status bar -->
<dimen name="status_bar_height">50dip</dimen>
当然,如果相改title的高度,可以修改Frameworks/base/core/res/res/values/themes.xml中的Window attributes的windowTitleSize值,不过我觉得没必要,改了反倒不好看了:)
编译运行一下:
- ~/donut$source./env.sh
- ~/donut$make–j8
- ~/donut$emulator–skinWVGA800
,看状态栏是不是改变了?
二为按钮添加动态效果
添加动态效果,就是触摸按下hilight,松开或者移出后恢复的动作。这一块,我是通过修改frameworks/base/services/java/com/android/server/status/StatusBarView.java实现的。
1.获取statusbar中新增加的icon的handler。
在类中新增加三个成员(这需要import android.widget.ImageView;):
- ImageViewmHomeIcon;
- ImageViewmBackIcon;
- ImageViewmMenuIcon;
同时增加三个常量,表示这些icon对应的键值(这需要import android.view.KeyEvent;)
- publicstaticfinalintRESV_KEY_HOME=KeyEvent.KEYCODE_HOME;
- publicstaticfinalintRESV_KEY_BACK=KeyEvent.KEYCODE_BACK;
- publicstaticfinalintRESV_KEY_MENU=KeyEvent.KEYCODE_MENU;;
在onFinishInflate()中,获得实际的对象:
- mHomeIcon=(ImageView)findViewById(R.id.status_home);
- mBackIcon=(ImageView)findViewById(R.id.status_back);
- mMenuIcon=(ImageView)findViewById(R.id.status_menu);
这三个对象就是我们在status_bar.xml中添加的。
2.添加触摸处理。
首先,应该判断是那个图标被按下,这个我们在StatusBarView.Java的onTouchEvent中来判断。
这里,我做了一个小的按键状态,已方便处理按下、弹起和移出的动作。
首先增加两个状态成员:
- intmResvKeyState=-1;//记住的上次按键状态,-1为无状态。
- intmResvKeyCode=-1;//记住的上次按键值,-1为无状态。
这样我的onTouchEvent就变成这样了:
- @Override
- publicbooleanonTouchEvent(MotionEventevent){
- if(mService.mExpanded==true||mService.mTracking==true){
- if(event.getAction()!=MotionEvent.ACTION_DOWN){
- mService.interceptTouchEvent(event);
- }
- returntrue;
- }
- if(mResvKeyState==-1)//rememberedkeystate,noreserve
- {
- switch(getResvKeyArea(event)){
- caseRESV_KEY_HOME:
- caseRESV_KEY_BACK:
- caseRESV_KEY_MENU:
- {
- mResvKeyState=event.getAction();
- mResvKeyCode=getResvKeyArea(event);
- updateResvKeyIcon(mResvKeyState,mResvKeyCode);
- }
- break;
- default:
- if(event.getAction()!=MotionEvent.ACTION_DOWN){
- mService.interceptTouchEvent(event);
- }
- }
- }else{
- mResvKeyState=event.getAction();//newstate
- if(mResvKeyState==MotionEvent.ACTION_MOVE){
- if(mResvKeyCode!=getResvKeyArea(event)){
- /*outofbound,resumetheicon*/
- updateResvKeyIcon(MotionEvent.ACTION_UP,mResvKeyCode);
- mResvKeyCode=-1;
- mResvKeyState=-1;
- }
- }elseif(mResvKeyState==MotionEvent.ACTION_UP){
- updateResvKeyIcon(mResvKeyState,mResvKeyCode);
- mResvKeyCode=-1;
- mResvKeyState=-1;
- }else{
- Log.d(TAG,"statemachineerror!Neverbehere!");
- }
- }
- returntrue;
- }
里面用到的两个private方法简单实现如下:
- privateintgetResvKeyArea(MotionEventevent)
- {
- if((event.getX()<=mHomeIcon.getRight())
- &&(event.getY()<=this.getHeight())){
- returnRESV_KEY_HOME;
- }
- elseif((event.getX()>=mBackIcon.getLeft())
- &&(event.getY()<=this.getHeight())){
- returnRESV_KEY_BACK;
- }
- elseif((event.getX()>=mMenuIcon.getLeft())
- &&(event.getY()<=this.getHeight())){
- returnRESV_KEY_MENU;
- }else
- return-1;
- }
- privateintupdateResvKeyIcon(intstate,intkey)
- {
- if(key==RESV_KEY_BACK){
- if(state==MotionEvent.ACTION_UP){
- mBackIcon.setImageResource(com.android.internal.R.drawable.stat_back);
- }elseif(state==MotionEvent.ACTION_DOWN){
- mBackIcon.setImageResource(com.android.internal.R.drawable.stat_back_pressed);
- }
- }elseif(key==RESV_KEY_HOME){
- if(state==MotionEvent.ACTION_UP){
- mHomeIcon.setImageResource(com.android.internal.R.drawable.stat_home);
- }elseif(state==MotionEvent.ACTION_DOWN){
- mHomeIcon.setImageResource(com.android.internal.R.drawable.stat_home_pressed);
- }
- }elseif(key==RESV_KEY_MENU){
- if(state==MotionEvent.ACTION_UP){
- mMenuIcon.setImageResource(com.android.internal.R.drawable.stat_menu);
- }elseif(state==MotionEvent.ACTION_DOWN){
- mMenuIcon.setImageResource(com.android.internal.R.drawable.stat_menu_pressed);
- }
- }
- return0;
- }
同时,我不想再在按下这些icon的时候,触发下拉动作,我也改了onInterceptTouchEvent函数:
- @Override
- publicbooleanonInterceptTouchEvent(MotionEventevent){
- if((event.getX()>mHomeIcon.getRight())
- &&(event.getX()<mMenuIcon.getLeft())){
- returnmService.interceptTouchEvent(event)
- ?true:super.onInterceptTouchEvent(event);
- }
- returnfalse;
- }
再编译一下,看一下结果:)是不是能动了?
三,添加相应事件
1. 添加新的intent
首先是新增一条intent,在framework/base/core/java/android/content/intent.java中增加
- @SdkConstant(SdkConstantType.BROADCAST_INTENT_ACTION)
- publicstaticfinalStringACTION_ICONKEY_CHANGED="android.intent.action.ICONKEY_CHANGED";
2. 发送intent
在StatusBarView.java的OnKeyEvent中,松开按键的分支else if(mResvKeyState == MotionEvent.ACTION_UP)操作中加入发送intent的动作:
- Intentintent=newIntent(Intent.ACTION_ICONKEY_CHANGED);
- intent.addFlags(Intent.FLAG_RECEIVER_REGISTERED_ONLY);
- intent.putExtra("keycode",mResvKeyCode);
- mService.sendIntent(intent);
这个intent是只有注册的接收者才能接收。
这里,我们是通过StatusBarService来发送这个intent的。
在StatusBarService.java中新增一个方法:
- voidsendIntent(Intentintent)
- {
- mContext.sendBroadcast(intent);
- }
3.接收并处理intent
这个就要修改StatusBarPolicy.java了
首先,在构造函数中加入Intent的filter,注册号这个intent的receiver。
filter.addAction(Intent.ACTION_ICONKEY_CHANGED);
然后再private BroadcastReceiver mIntentReceiver = new BroadcastReceiver() 加入Intent的receiver动作;
- elseif(action.equals(Intent.ACTION_ICONKEY_CHANGED)){
- G,"ReceivedACTION_ICONKEY_CHANGED");
- updateIconKeyAction(intent);
- }
方法updateIconKeyAction的定义如下:
- privatefinalvoidupdateIconKeyAction(Intentintent){
- intkeycode=intent.getIntExtra("keycode",-1);
- if(keycode!=-1){
- longnow=SystemClock.uptimeMillis();
- try{
- KeyEventdown=newKeyEvent(now,now,KeyEvent.ACTION_DOWN,keycode,0);
- KeyEventup=newKeyEvent(now,now,KeyEvent.ACTION_UP,keycode,0);
- (IWindowManager.Stub
- .asInterface(ServiceManager.getService("window")))
- .injectKeyEvent(down,false);
- (IWindowManager.Stub
- .asInterface(ServiceManager.getService("window")))
- .injectKeyEvent(up,false);
- }catch(RemoteExceptione){
- Log.i("Input","DeadOjbectException");
- }
- }
- }
这样,基本上就完成了。
编译一下, 由于新增了一个intent,因此要先make update-api,
- ~/donut$source./env.sh
- ~/donut$makeupdate-api
- ~/donut$make–j8
- ~/donut$emulator–skinWVGA800
另外,如果不是做phone,也可以在StatusBarPolicy.java中将所有phone相关的处理都删掉。
______________________________________________________________________________________________________________
在Android 2.3状态栏中添加menu,home和back快捷键的方法
1、准备资源,修改XML文
准备几张图,这里我们准备添加home back和menu图标,就需要准备6张图,三张普通状态,三张按下的高亮状态图标:
stat_home.png
stat_home_pressed.png
stat_back.png
stat_back_pressed.png
stat_menu.png
stat_menu_pressed.png
把它们放在frameworks/base/packages/SystemUI/res/drawable/目录下
同时,在frameworks/base/packages/SystemUI/res/drawable 下创建三个imageButton的xml文件
xml_stat_home.xml
xml_stat_back.xml
xml_stat_menu.xml
修改status_bar.xml成如下
目录:frameworks/base/packages/SystemUI/res/layout/status_bar.xml
二 为按钮添加动态效果
修改frameworks/base/packages/SystemUI/src/com/android/systemui/statusbar/StatusBarView.java
在类中新增加四个成员(须导入android.widget.ImageButton和android.content.Context):
增加三个常量:(须导入android.view.KeyEvent;)
public static final int RESV_KEY_HOME = KeyEvent.KEYCODE_HOME;
public static final int RESV_KEY_BACK = KeyEvent.KEYCODE_BACK;
public static final int RESV_KEY_MENU = KeyEvent.KEYCODE_MENU;;
在构造函数StatusBarView中初始化mContext
注意”mContext=context;”须在”super(context, attrs);”后面,不然编译会报错
在onFinishInflate中,获取几个button 的handler,并设置touch事件,添加如下代码:
各button的touch事件添加如下:
为防止点击statusBar上的按钮, 触发标题栏的expend事件, 修改一下函数onInterceptTouchEvent,点击到不属于button区域时才允许解析Motion的event:
需要自己添加Intent
打开frameworks/base/core/java/android/content/Intent.java,增加下面的内容,由于我们的使用的API不公开,须加上/**@hide*/,不然编译会报错
接收并处理intent
修改StatusBarPolicy.java
目录:frameworks/base/packages/SystemUI/src/com/android/systemui/statusbar/StatusBarPolicy.java
首先在构造函数中加入Intent的filter,注册号这个intent的receiver。
filter.addAction(Intent.ACTION_ICONKEY_CHANGED);
接着在private BroadcastReceiver mIntentReceiver = new BroadcastReceiver() 加入Intent的receiver动作;
及处理函数:
须导入以下包
import android.view.IWindowManager;
import android.os.SystemClock;
import android.view.KeyEvent;
StatusBar通知栏屏蔽按钮
当拉出expand的通知栏时,按钮的响应非常慢,这时最好将按钮给屏蔽掉,我们在 statusBarView.java中增加两个方法:
拉出或收回通知栏中,就可以调用这个函数来显示或隐藏这几个按钮。
修改文件: statusBarService.java
目录:frameworks/base/packages/SystemUI/src/com/android/systemui/statusbar/StatusBarService.java
编译工程
#source /opt/android_froyo_smdk/build/envsetup.sh
#export TARGET_PRODUCT=full_smdkv210
#mmm frameworks/base/
把编译生成的相关文件放进SD卡对应的目录即可, 在伟研科技 WY-S5PV210开发板上的效果如下图


发表评论

相关推荐
在android的状态栏(statusbar)中增加menu,home和back快捷键的方法 framework里 修改的
打包文件中列出在Android 2.3系统的StatusBar上面添加,home,back等按钮所需要的资源文件及其一些代码Patch。
网上找了一些源码,都没说清楚,自己总结处理了一下,其实很简单,在不隐藏StatusBar的情况下,利用UIWindow视图覆盖状态栏StatusBar
gm-statusbar 状态栏透明工具类
android改变状态栏颜色,支持4.4以后系统,非常好用,支持eclipse导入
android开发讲解 在android的状态栏(statusbar)中增加menu,home和back快捷键
wpf 状态栏 右下角三角 statusbar
本文实例讲述了Android编程实现禁止StatusBar下拉的方法。分享给大家供大家参考,具体如下: Android中有许多隐藏的Service,StatusBarManager就是其中一个,在Context.java中可以看到: /** * Use with {@link #...
自定义状态栏(Status Bar),支持两种点击动作:1. 当用户点击状态栏时,状态栏会收缩,仅仅遮盖住状态栏右方的电池图标; 2. 当用户点击状态栏时,一个有详细信息的视图会下拉出现。 注意:请在Mac下解压使用
本篇文章主要介绍了Android实现状态栏(statusbar)渐变效果的示例,具有一定的参考价值,感兴趣的小伙伴们可以参考一下
无系统权限应用使用悬浮窗起到禁用status功能bug
简单优雅地动态改变状态栏颜色,支持安卓4.4 。 Screenshots The left part is KITKAT, and right is LOLLIPOP. 左边是4.4,右边是5.0 。 Sample APK StatusBarColorCompat.apk Usage Just copy the ...
Android系统控制状态栏的下拉,禁止状态栏的下拉,通过反射获取系统的方法控制状态栏。
主要介绍了Android有效获取状态栏(StatusBar)高度的方法,涉及Android针对状态栏(StatusBar)属性操作的相关技巧,需要的朋友可以参考下
delphi中改变statusbar的背景色和字体颜色
matlab开发-statusbar。设置/获取GUI图形和Matlab桌面的状态栏
statusbar 设置 Matlab 桌面或图形的状态栏文本。 statusbar 接受 sprintf 函数接受的格式的参数,并返回状态栏句柄(如果可用)。 句法: statusbarHandle = statusbar(handle, text, sprintf_args...) statusbar...
android状态栏颜色主题设置,直接使用设置主题状态栏主题,或者修改状态栏颜色
qtstatusbar:Qt的StatusBar允许在Android和iOS上设置状态栏的颜色和主题